Sign users in with Supabase
Supabase Authentication lets people create an account in your app and sign in with their email and a password. Nowa sets up sign-up, sign-in and sign-out for you as soon as you connect, so you can try them in the editor right away and then put them behind your own login screen.
Before you start
- Connect Supabase. Nowa can create the Supabase project for you while you connect.
Meet the auth functions
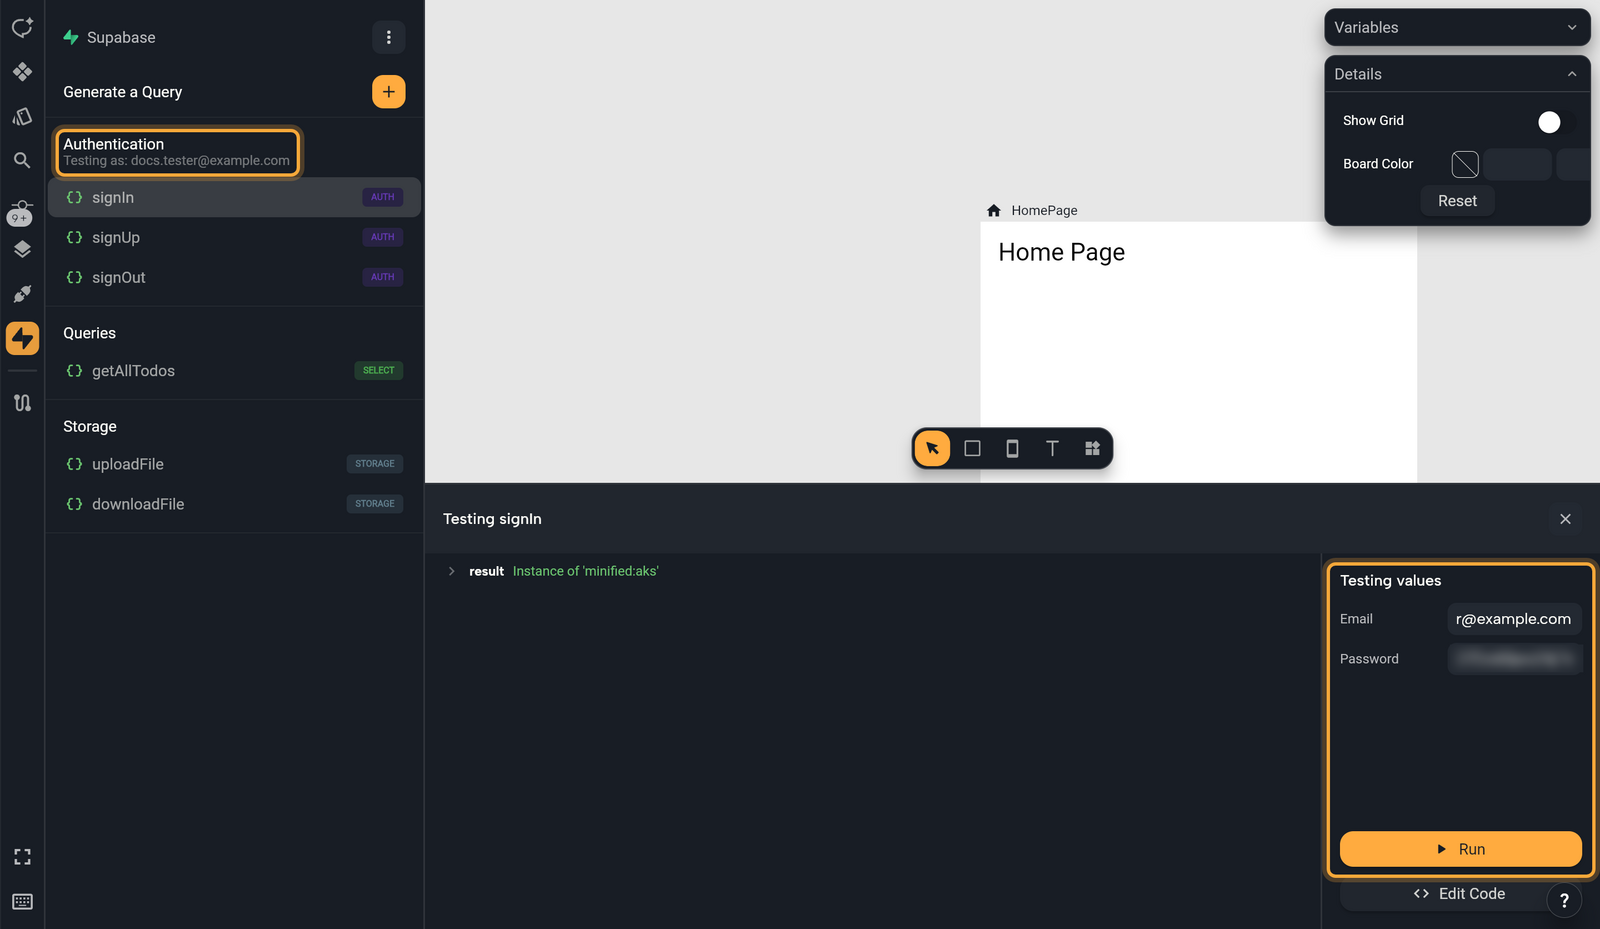
The Authentication section of the Supabase panel lists three ready-made functions. They live in SupabaseService, the place that holds all your Supabase functions, and that's where you'll pick them in Circuit.
| Function | You give it | What it does |
|---|---|---|
signUp | Email, Password | Creates a new user account in your Supabase project. |
signIn | Email, Password | Signs an existing user in. |
signOut | Nothing | Signs the current user out. |
The section also tells you who you're testing as: Not logged in, or Testing as: followed by an email. Functions that you or Nowa AI add to SupabaseService to sign users in, up or out show up here too.
Decide whether new users confirm their email
Supabase can ask each new user to confirm their email address before they sign in for the first time. Hosted Supabase projects do this by default. It keeps fake sign-ups out, and it changes how you test:
- Supabase's built-in email sender is meant for trying things out. It only sends to the email addresses of your Supabase organization's team, and only a few emails an hour. While confirmation is on, a test sign-up with any other address fails, and because Supabase's message says the address isn't authorized, Nowa's test panel can show it as RLS Policy Error. So test with the email address you use for Supabase, or turn confirmation off while you build.
- The link in the email confirms the address, then opens your project's Site URL. Until you change it, that's
http://localhost:3000, which usually shows an error page because nothing runs at that address. The address is confirmed anyway, so the new user can go back to your app and sign in.
To turn email confirmation on or off:
- In Nowa, click ⋮ in the Supabase panel, then Open Supabase. Your project opens in the Supabase dashboard.
- Go to Authentication → Sign In / Providers.
- Turn Confirm email on or off (it's in the User Signups section), and save.
Before you launch, set up your own email sender (custom SMTP), so every new user gets their email. Supabase's custom SMTP guide shows how. Once your app has a web address, enter it as Site URL under Authentication → URL Configuration.
Test sign-up and sign-in
The test runs on your real Supabase project, so what you see here is what your users will get.
- Click
signUpunder Authentication. The test panel opens at the bottom of the editor. - Under Testing values, type an Email and a Password. The Password field shows what you type, so use a test password.
- Click Run. Supabase creates the user, and you'll find it in the Supabase dashboard under Authentication → Users. If your project doesn't ask new users to confirm their email, you're signed in right away and the section reads Testing as: and the email. If something goes wrong, the result area shows Error: and the message from Supabase.
- To test
signIn, runsignOutfirst. Then clicksignInand repeat steps 2 and 3 with the same Email and Password. The section now reads Testing as: and your email. - Test your other functions. They run as this user, the way they will in your app.
- When you're done, run
signOutto go back to Not logged in.
Every signUp creates a real user. You can delete test users later under Authentication → Users. If your project asks new users to confirm their email, click the link in the confirmation email before signIn works (see Decide whether new users confirm their email).
Sign in before you test queries on tables that use Row Level Security (RLS), the rules that decide which rows each user can see. Signed out, such a query can come back empty or with an RLS Policy Error. See Read and write Supabase data.
Add sign-in to a login screen
Once sign-in works in the test panel, connect it to a screen: the user types an email and a password, taps a button, and your app opens the home screen. You call the functions from an event, such as a button's On Pressed.
- Build the screen with two Text Field widgets and a button (see Add widgets). To start from a ready-made design, pick the Authentication Template in the screen template picker (see Start from a template).
- Optional: rename each Text Field's controller in the Variables panel, for example to
emailandpassword. A controller holds what the user types into its field, and clear names make the next steps easier. See Store data in variables. - Select the button. In Details, open its On Pressed event in Circuit: click + to create it, or Edit if it already has logic. See Respond to taps and other events.
- Hover the dot under the top node until it becomes +, then click it. The All nodes for this circuit menu opens.
- Search for
SupabaseServiceand click it. Then clicksignIn. - In Details, click the Email label, open LOCALS, pick the email controller, then choose
text(the words typed into the field). See Expressions and conditions. - Link Password the same way, with the password controller.
- Signing in takes a moment, so the
signInnode has Future Options: what to do when it works and when it fails. With the node selected, find Future Options in Details and click + next to onValue. A new Circuit opens: add a GoRouter or Navigator node from GLOBALS that opens your home screen, then close it with ×. See Navigate between screens. - Select the
signInnode again, open Future Options, and click Edit next to onError. Nowa pre-fills it with aprintof the error, which writes it to the logs for you but shows your users nothing. Add Show snackbar, so people see why signing in failed. - Click Play on the screen, enter the email and password of a user you created, and click the button. See Play your app on the board.
Sign-up works the same way with signUp. If your project asks new users to confirm their email, show a message such as "Check your email" in onValue instead of opening the home screen.
To sign people out, put SupabaseService → signOut on a button, for example on a profile screen, and open the login screen in onValue.
To skip the login screen when someone is already signed in, see Start on the login screen or the home screen.
Or ask Nowa AI. In Agent mode, try: "Add a sign-in screen that uses SupabaseService and opens the home screen when it works." Attach SupabaseService first with + in the chat field, or type @SupabaseService, so the agent builds on your existing functions. Then try the screen with Play. See Give Nowa AI context.
Other ways to sign in
Google
Google sign-in with Supabase has three parts: client IDs from Google, Nowa's Google Sign-In settings, and Google turned on in Supabase.
- Create your Google client IDs and add them in Settings → Integrations → Google Sign-In, as Google Sign-In describes.
- In the Supabase dashboard, go to Authentication → Sign In / Providers and open Google.
- Turn Google on, then paste your client IDs into Client IDs, separated by commas, with the Web Client ID first.
- Turn on Skip nonce check, which Google sign-in on iOS needs, and save.
- Ask Nowa AI in Agent mode to build the button, for example: "Add a Continue with Google button to the login screen that signs the user in with Supabase."
If your app also runs on the web, do a little more before you try the button there, because on the web Supabase's guide signs people in through Google's sign-in web page:
- On the same Google page in Supabase, also paste your Web client's secret. Google shows it when you create the Web client (see Google Sign-In).
- In Google Cloud, open your Web client. Add the callback URL shown on that Supabase page under Authorized redirect URIs, and your web app's address under Authorized JavaScript origins.
- Enter your web app's address as Site URL in Supabase too, under Authentication → URL Configuration.
Supabase's Login with Google guide has the details.
Everything else
For anything else Supabase Authentication offers, such as a "forgot password" email, ask Nowa AI to add a function to SupabaseService, or write it in code. New functions that sign users in, up or out appear under Authentication with an AUTH badge, ready to test. Others, such as a password reset, don't show in the panel, but you can still use them in Circuit under SupabaseService.