Get ready to publish
When your app is ready for real people, Nowa builds it for you in the cloud, so there's nothing to install on your computer. Click Deploy in the top bar to put your app on the web, build it for Android, or send an iOS build to your App Store Connect account. The guides in this section walk you through every step, including the parts on Apple's and Google's websites.
Cloud projects Paid plansPublishing needs a cloud project on a paid plan. If your plan doesn't include a target, its row in the Deploy menu shows Premium, and its tab on the Deployment page shows a lock with an Upgrade button. See pricing for what each plan includes.
What you can publish
| Target | What you get | Guide |
|---|---|---|
| Web | A live web address for your app that anyone can open in a browser. Update it, take it down, or serve it from your own domain. | Publish to the web |
| Android Debug | A quick, unsigned test version to install on your own Android phone. | Publish to Google Play |
| Android Release | A signed, store-ready build that you upload to Google Play yourself. | Publish to Google Play |
| iOS | A signed build that Nowa sends to your App Store Connect account, ready for testing and review. | Publish to the App Store |
The web needs nothing beyond your Nowa plan. The stores have their own accounts: Google Play needs a developer account with a one-time registration fee, and the App Store needs an Apple Developer Program membership with a yearly fee. Each guide shows how to set yours up.
Check your app details
Stores and phones read these from your project, so set them before your first build. Click Settings (the gear in the top bar), then Project Details.
| Setting | What to enter |
|---|---|
| App Name | The name people see under your app icon. |
| Bundle Identifier | Your app's unique ID on iOS and Android, such as com.yourcompany.yourapp. Use letters and digits separated by dots, starting with a letter, or Nowa shows Invalid package name. New projects start with a placeholder that begins with com.example, so replace it. Settle on it before your first store upload: Apple locks it once you upload a build, and on Google Play it can never change. |
| Build version | The version people see in the stores: three numbers separated by dots, such as 1.0.0. |
| Build number | A whole number the stores use to tell your uploads apart. Raise it before each new store upload. |
| App Icon | Click Change all to set every platform at once, or pick Android, iOS, Web or macOS. Nowa accepts images up to 1024 x 1024 pixels. For the best result, use a square image of exactly 1024 x 1024 pixels, with square corners and a solid background (no transparent areas). That's the size Apple asks for, and iPhones round the corners for you. |
Package Name on the same page is a technical name inside your project that your users never see, and it can't be changed. Don't use it as your store identifier.
If your app uses the camera, microphone, location or similar, switch those on under Settings → Permissions, so phones can ask your users for access. For iOS you can also edit the message people see when the app asks. Project settings lists everything on both pages.
Before you publish, work through the publish checklist. It covers these settings, test keys, secrets and each target.
Start a deployment
- Open your cloud project. The Deploy button sits next to Run in the top bar.
- Click Deploy. The menu lists Web, Android Debug, Android Release and iOS, each with its status.
- Click Deploy on the row you want. The top-bar button reads Deploying while anything is building, and you can keep working in the meantime.
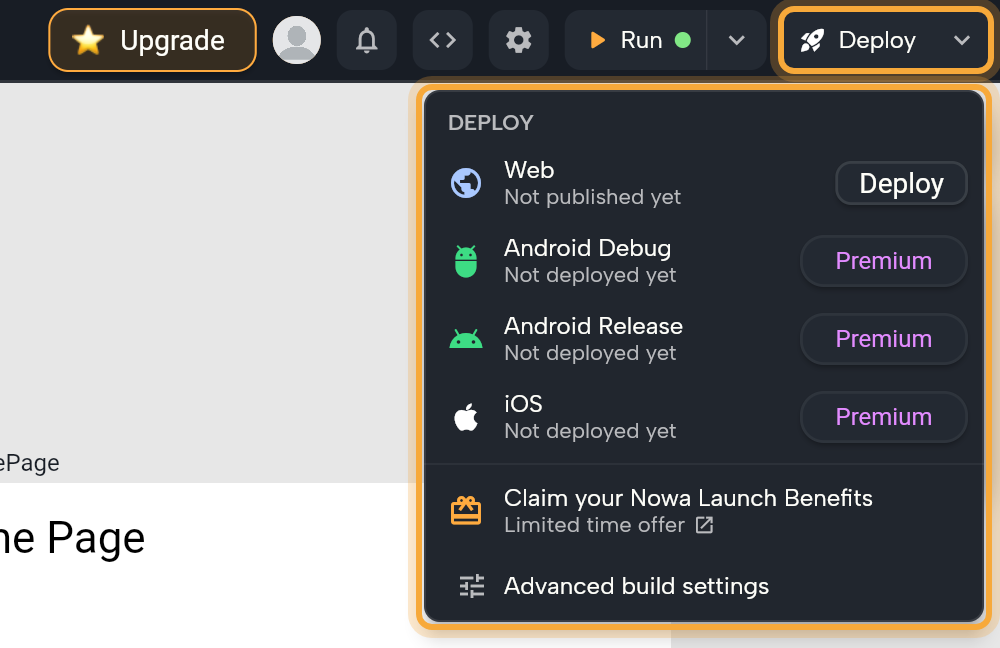
Each row keeps you posted:
| Row | Status text | Buttons |
|---|---|---|
| Web | Not published yet, Publishing…, Last publish failed, or the host name of your live site | Deploy, then Redeploy once the site is live. Cancel while it publishes. |
| Android Debug, Android Release, iOS | Not deployed yet, the build status such as Building…, or Deployed, Failed or Canceled with how long ago | Deploy, or Cancel while it builds |
- On a mobile row, Set up replaces Deploy when something is missing: the Android signing key, the iOS distribution certificate or App Store Connect credentials, or a Git repository. It opens the Deployment page, where you pick the tab you need.
- Premium replaces the button when your plan doesn't include that target. Click it to see the Time to level up dialog.
- Click a live Web row to open your site. Click any other row to open its tab on the Deployment page, or the Time to level up dialog if the row shows Premium.
- Advanced build settings opens the Deployment page directly. It has an Android, an iOS and a Web tab, and each mobile tab lists its past builds.
Before you deploy, ask Nowa AI to scan your project: "Fix problems in my project." Publishing to the web stops when Nowa finds errors, so a quick check first saves you a failed attempt. See How Nowa AI works.
Publish a local project
Local projects don't have a Deploy button, because builds run in Nowa's cloud. Open Settings → Deployment and you see Cloud build is not available on local projects with a Sync to cloud button. It opens Project Sync, where Clone to Cloud makes a cloud copy of your project. Deploy from that copy, and use Sync from Local to bring later changes over. Work with local projects has the details.
In the playground, Save your app to your account first. The playground has no Deploy button.
On a phone, Build in the top bar opens the same Android, iOS and Web tabs. See Use Nowa on your phone.
Ship an update
Changed something? Publish it again. Your users get the new version, and each target updates in its own way.
| Target | How to update |
|---|---|
| Web | Click Update on the Web tab, or Redeploy on the Web row of the Deploy menu. Your site keeps the same address. See Update your site. |
| Android | Raise Build number in Settings → Project Details, build a release again with the same signing key, and upload the new .aab in Google Play Console. See Release an update. |
| iOS | Raise Build number in Settings → Project Details (and Build version for a new release), then build again. See Build and send to App Store Connect. |
Next steps
- Build history and logs: start builds, follow them and read their logs.
- Download your code: take the full Flutter source with you.
- Share a preview: get feedback from others without a build.
- Build a great app: a complete walkthrough and tips for design, Nowa AI, data and shipping.