Build history and logs
Every Android and iOS build runs in Nowa's cloud and leaves a record. Start a build, watch it move through its steps, then download the files it made. If something goes wrong, the log of each step shows exactly where, and Nowa AI can help you read it.
Cloud projects Paid plansStart a build
- Click Settings → Deployment and open the Android or iOS tab. On Android, Debug mode decides which build you start and which builds you see: debug and release builds are listed separately. It's off whenever you open the page from Settings, so turn it on to see your debug builds.
- In Start New Build, pick a Branch. It starts on the branch you have checked out.
- Click Build. Above the button, Nowa reminds you: "Starting a build will commit all changes to the selected branch."
A branch is a named line of saved versions of your project, kept with Git. The build starts from the branch you pick, and starting it saves all your changes to that branch, so the build includes everything you've done so far. Leave the default, the branch you have checked out, unless you work with several branches. To create or switch branches, see Work with branches.
If Branch shows Init Repository instead of a menu, your project has no Git repository yet. Click Init Repository once, and Nowa selects the checked-out branch for you. The Deploy menu points at the same gap with "Connect a repository in settings to deploy to the app stores."
You can also click Deploy in the top bar, then Deploy on an Android or iOS row. That builds the branch you have checked out.
When Build is off, hover over it to see why:
| Hint | What to do |
|---|---|
| Finish the workflow configuration above | Save the signing key on Android (with Debug mode off), or the certificate and App Store Connect credentials on iOS. An error icon next to Start New Build also reads "Missing configuration. Check your workflow settings above". |
| A build is already running | Wait for it, or click Cancel on the Active Build card. |
| Select a branch to build from | Pick a branch, or click Init Repository. |
| Loading the workflow status… | Wait a moment. |
Your plan sets how many builds you can run. When the allowance is used up, Time to level up appears with the message "Your build quota has been used up. Please upgrade your plan to continue using this feature." See Plans, billing and AI usage.
Follow a build
While a build runs, the card is called Active Build. It shows the current status and a Cancel button. Nowa checks the status every few seconds, so you don't need to refresh.
Along the way the status reads Queued, Initializing, Preparing, Fetching, Building, Testing, Publishing or Finishing. It ends as Finished, Failed, Canceled, Skipped or Timeout. A build can wait in Queued for a while before it starts. You don't have to watch it: you can close Nowa in the meantime, and the build keeps going in the cloud.
The Deploy button in the top bar reads Deploying while a build runs, and the build's row in the Deploy menu shows the same status.
Read the results
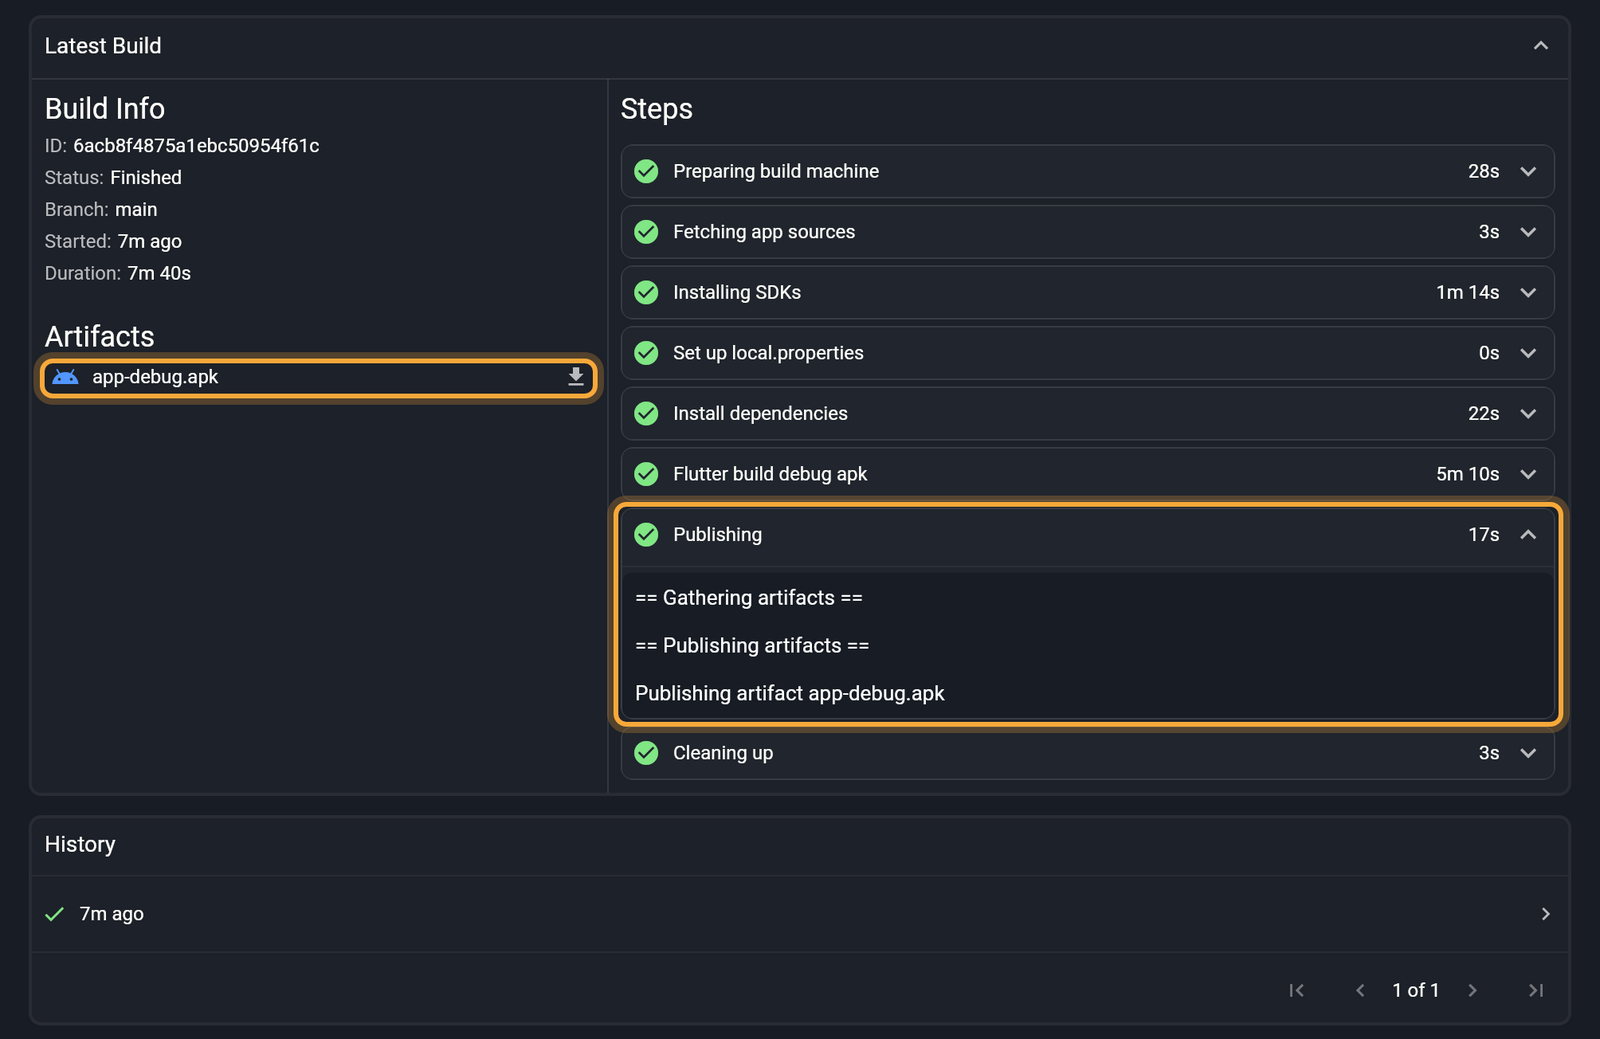
When a build ends, the card is called Latest Build. Click its header to open or close it.
- Build Info shows the build's ID, Status, Branch, Started and, once it has finished, Duration.
- Artifacts lists the files the build produced, such as your Android
.apkand.aabor your iPhone.ipa. Click a file to download it in your browser. Download links are short-lived. If one stops working, open the build again from History to reload its files. - Steps lists each stage with a status icon and how long it took. Click a step to read its log, the running record of what the build did.
When a build fails
A failed build doesn't break anything in your project. Find the cause, fix it and build again.
- Find the step with the red icon under Steps and click it to read the log.
- Click Explain with AI. Nowa AI gets the end of the log and is asked to find the cause, fix your project and tell you when to build again. On a failed iOS code signing step, it's asked to explain the problem and how to fix it instead. See How Nowa AI works.
- On a failed iOS code signing step, click Documentation for help with your distribution certificate.
- Fix the problem, then click Build again.
Browse past builds
History lists your builds, newest first, with a status icon and how long ago each one started. Click a row to open Build Details, which shows the same Build Info, Artifacts and Steps. Use the arrows and the page counter, such as 1 of 3, to move through the list. Before your first build, the list reads "No builds yet".
What runs behind the scenes
Builds run in Nowa's cloud. When you start one, Nowa commits your changes (saves them as a new version) to the branch you pick, and the build starts from that branch. The build steps themselves are written in a settings file in your project, codemagic.yaml. Nowa takes care of it, so you can leave it as it is.
If that file ever gets broken, for example after an edit in code mode, Nowa shows a red error bar when you open it in code mode. Click Reset to default on the bar to put the default build steps back.
Next steps
- Publish to Google Play: create a signing key and upload your release.
- Publish to the App Store: save your Apple credentials and send builds to App Store Connect.
- Find and fix problems: clear errors before you build.