Use Git
Git keeps a history of your project. You can see what changed and when, go back when something breaks, try ideas on a branch without risking your working app, keep a backup on GitHub, and work with others without overwriting each other's work. The Git panel brings all of this into Nowa, in cloud and local projects alike.
Git in a minute
New to Git? These are the words you'll meet on this page.
| Word | What it means |
|---|---|
| Repository | Your project's files plus the full history of the changes saved in them. |
| Commit | A saved snapshot of your files, with a short message that says what changed, such as "Add the booking screen". Your history is a list of commits. |
| Stage | Pick which changes go into the next commit. |
| Remote | A copy of the repository somewhere else, usually on GitHub. |
| Push and pull | Push sends your new commits to the remote. Pull brings in commits that are on the remote but not in your project yet, such as a teammate's. |
| Branch | A separate line of work. Build a feature on its own branch while the main version of your app stays as it is. |
| Merge | Bring the commits of one branch into another. |
| Conflict | Two versions changed the same lines of a file, so Git asks you which one to keep. |
Before you start
- A plan with Git integration. If yours doesn't include it, the Git panel and the Git settings show "Your plan does not support git integration" with an Upgrade button. See pricing.
- A project in your account or on your computer. The Git panel isn't available in the playground.
- A remote repository, to sync. You can commit without one. To push and pull, see Connect GitHub.
Cloud projects run Git on Nowa's servers. Local projects run Git on your computer, on the same repository your other tools use. Want a cloud copy and a local copy of the same app to stay in step? Git can do that too: see Move work between a cloud and a local project.
Open the Git panel
Click Git in the left sidebar, or the branch name in the status bar. A badge on the icon counts your changed files.
New projects start with a repository and an Initial commit, so there's nothing to set up. In a project that has no repository yet, for example a cloud import, click Create Git Repository.... The new repository starts empty, so every file shows under Changes until you make a first commit, with a message such as "First version".
Commit your changes
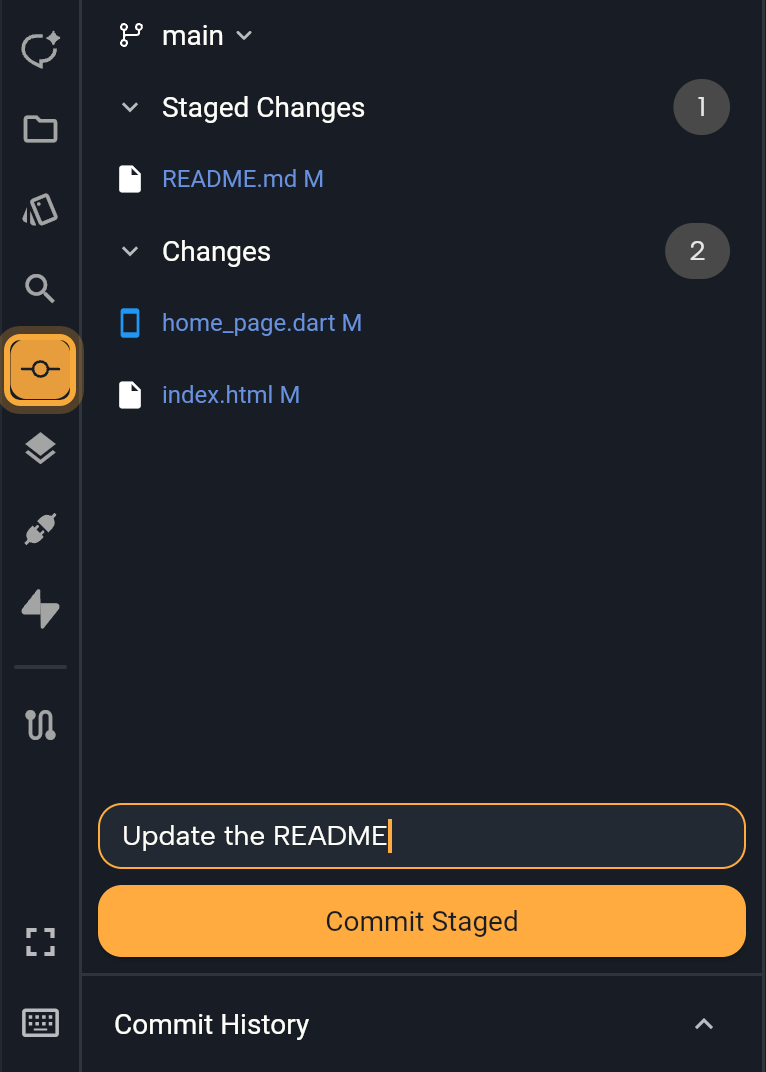
Everything you change, on the board, in Details or with Nowa AI, ends up in your project's files, and the changed files are listed under Changes. Each one shows what happened to it: A (green) added, M (blue) modified, D (red) deleted or R renamed. Files you stage move to Staged Changes.
- Type a Commit message that says what you changed, such as "Add the booking screen". You'll be glad of it when you scroll back through the history.
- Click the button under the box. It reads Commit All and commits every change. Once you stage files, it reads Commit Staged and commits only those.
- Wait for "Committed successfully."
A commit stays in your project until you push it, so nothing reaches GitHub yet. When you're ready to share, see Sync with GitHub. Commit often, for example each time a screen or a fix works: small commits are easier to read and easier to undo.
Staging lets you put only some of your changes in a commit, for example to keep a new screen and an unrelated color fix apart. To stage a file, hover it and click Stage file. To stage everything, hover Changes and click Stage Changes. Unstage file and Unstage Changes do the reverse.
To pick files in a dialog, hover the branch row, click ... and choose Commit. In Create Commit, select files under Not Added, click >> to stage them under Added (<< unstages them), type a message and click Commit. Add Files... in the same menu stages files without committing.
Commits carry a name and an email, and new projects use your account's. A cloud project without one asks for it ("You need to set your identity first"). A local project uses the identity in its repository or in Git on your computer, so set your identity if neither has one.
Review or discard changes
- Review. Click a changed file to open its diff, a view of the lines that changed, in a tab. Previous change and Next change step through the edits, and a badge shows whether you're viewing the Staged or Unstaged version.
- Discard. Hover a file and click Discard file changes, or hover Changes (or Staged Changes) and click Discard all changes. Confirm with Continue.
Discarding puts your files back to the last commit and deletes files you added since. You can't undo it.
Sync with GitHub
Committing saves your work in your project. Syncing shares it: your commits go up to GitHub, and anything new on GitHub comes down. When there's nothing left to commit, the button under the commit box reads Sync. Arrows show how many commits you'll push (↑) and pull (↓).
- Sync pulls first, then pushes, and shows "Sync complete".
- Publish Branch takes its place for a branch that isn't on the remote yet, and pushes it.
- Push and Pull in the ... menu do one half each.
Once synced, your commits show on GitHub with the name and email of your Git identity.
With no remote yet, Publish Branch and Sync open Manage Remotes so you can create or connect a repository, while Push and Pull report "No remote repository found".
Nowa checks the remote for new commits at most every five minutes, and when you pull or push. If you see "You need to provide authentication for this action" or "You need to add your credentials to access the remote repository", Nowa can't sign in to GitHub yet: connect your account, or add an access token (a password-like code you create on GitHub), as Connect GitHub explains.
If a Pull brings in changes that clash with yours, Resolve Conflicts opens. After a clash during Sync, the files appear under Conflicts instead; see Resolve conflicts.
Work with branches
A branch keeps one piece of work apart from the rest. Create one for each feature or fix, such as booking-screen, and your main branch keeps the working version of your app while you experiment. When the feature is ready, merge it back. Switching branches updates your files, so the board shows that branch's version of your app.
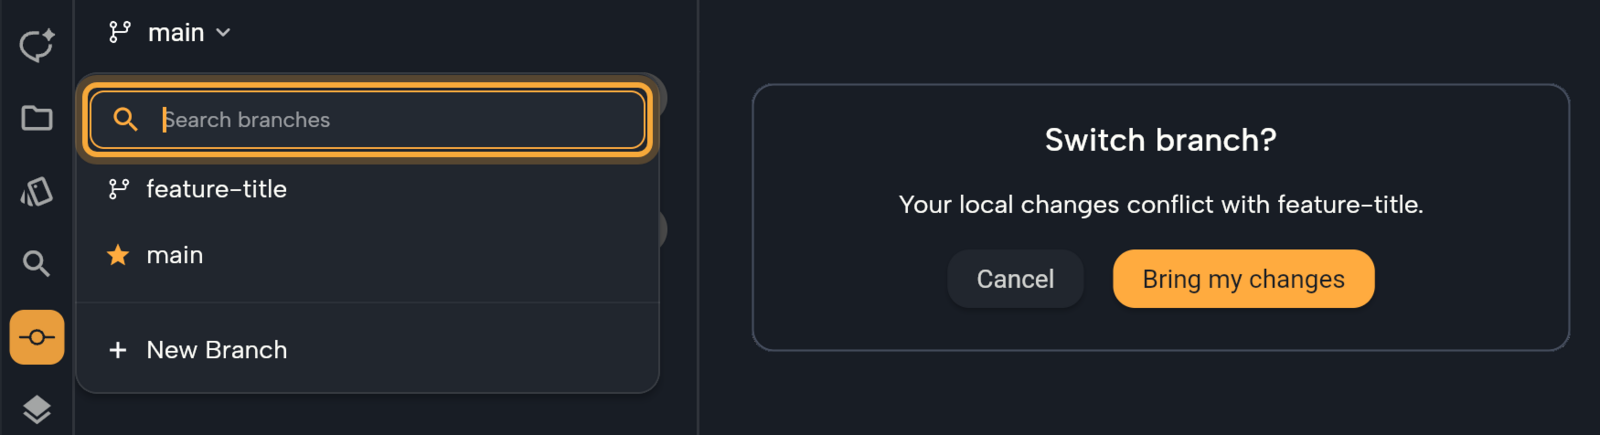
Click the branch name at the top of the panel. The menu opens below it, with a Search branches field that filters your local branches and the remote branches you don't have locally yet. A star marks the current branch.
| To | Do this |
|---|---|
| Switch | Click a branch. Nowa saves your open edits first, and your uncommitted changes come along. If they clash with the other branch, Nowa asks "Switch branch?": click Bring my changes to carry them over (clashes open Resolve Conflicts) or Cancel. |
| Create | Click New Branch, type a Branch Name and click Create Branch. The new branch starts from the current one and Nowa switches to it. Spaces become -. |
| Use a remote branch | Click it under Remote. Nowa creates a local branch that follows it. |
| Merge | Hover another branch, click Merge into current branch, then Merge. Commit or discard your changes first. |
| Delete | Hover a local branch you're not on, click Delete branch, then Delete Branch. The remote branch stays. |
A branch you delete in Nowa stays on GitHub. To delete it there too, open the repository on GitHub, choose View all branches in its branch menu and click the trash icon next to the branch.
In a local project you can also switch branches in another tool, such as VS Code, GitHub Desktop or a terminal (git checkout branch-name). Nowa notices and reloads the files that changed: see What syncs and when.
Resolve conflicts
A conflict happens when both sides changed the same lines of a file. After a Pull, a merge or Bring my changes, Resolve Conflicts opens by itself and shows one file at a time. Two read-only panes hold the whole file, so you can compare before you choose: Local is the version on your current branch and Remote is the one coming in.
- Read both panes, then click Accept Local or Accept Remote to keep that version. You choose per file, not per line.
- Repeat for each file. Nowa stages the resolved files.
- Commit as usual.
In a local project, the panes are the other way round after Bring my changes: Local is the version on the branch you switched to, and Remote holds your own changes.
To reopen it, or to open it after a Sync, expand Conflicts and hover a file for Resolve conflict, or the section for Resolve all Conflicts.
Browse and undo history
Expand Commit History at the bottom of the panel (Refresh Commits reloads it). Click a commit to see its message, whether it's Pushed or Not Pushed, and its changed files, then click a file for its diff. Right-click a commit for actions:
| Action | What it does |
|---|---|
| Copy SHA | Copies the commit's ID. |
| Undo commit | Takes back your latest commit and moves its changes to Staged Changes. It works only on the latest commit, and only before you push it. |
| Revert commit | Undoes the changes of the commit you picked, so it also works on older and pushed commits. In a local project the undone changes appear under Staged Changes; commit them to finish. |
Both are greyed out when they can't run. Neither works on a repository's first commit. With the View Only role the menu has only Copy SHA. With uncommitted changes they do nothing, even if a success message appears, so commit or discard first.
Work with a team
A Nowa workspace shares cloud projects with your teammates, but it has no live co-editing. With Git and GitHub, several people change the same app, each in their own project, and bring the work together. Your project is a normal Flutter repository, so teammates can work in Nowa or in their own editor, and Nowa needs no extra branches of its own.
- One person connects the project to a GitHub repository: create or connect a repository.
- On GitHub, they invite the others. For a repository in their personal account: open the repository, click Settings, then Collaborators in the "Access" section of the sidebar. Click Add people, pick a teammate and confirm. Each teammate accepts the invitation GitHub sends them by email.
- Each teammate connects their own GitHub account and creates their project with Clone from GitHub: a cloud project, or a local one with Local-only in the desktop app. That list only shows repositories the teammate's own GitHub connection reaches, so a repository in someone else's account may be missing. If it is, clone it with another Git tool, such as GitHub Desktop, and open the folder with Import project as a local-only project. That tool can also push and pull for it if Nowa's Git panel can't sign in to it.
- Everyone works on their own branch, commits, and clicks Sync to share (Publish Branch the first time). Sync before you start working too, so you build on the latest version.
When a feature is finished, merge its branch in Nowa, or open a pull request on GitHub: a page where the team reviews and discusses a branch before it's merged. After a merge on GitHub, switch to the branch it went into and click Sync to bring the result into your project. If two people changed the same lines, Nowa shows the clash when you pull, sync or merge: see Resolve conflicts.
Move work between a cloud and a local project
Git shares work between a cloud project and a local one without overwriting either, unlike Project Sync, which copies every file one way. A common setup: the cloud project for Deploy, the local one for VS Code and your simulators, and the GitHub repository in the middle as the copy everyone shares.
- In the first project, commit your changes.
- Open Manage Remotes and create a GitHub repository. Nowa pushes your commits to it.
- Create the other kind of project with Clone from GitHub and pick that repository. To make it a local project, tick Local-only.
- From then on, commit in either project and click Sync to push your work and pull the other side's.
Next steps
- Connect GitHub: connect your account, or use an access token.
- Use Nowa with VS Code: work on a local project in Nowa and your editor at once.
- Import an existing Flutter project: bring in an app you already have, from a folder or from GitHub.