Publish to the web
Publish your app as a website straight from Nowa. One click builds it, hosts it and gives you a web address to share. When you change something, publish again and the same address shows the new version.
Cloud projects Paid plansBefore you start
- Use a cloud project on a paid plan. Get ready to publish covers the plan gate and the app details to set.
- Clear the errors in your project. Publishing starts by checking your project for errors and stops if it finds any. Find and fix problems shows where to look.
Publish your app
- Click Deploy in the top bar, then Deploy on the Web row. Or click Settings → Deployment, open the Web tab and click Publish.
- Wait while Nowa works. The status reads Saving, then Creating, then Deploying: Nowa saves your project, checks it, then builds and hosts it. Creating appears only when Nowa has to set up your site first. Click Cancel to stop.
- When it finishes, the Your Website card shows Published with the date, and your site's address below it.
- Click the open icon (Open in browser) to visit the site, or the copy icon (Copy) to copy the address.
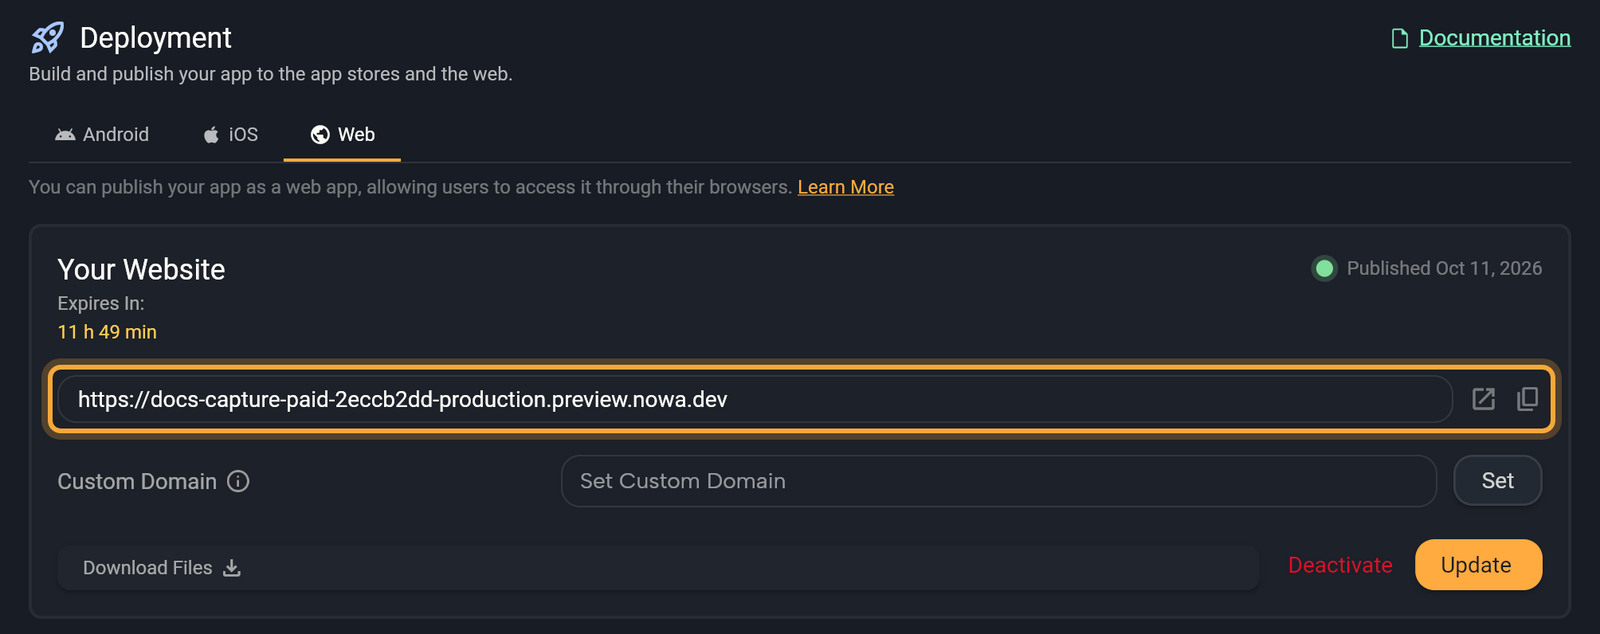
That's it, your app is live. Send the address to your team, early users or anyone whose feedback you want: they open it in any browser, nothing to install.
If the Problems tab lists anything when you click Publish on the Web tab, a Your Project has Problems dialog asks first. Click Close to go and fix them, or Ignore and Publish to continue anyway.
When the card shows Expires In:, the countdown is the time left until the site expires.
If publishing fails
A red bar on the card names what went wrong, and the button changes to Republish.
- Analysis Failed means the check found errors in your project. The Console opens on its Logs tab with the messages. Fix them, then publish again.
- Publish Failed means the publish job itself failed. Click Show Details to read its log on the Error in Deployment page.
Click Fix with AI below the bar to hand the failure to Nowa AI. It closes Settings and sends the error log to the chat, asking Nowa AI to fix the project and tell you when it's safe to republish. If the chat is busy, the message waits in the box for you to send. See How Nowa AI works.
Type "Fix problems in my project" in the chat, then publish again.
Update your site
Make your changes, then click Update on the Web tab. In the Deploy menu, the Web row's button reads Redeploy. Your site keeps the same address, so everyone you shared it with sees the new version. There's no need to take the site down first.
Take your site down
Click Deactivate on the Web tab. Nowa takes the site down without asking you to confirm. Your project itself isn't touched, so click Publish whenever you want to put your app online again.
Download the build files
Want to host the site somewhere else? Once your site is live, click Download Files to get the finished website files, ready to upload to any web host. In the web app, your browser downloads them. In the desktop app, Nowa asks where to save them and then opens that folder.
Use your own domain
Serve your site from an address you own, such as example.com, instead of the one Nowa gives you. You buy a domain from a domain provider (also called a registrar), then point it at your site. Custom domains need a higher plan. See pricing for what each plan includes. Without one, Custom Domain shows Premium.
- Publish your site. The Custom Domain field appears below the address once the site is live.
- Type your domain without
www.. Nowa shows Please remove "www." if you include it. - Turn on the switch below the field if people should reach your site at the
wwwaddress too. It reads Also www. followed by your domain. - Click Set. The button changes to DNS.
- Click DNS. The DNS Records page lists each record's Name, Type and Value, with a copy icon next to the name and the value. DNS records are settings at your domain provider that tell the internet where your domain should lead.
- Add every record in your domain provider's DNS settings. Your provider's help explains where to find them.
- Click Verify to refresh the status. DNS changes can take up to 48 hours, and the page shows Pending until then. It closes once Nowa no longer lists DNS records for you to add.
Once Set turns into DNS, the domain and the Also www. switch can't be changed. After Nowa verifies the domain, a trash icon appears in the field (Remove custom domain): click it to remove the domain and start again. There's no way to remove a domain that's still pending, so double-check the spelling and the switch before you click Set. If you need to change a pending domain, ask the Nowa team with Chat with support. See Get help.
Each project has one live site. The separate Development mode from older versions is gone, as What's New explains.
Next steps
- Get ready to publish: set the name, identifier, version and icon.
- Share a preview: let others try your app without publishing it.
- Download your code: host or build the app yourself.