Publish to Google Play
Nowa builds your Android app in the cloud. Try it on your own phone with a quick test build, then make a signed release for Google Play. Nowa hands you the files, and this page walks you through Google Play Console, where your app goes on the store.
Cloud projects Paid plansHere's the path:
- Test on a device with a debug build (optional).
- Create a signing key in Nowa.
- Build a release and download the app bundle.
- Set up your developer account and your app in Google Play Console.
- Upload the release and send it for review.
Before you start
- Use a cloud project on a paid plan.
- Set your app details first: App Name, Bundle Identifier, Build version, Build number and App Icon. See Check your app details.
- For a release, you need a Google Play developer account. Create your developer account shows how.
Nowa uses the Bundle Identifier as your app's package name on Android, the unique ID Google Play knows your app by. Once your app is on Google Play, that name can never change or be used again, so settle on it before your first upload.
Test on a device
Debug builds are for quick tests on your own phone. They're unsigned, so you can build one before you have a key.
- Click Settings → Deployment and open the Android tab.
- Turn on Debug mode. Its note reads "Unsigned builds for quick testing on devices. Turn off for store-ready release builds."
- Pick a Branch and click Build. Leave the default unless you work with several branches. Start a build explains what a branch is and the build card.
- When the build finishes, open Latest Build, click the
.apkfile under Artifacts to download it, then install it on an Android device.
A debug build gives you only an .apk, an app file you install directly. It isn't optimized either, so it can feel slower or jumpier than your finished app. Use it to check your screens and flows, not to judge speed. Google Play doesn't accept it: for the store, you build a release.
You can also click Deploy in the top bar, then Deploy on the Android Debug row. To test without a cloud build, run your app instead.
Create a signing key
Google Play only accepts apps signed with your own key: a digital key that proves each upload really comes from you. Nowa keeps it in a keystore, a password-protected file (.jks or .keystore) that holds the key.
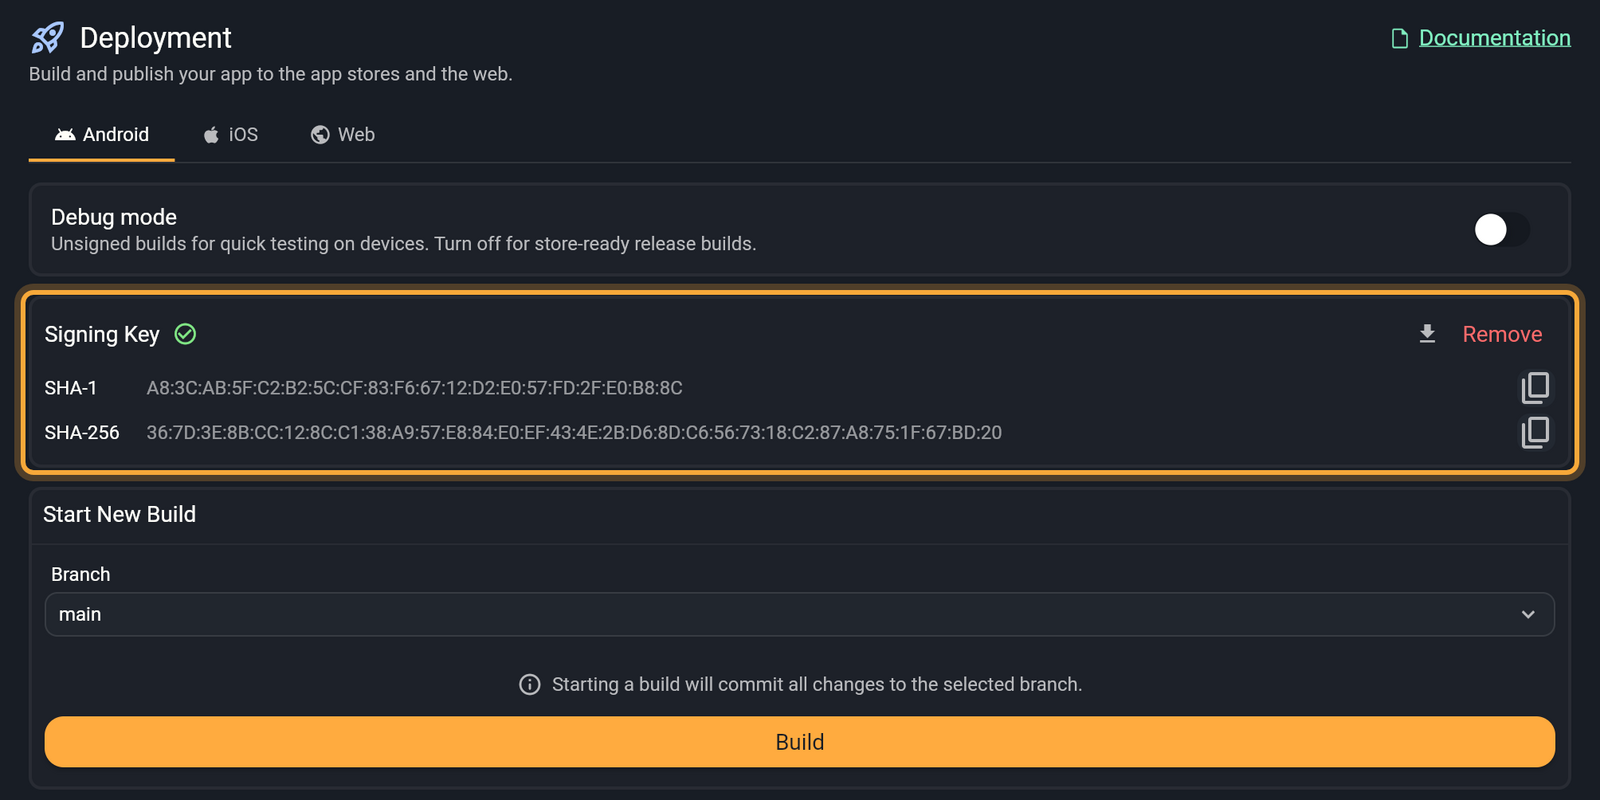
Turn Debug mode off to see the Signing Key card. A warning icon on it means no key is saved yet. Hover over the icon to read Missing signing key.
Let Nowa generate a key
- Click Generate in the Signing Key card.
- In the Important! dialog, click Download and save
android_signing_key.zipsomewhere safe. It holdskeystore.jks(your keystore) andkey_info.txt, which lists the key alias and both passwords.
Use a key you already have
If you've published this app before with another tool, use that same key, so Google Play accepts your update.
- Enter your Keystore Password, Key Alias and Key Password.
- Click Browse next to Key File and pick your
.jksor.keystorefile. - Click Save.
If you lose this key, you can't release new updates for your app. Download it, store it somewhere safe and keep a backup. Remove deletes the key from Nowa and can't be undone.
Google Play adds a safety net. For a new app, Google turns on Play App Signing when you upload your first app bundle: Google keeps the keys that sign the app people download, and the key you make in Nowa becomes your upload key. If you ever lose it, you can ask Google to reset it from Play Console. See Use Play App Signing.
Once a key is saved, the icon turns into a check mark (hover to read Signing key saved), and the card shows these controls:
- SHA-1 and SHA-256: the key's fingerprints, short codes that identify it, each with a copy button. Services such as Google Sign-In ask for them. With Firebase, Nowa can add them for you. See Add SHA fingerprints for Google sign-in on Android. Apps downloaded from Google Play are signed with Google's own keys, so add their fingerprints too: Play Console lists them in the App signing key section of its app signing page. A new app gets three of these keys, and each one needs adding. Android's Sign your app explains both keys.
- The download icon (Download Signing Key) saves the zip again.
- Remove asks "Are you sure?" before it deletes the key.
Build a release
A release build is the version for the store: signed with your key and optimized to start fast and run smoothly.
- Make sure Debug mode is off.
- In Start New Build, pick a Branch (the default is fine; see what a branch is) and click Build. The button stays off until the signing key is saved.
- Wait for the build to finish. It runs in the cloud, so you can keep working or close Nowa.
Or click Deploy in the top bar, then Deploy on the Android Release row. It shows Set up until the key is saved.
Download your files
When the build finishes, open Latest Build and click a file under Artifacts to download it. By default, a release build lists an app bundle (.aab) and an .apk.
- The
.aab(Android App Bundle) is what you upload to Google Play. Google turns it into the right download for each phone. See Android App Bundles. - The
.apkinstalls directly on a device, which is handy for trying the release build yourself before you upload.
Set up Google Play Console
Google Play Console is Google's website for publishing Android apps. Nowa doesn't upload to Google Play for you, so this part happens there. You set up your account and your app once. After that, each update is a new upload.
Create your developer account
- Go to Google Play Console and sign up for a developer account with your Google Account. You must be at least 18.
- Accept the Google Play Developer Distribution Agreement.
- Pay the one-time registration fee. Get started with Play Console shows it and the cards Google accepts.
- Choose a Personal or an Organization account. An organization account needs a D-U-N-S Number (a business identification number).
- Verify your identity. Google may ask for a government ID and a card in your legal name.
With a new personal account, Google also asks you to confirm you have an Android device, using the Play Console mobile app, and to test your app with testers before it can go live. See Test with testers first.
Create your app
- In Play Console, select Home → Create app.
- Choose a default language and enter your app's name as people should see it on Google Play. You can change the name later.
- Say whether it's an app or a game, and whether it's free or paid.
- Add an email address where people can contact you about the app.
- Under Declarations, acknowledge the "Developer Program Policies" and "US export laws" declarations, and accept the Play App Signing Terms of Service.
- Click Create app.
Google's guide: Create and set up your app.
Set up your app
Your app's Dashboard lists everything Google needs before you can publish, under Set up your app. Work through it from top to bottom. The main parts:
- App content (Policy and programs → App content): declarations you start with Start. They include your privacy policy link, whether your app shows ads, sign-in details (a working test account if your app has sign-in, so reviewers can get in), your target audience, the content rating questionnaire and the Data safety form. See Prepare your app for review.
- Main store listing: what people see on your app's Google Play page.
- Store settings: your app's category and contact details. A support email is required.
| Store listing item | What Google asks for |
|---|---|
| App name | Up to 30 characters. |
| Short description | Up to 80 characters. It's the first text people see on your page. |
| Full description | Up to 4,000 characters. |
| App icon | A PNG of 512 x 512 pixels, up to 1,024 KB. |
| Feature graphic | A JPEG or PNG without transparency, 1024 x 500 pixels. |
| Screenshots | At least two, JPEG or PNG without transparency, 320 to 3,840 pixels on each side. The long side can't be more than twice the short side. |
Export as image saves a screen from your board as a PNG or JPG, a quick way to start on your graphics. Google's Add preview assets has all the image rules.
Test with testers first
If you created a personal developer account after November 13, 2023, Google wants you to test before you publish. Once your app setup is done, run a closed test (a test only people you invite can join) with at least 12 testers who stay opted in for 14 days in a row. Friends, family and colleagues make good first testers. Then open your Dashboard, click Apply for production and answer Google's questions about your test. Google usually replies within seven days.
Internal testing, for up to 100 people you choose, is optional and a good first step, but the requirement needs a closed test. Set up an open, closed, or internal test shows how to invite testers, and App testing requirements for new personal developer accounts has the details.
Upload to Google Play
Each time you have a new release build, you put it on Google Play the same way, in Google Play Console:
- Select your app and open a track: Test and release → Testing → Internal testing or Closed testing for testers, or Test and release → Production for everyone.
- Click Create new release. If it's greyed out, finish the setup tasks on your Dashboard first.
- The first time, follow the on-screen steps for Play App Signing. Letting Google create the app signing key is the default.
- Upload the
.aabyou downloaded from Nowa. - Check the release name (only you see it, and Play Console fills it in from your Build version) and add release notes that tell people what's new.
- Click Next. Fix anything listed under Errors summary, then save the release, or roll it out with Start rollout when Play Console offers it.
- Changes that need Google's review wait on the Publishing overview page until you click Send for review. Review can take from a few hours up to seven days, sometimes longer.
Once Google approves the release, it goes live on that track, unless you turned on managed publishing to choose the moment yourself. Prepare and roll out a release has the details. Before you publish, read Follow Google Play's rules. Play Console Help covers the store side in full.
Follow Google Play's rules
Read the Google Play Developer Policy Center before you publish, and check Google Play Policies for upcoming deadlines. These parts match what you can build with Nowa:
- Payments. Google Play's billing system is "a service that enables you to sell digital products and content in your Android app", with one-time purchases or subscriptions. Read Understanding Google Play's Payments policy too. See Stripe or RevenueCat? for what each does in Nowa.
- Data safety. "The Play Console includes a Data safety form on the App content page. In this form, you explain to users which types of user data your app collects and shares." If a third-party SDK or library in your app collects or shares user data, "you must reflect this collection and sharing in the Data safety form". See Declare your app's data use and the User Data policy.
- Accounts. Read Understanding Google Play's app account deletion requirements. The sign-up functions Nowa adds don't delete accounts.
- Pre-review checks. Play Console has "pre-review checks" that help you "identify issues early, like incomplete policy declarations or crashes, and avoid rejections". In December 2025, Google said it had expanded them "for privacy policy links, login credential requirements, data deletion request links, inaccuracies in your Data safety form, and more". See Building a safer Android and Google Play, together.
Release an update
- Raise Build number in Settings → Project Details. Google Play needs a higher number for every upload. Change Build version too when people should see a new version number.
- Build a release again with the same signing key.
- In Play Console, create a new release on the same track and upload the new
.aab.
Next steps
- Build history and logs: follow a build and read its logs.
- Publish to the App Store: ship the iOS version.
- Download your code: take the full Flutter source with you.