Select, move and resize
Click to select, drag to move, pull a handle to resize. Purple guides snap things into line as you go, and every change can be undone, so you can rearrange freely until it looks right.
Select widgets
| To | Do this |
|---|---|
| Select a widget | Click it. A click picks the outermost widget under the pointer. To select a screen itself, click its title. |
| Go one level deeper | Double-click the selected widget. On a Text, this starts editing instead. |
| Pick the innermost widget | Ctrl/Cmd + click. |
| Add or remove a widget | Shift + click, on the board or in the Outline. |
| Select with a box | Drag on empty space. Start on the board to select whole screens and components. Start inside a screen to select the widgets placed freely in its main Stack group. Shift toggles. |
| Select all | Ctrl/Cmd + A selects the selected widget and the other widgets in the same group (its siblings). With nothing or a board item selected, it selects every board item. |
| Select a parent (the widget around it) | Click its name in the breadcrumbs at the top of Details. |
| Clear the selection | Click empty board space. |
Move widgets
- Drag a widget. You don't need to select it first. Start moving right away: if you hold the mouse button still on a widget for about half a second, its right-click menu opens instead.
- Hold Shift while dragging to move along one axis only. Keep the pointer inside the screen when you let go: if it's outside, the widget leaves the screen and becomes its own board item, even if it still looks inside. Press Ctrl/Cmd + Z to undo that, or use Shift + arrow keys to move a widget along one axis inside its screen.
- Hold Alt/Option while dragging to drag a copy instead. You can press or release the key mid-drag.
- Press an arrow key to nudge a free widget by 1 pixel, or Shift + arrow for 10. Free means placed in a Stack or directly on the board. In a Row or Column, the arrow along the layout direction moves the widget one place earlier or later.
Screens always stay board items, so you can't drop one inside another item. To type exact positions and sizes instead of dragging, see Lay out widgets.
Where a dragged widget lands
What happens when you drop depends on what is under the pointer, so watch the outline on the board before you let go.
| Under the pointer | What happens |
|---|---|
| Empty board | The widget becomes its own board item and snaps to nearby items. |
| A Stack | It is placed where you drop it. A widget from elsewhere goes on top of the others, and one you move within the stack keeps its place in the stacking order (use Bring to front to change that). The stack is outlined in purple. |
| A Row, Column, Wrap or List View | It is inserted between the children at the pointer. An orange box outlines the dragged widget. |
| A screen, outside its groups | An App Bar, Floating Action Button, Bottom Navigation Bar or Drawer goes into its slot. Anything else goes into the body. |
| An app bar | The left, middle and right zones fill the leading, title and actions. |
| A Text or a Padding | A text can't hold children, so the drop goes to the container behind it. Padding passes it to its child. |
| Any other widget, such as a Container | It doesn't take drops. The drop goes to whatever is behind it. To put a widget inside, use + in Details. |
A screen from Empty Page has a Stack that fills its body, so a drop over it follows the Stack row, even for an App Bar, Floating Action Button, Bottom Navigation Bar or Drawer. To fill one of those slots, pick the widget in the slot under Screen in Details. See Set up a screen.
A component can't be dropped into itself.
Resize widgets
Select a widget and drag a corner handle, or an edge, to resize it. Hold Shift to keep the proportions. Hold Alt/Option to resize from the center. With several widgets selected, they resize together.
Some widgets have no handles, for example a widget placed directly inside a Container or Padding, because the widget around it decides its size. Set their size in Layout instead. See Lay out widgets.
Snapping and guides
While you move or resize, edges and centers snap to nearby items and purple guide lines show what lined up, so it's easy to line things up neatly. Widgets in a Stack snap to the stack's edges, its center and their siblings. Board items snap to other board items. Hold Shift or Alt while resizing to skip snapping. Nothing snaps to the board's grid.
Edit text on the board
Double-click a Text, Markdown or Html widget (the last two show formatted text), or place one with the Text tool, and type. Press Esc or click away to save. Rich text (text that mixes styles, such as one bold word in a sentence) is edited in Details. If the text comes from a variable, editing it here replaces that link with the text you typed. Undo brings the link back.
Copy, cut and paste
Press Ctrl/Cmd + C, X or V. A widget's right-click menu has Copy and Cut, and the menu on empty board space has Paste. A paste lands at your pointer. With a widget selected, it goes into that widget's parent, the widget it sits in. For pasting images and text, see Add widgets.
Use the right-click menu
Right-click a widget to see everything you can do with it. An unselected widget is selected first.
| Entry | What it does |
|---|---|
| Remove | Takes the selected widgets out of your design. A screen or component only leaves the board and stays in your project. Key: Delete, or Backspace on macOS. |
| Replace with... | Opens the widget picker dialog and swaps the widget for the one you pick. Nowa keeps its children and the properties the new widget also has. See Add widgets. |
| Group | Puts the selected widgets into one group. Key: Ctrl/Cmd + G. Inside a Row, Column or Stack the group matches its parent. Elsewhere it is a Stack. |
| Ungroup | Shows when one group is selected. It moves the children out and removes the group. The key only groups. It never ungroups. |
| Bring forward, Send backward | Moves the widget one place later or earlier among the widgets in its group. Keys: Ctrl/Cmd + ] for Bring forward, Ctrl/Cmd + [ for Send backward. |
| Bring to front, Send to back | Moves the widget to the last or first place. Keys: Alt/Option + Ctrl/Cmd + ] for Bring to front, Alt/Option + Ctrl/Cmd + [ for Send to back. |
| Export as image... | Saves a widget or screen as a picture. |
Later means lower in a Column, further right in a Row, and in front in a Stack, where later widgets sit on top. Each entry shows its own keys. An entry that can't run, such as Bring forward on the last widget, is greyed out.
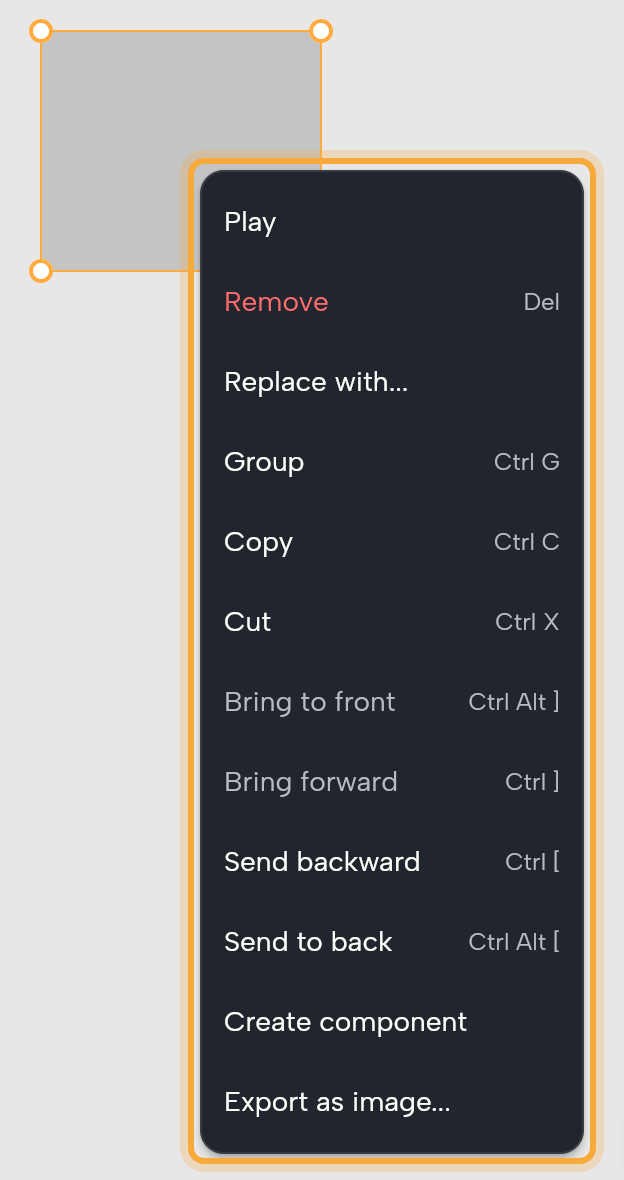
Play, Create component, Detach and Copy as new widget are covered in Play your app on the board and Build reusable components. Detach and Copy as new widget show only where they apply. Right-click empty board space for Undo, Redo, Save, Create a page and Paste.
Export as image
Need a picture of a screen, for a pitch deck or to show a teammate? Right-click a widget or screen and choose Export as image.... Choose a Format (PNG or JPG) and a Size (1x to 4x, or type a number), then click Export and choose where to save.
Transparent background is available for PNG. Resolution shows the picture size in pixels, and Export turns off if a side would pass 8192 pixels. Exporting also works with the View Only role.
Undo and redo
Press Ctrl/Cmd + Z to undo. Press Ctrl/Cmd + Shift + Z or Ctrl/Cmd + Y to redo. The board's right-click menu has Undo and Redo too. The keys do nothing while you type in a field.
Each area keeps its own history: every board, the Library, and a screen opened on its own. To jump back several steps at once, press Ctrl/Cmd + Shift + H to open Action History. Click an entry to undo it and every later step. Dimmed entries are steps you undid. Click one to redo up to it.
Select a widget, then type something like "Make this button full width with rounded corners." The selected widget is attached to your message automatically. See Give Nowa AI context.
Next steps
- Change widget properties: edit what you selected in Details.
- Lay out widgets: rows, columns, stacks and sizes.
- Use the Outline: select any widget from the widget tree.