Publish to the App Store
Nowa builds and signs your iOS app in the cloud, so you don't need your own Mac to publish it. You set your app up on Apple's side once, then give Nowa an API key from Apple and a certificate key, which Nowa can generate for you. From then on, every build goes straight to App Store Connect, ready for testing and review.
Cloud projects Paid plansHere's the whole journey at a glance:
- Join the Apple Developer Program.
- Register your app's bundle ID with Apple.
- Create your app in App Store Connect.
- Create an App Store Connect API key, so Nowa can work with your Apple account.
- Save that key and a distribution certificate in Nowa.
- Build, then test and submit your app in App Store Connect.
Steps 1 to 4 happen on Apple's websites. Most of it is a one-time job: the same membership, API key and certificate work for all your apps.
Before you start
- Use a cloud project on a paid plan.
- Set your app details in Nowa, above all the Bundle Identifier. See Check your app details.
- Keep a note open while you work. You'll copy a few IDs from Apple's sites into Nowa, and it helps to have them in one place.
Your Bundle Identifier is your app's bundle ID: its unique name in Apple's systems, written like a reversed web address, such as com.yourcompany.yourapp. Choose it with care. Once you upload your first build to App Store Connect, Apple doesn't let you change it.
Set up your Apple account
If you share an Apple team with other people, some of these steps need the Account Holder or an Admin. Each step says which.
Join the Apple Developer Program
Publishing on the App Store needs a membership in the Apple Developer Program. It has a yearly fee, shown on Apple's enrollment page.
- Get your Apple Account ready, or create one. Turn on two-factor authentication, and use your legal first and last name: a nickname or company name delays Apple's approval.
- On the enrollment page, click Start your enrollment, sign in, and enroll as an individual or as an organization. An organization also needs a D-U-N-S Number (a business identification number) and a public website on its own domain.
- Once Apple has verified your details, agree to the Apple Developer Program License Agreement and complete the purchase.
Register your bundle ID
Apple needs your bundle ID registered, as an App ID, before you can create your app in App Store Connect. You do this once per app, in your developer account. This needs the Account Holder or Admin role.
- In Nowa, click Settings → Project Details and copy your Bundle Identifier.
- Sign in to your Apple Developer account and open Certificates, Identifiers & Profiles.
- Click Identifiers in the sidebar, then the add button (+).
- Select App IDs and click Continue. Keep App as the type and click Continue again.
- In Description, enter a name you'll recognize, such as your app's name.
- Select Explicit App ID and paste your bundle identifier into Bundle ID. It has to match Nowa letter for letter.
- Under Capabilities, tick the Apple features your app uses, such as push notifications or Apple Pay. In-App Purchase is already on. Not sure? Leave the rest off. You can turn capabilities on later: select the App ID, click Edit, then Save.
- Click Continue, check the details and click Register.
Apple's guide: Register an App ID.
Create your app in App Store Connect
App Store Connect is Apple's website for everything about your app on the store: its page, its builds, testing with TestFlight and App Review. Your app needs a place there before Nowa can send it builds. This needs the Account Holder, Admin or App Manager role, and the Account Holder must have signed Apple's latest agreement in the Business section.
- Sign in to App Store Connect and open Apps.
- Click the add button (+) and choose New App.
- Fill in the dialog:
| Field | What to enter |
|---|---|
| Platforms | iOS. |
| Name | The name people see on the App Store, 2 to 30 characters. You can change it until you submit the app for review. |
| Primary Language | The main language of your App Store page. You can change it later. |
| Bundle ID | The bundle ID you registered above. It's locked once you upload a build. |
| SKU | An ID for your own records that customers never see. Your bundle ID works well. You can't change it later. |
| User Access | Full Access, or Limited Access to choose which people on your team can see the app. |
- Click Create. If anything is missing, App Store Connect tells you.
Apple's guide: Add a new app.
Create an App Store Connect API key
An API key is a pass that lets Nowa work with your Apple account for you. During each build, Nowa uses it to fetch or create the signing files your app needs, then to upload the finished app. This needs the Account Holder or Admin role.
- In App Store Connect, open Users and Access, then the Integrations tab. App Store Connect API is already selected.
- The very first time, the Account Holder clicks Request Access, ticks the box to agree to the terms and clicks Submit. Apple reviews the request before anyone can create keys.
- Click Team Keys, then Generate API Key. If you already have a key, click the add button (+) instead.
- Give the key a name you'll recognize, such as "Nowa". It's only for you.
- Under Access, choose Admin or App Manager. Nowa recommends one of these, so the key can create your signing files and upload your app.
- Click Generate. The new key appears in the list.
- Copy two values into your note: the Issuer ID, shown above the list of keys, and the new key's Key ID.
- Click Download API Key and save the file somewhere safe. It's a
.p8file: a small text file that holds the secret part of your key.
Apple doesn't keep a copy of the .p8 file. If you lose it, revoke the key on the same page (Edit, select the key, Revoke Key), generate a new one and save it in Nowa. Keep the file private, like a password.
Use a team key like this one: the individual key on your profile can't create signing files. You can't change a key's access later, so if you picked the wrong one, revoke the key and generate a new one. Apple's guide: App Store Connect API.
Save your App Store Connect credentials
Back in Nowa, add the key you created.
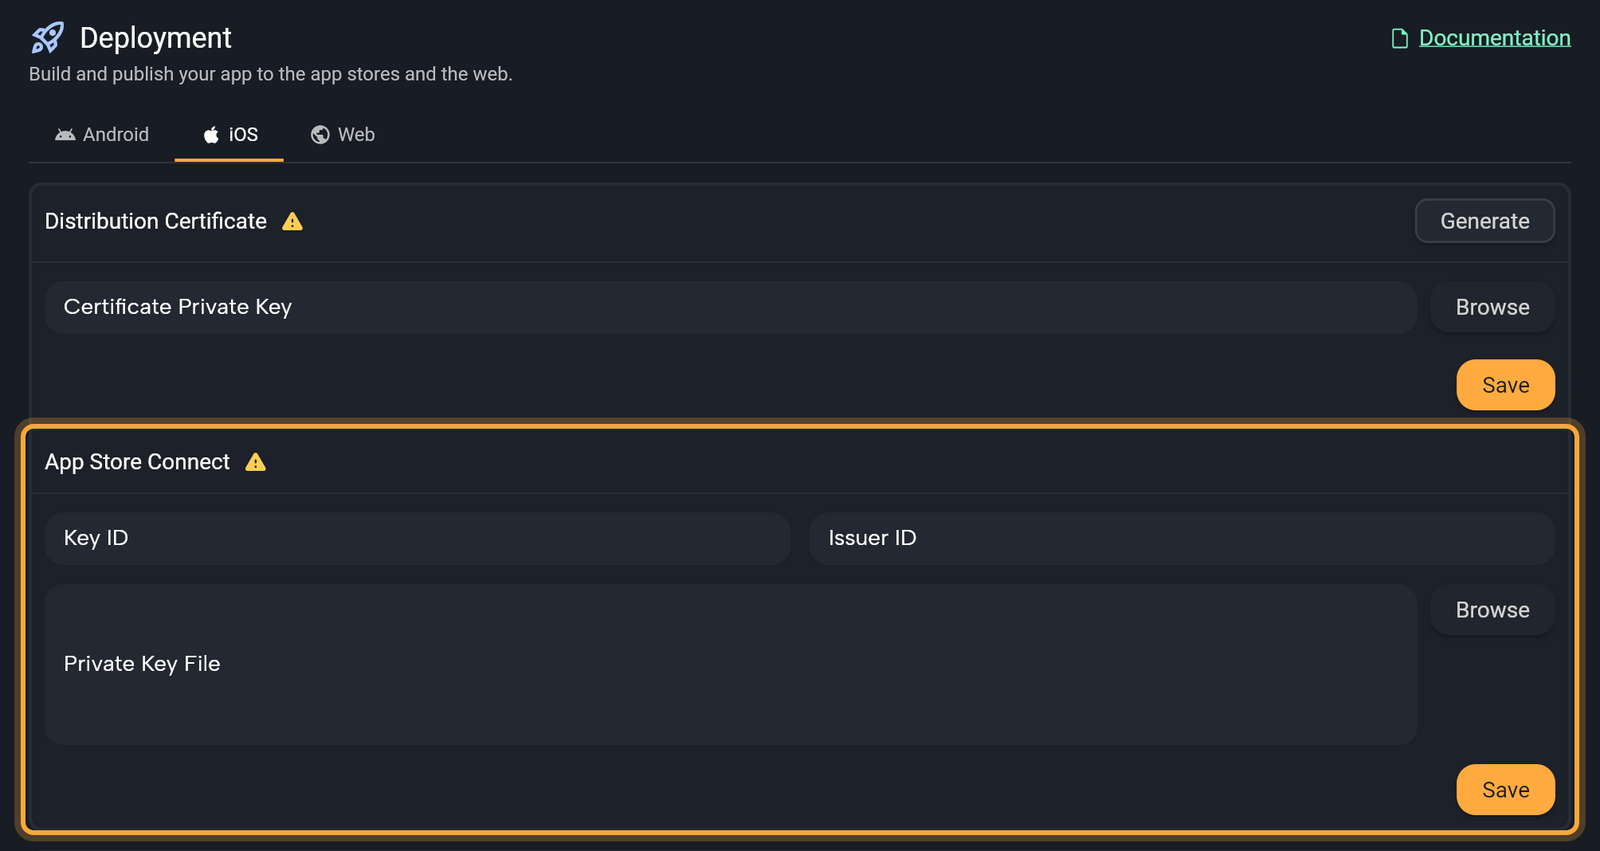
- Click Settings → Deployment and open the iOS tab. The Distribution Certificate card holds an App Store Connect section with a warning icon. Hover over it to read Missing App Store Connect credentials.
- Enter your Key ID and Issuer ID.
- Next to Private Key File, click Browse and pick your
.p8file. You can also paste the key text into the field. - Click Save. The icon turns into a check mark (hover to read App Store Connect credentials saved).
Nowa saves your Bundle Identifier together with these credentials. If you change the identifier later, click the pencil (Change credentials) and Save again so Nowa picks up the new one. The same pencil is how you swap in a new API key. The X (Discard changes) closes the form without saving.
Add a distribution certificate
A distribution certificate is your digital signature as an Apple developer. Nowa signs every iOS build with it, so Apple can tell the app really comes from your team and hasn't been changed since it was signed. The certificate belongs to your team rather than to one app, so one certificate can sign all your apps.
Every certificate is paired with a private key, a secret file that only you and Nowa should have. That key is what Nowa needs. On a Mac, people usually create the key with Keychain Access and then request the certificate from Apple. With Nowa you skip that: during the build, Nowa looks in your Apple account for the certificate that matches your key, and creates one if there isn't one yet.
If a build failed at iOS code signing, start with the troubleshooting steps at the end of this page.
Let Nowa generate a key
- In the Distribution Certificate card, click Generate. A warning icon means no key is saved yet (Missing distribution certificate).
- Read the Important! warning. It says Apple allows three active certificates at a time, that the build fails if you've already used three, and that reusing a certificate is better. If your account is at that limit, revoke a certificate you no longer use first (see Manage the saved key). Click Generate anyways to go on, or Cancel.
- In the next Important! dialog, click Download and save
ios_distribution_certificate_key.p12somewhere safe. If you lose it, you can't sign your other iOS apps with this certificate and you have to generate a new one.
After the first build with this key, the new certificate appears under Certificates in your developer account.
Use a key you already have
The easiest key to reuse is one Nowa gave you for another app: the ios_distribution_certificate_key.p12 file you downloaded there. Using one certificate for all your apps and their updates keeps you clear of Apple's limit. If several people publish from one Apple account, each can have their own certificate until you reach the limit. After that, share one key.
- Click Browse next to Certificate Private Key and pick the key file. The file picker lists
.p12files. - Click Save.
Nowa reads the key as text, in the same format as its own download. A .p12 file exported from Keychain Access on a Mac is a different kind of file, even though its name ends the same way, and Nowa can't read it. The card then shows a red error icon (hover to read Failed to load or save certificate info) and a refresh icon where Generate was. Click the refresh icon to reset the card, then let Nowa generate a key instead. If you'd rather keep your Mac certificate and you're comfortable with the command line, What Nowa adds to your code explains how to turn its key into the text format Nowa reads.
Manage the saved key
Once a key is saved, the card shows a check mark (hover to read Distribution certificate saved). The download icon (Download Certificate) saves the key file again, which is handy when you set up your next app. Remove asks "Are you sure?" and then deletes Nowa's copy of the key. The certificate itself stays in your Apple account.
To get rid of the certificate too, revoke it in your Apple Developer account. This needs the Account Holder or Admin role.
- In Certificates, Identifiers & Profiles, click Certificates in the sidebar.
- Select the certificate and click Revoke, then click Revoke again in the dialog.
Apple says apps already on the App Store aren't affected when you revoke a certificate. You can't upload new builds signed with it, though, and builds you uploaded but haven't submitted for review yet may be marked Invalid Binary. See Apple's Certificates overview.
Build and send to App Store Connect
With your credentials and certificate saved, you're ready to build.
- In Start New Build, pick a Branch and click Build. Leave the default unless you work with several branches. Start a build explains what a branch is. The button stays off until both the certificate and the App Store Connect credentials are saved.
- Follow the build. It signs your app in the iOS code signing step, builds the
.ipa(the installable iPhone app file) and ends with a Publishing stage that uploads it to App Store Connect. Build history and logs explains the build card. - When the build finishes, look for it in App Store Connect. By default, the
.ipais also listed under Artifacts, but you don't need to download it: Nowa has already uploaded it.
You can also click Deploy in the top bar, then Deploy on the iOS row. Until everything above is saved, the row shows Set up instead. It opens the Deployment page on the Android tab, so switch to iOS there.
By default, Nowa's part ends at the upload. After the upload says what comes next in App Store Connect.
To send a new build, raise Build number in Settings → Project Details (and Build version for a new release), then build again. Apple tells your uploads apart by the build number, so every upload needs a new one.
After the upload
Once the build is uploaded, you carry on in App Store Connect:
- Wait for Apple to process the build. Apple emails you when it's done, and the build shows up on your app's TestFlight tab. See Upload builds.
- Answer Apple's questions about encryption (export compliance). Until you do, TestFlight marks the build Missing Compliance. Open the build, click Provide Export Compliance Information, answer the questions and click Save. See Provide export compliance information for beta builds.
- To try the app with testers first, use TestFlight. See TestFlight overview.
- To release the app, fill in the information Apple requires for it, choose the build for your app version and submit it for review. See Required, localizable, and editable properties and Submit an app.
Before you submit for review, read Follow Apple's rules. Apple's App Store Connect Help covers the rest.
Follow Apple's rules
Read Apple's App Store Review Guidelines before you submit. These parts match what you can build with Nowa:
- Payments. 3.1.1 In-App Purchase says "you must use in-app purchase" to unlock features or functionality, for example with subscriptions, in-game currencies or access to premium content. 3.1.3 Other Purchase Methods lists apps that "may use purchase methods other than in-app purchase". See Stripe or RevenueCat?.
- Google sign-in. 4.8 Login Services names Google Sign-In as an example of a third-party or social login service. An app that uses one to set up or authenticate the user's primary account "must also offer as an equivalent option another login service" with the features Apple lists, unless an exception applies.
- Accounts. 5.1.1(v): "If your app supports account creation, you must also offer account deletion within the app." The sign-up functions Nowa adds don't delete accounts. Apple's Offering account deletion in your app has the details.
- Privacy. 5.1.1(i): "All apps must include a link to their privacy policy in the App Store Connect metadata field and within the app in an easily accessible manner." For the link inside your app, use the
openUrlaction, which opens a web address. App privacy details on the App Store covers what you provide in App Store Connect, including for third-party code. - Demo account. Apple's Before You Submit list asks for "an active demo account or fully-featured demo mode" if your app includes account-based features.
If the iOS code signing step fails
Open the failed step under Steps in the build and read its log. Click Explain with AI to send the failure to Nowa AI, or Documentation to come back to this page. Then check these, one at a time:
- Apple's certificate limit. Nowa's warning puts it at three active certificates. If you generated a new key while your account was already at the limit, revoke a certificate you no longer use (see Manage the saved key), or click Remove and use a key you already have.
- The API key. Use a team key with Admin or App Manager access. If you let Nowa generate your certificate key and an App Manager key doesn't work, try one with Admin access: Apple's Certificates overview says only the Account Holder or an Admin can create distribution certificates. Access can't be changed, so generate a new team key and save it with the pencil (Change credentials).
- The bundle ID. Nowa signs your app for the Bundle Identifier it saved with your credentials. If you changed Bundle Identifier since then, click the pencil and Save again.
Next steps
- Build history and logs: start builds, follow them and read their logs.
- Publish to Google Play: ship the Android version.
- Get ready to publish: the Deploy menu and your app details.