Read and write Supabase data
Your app's data lives in tables in your Supabase database, a bit like spreadsheets: a todos table has a column for each detail, such as the title and whether it's done, and a row for each to-do. Your app works with those rows through queries, requests such as "give me all my to-dos". Query Templates turn a table into ready-made functions that run them, Nowa AI writes any other query you need, and you can test each one right in the editor before you build a screen around it.
Before you start
- Connect Supabase. Nowa can create the Supabase project for you while you connect.
- A table in Supabase. See Create a table.
- If your table uses row-level security (rules for who can see which rows), a test user to sign in with. See Sign users in with Supabase.
Create a table
Nowa has no table editor, so you create tables in Supabase, or let Nowa AI do it for you. Either way, think about who may see each row. Row-level security (RLS) is Supabase's lock on a table: once it's on, your app sees nothing until you add policies, rules such as "people can only see and change their own to-dos".
With Nowa AI
This is the quickest way. Turn on the Supabase connector with the Supabase icon in the chat field, switch to Agent mode and describe the table and who may use it, for example: "Create a todos table with a title and a done column, where each signed-in user can only see, add, change and delete their own rows." Nowa AI shows you each change for approval before it runs it, unless Auto-approve tools is on. Then open ⋮ → Tables in the Supabase panel to see the new table. See Connect Figma and Supabase to Nowa AI.
In the Supabase dashboard
Prefer to set it up yourself? Supabase's SQL Editor runs ready-made instructions for you, so you can create the table and its rules in one go:
- In Nowa, click ⋮ in the Supabase panel, then Open Supabase.
- Open the SQL Editor.
- Paste the snippet below and click Run.
- Open the Table Editor to check that
todosis there.
-- A to-do list where each signed-in user only sees their own rows
create table todos (
  id bigint generated by default as identity primary key,
  created_at timestamptz not null default now(),
  user_id uuid not null references auth.users default auth.uid(),
  title text not null,
  done boolean not null default false
);

-- Let signed-in users and the full-access key reach the table
grant select, insert, update, delete on table todos to authenticated, service_role;

-- Turn row-level security on, then add one policy per action
alter table todos enable row level security;

create policy "Users can view their own todos" on todos
  for select to authenticated using ((select auth.uid()) = user_id);

create policy "Users can add their own todos" on todos
  for insert to authenticated with check ((select auth.uid()) = user_id);

create policy "Users can update their own todos" on todos
  for update to authenticated using ((select auth.uid()) = user_id);

create policy "Users can delete their own todos" on todos
  for delete to authenticated using ((select auth.uid()) = user_id);
In plain words: it creates the table with an automatic ID, the time each row was created and the user it belongs to (filled in for you), lets signed-in users reach it (and the full-access key, which Nowa uses when it lists your tables), turns RLS on, and adds one policy each for reading, adding, changing and deleting, all limited to the user's own rows.
Prefer clicking? In the Table Editor, click New table, enter a Name (lowercase, with underscores instead of spaces, such as shop_items), add your columns with Add column, and click Save. Supabase turns RLS on for you and adds id and created_at columns. Then ask Nowa AI for the policies, for example: "Add policies to the shop_items table so anyone can read it and only signed-in users can add rows."
Supabase is also changing how new tables are shared: on newer projects, and on every project from 30 October 2026, a new table doesn't let your app in until access is granted. Without that access, tests show RLS Policy Error even when your policies are right. The snippet above grants that access. If a table you made in the Table Editor shows this, ask Nowa AI, for example: "Give signed-in users access to the shop_items table."
Tables you make in the SQL Editor or the Table Editor aren't recorded as migrations (the saved, step-by-step history of how your tables were built), so Pull Backend Files can't save them into your project later. If you plan to share or copy your backend, ask Nowa AI to create the tables through migrations instead (see Manage your Supabase backend).
Add a query from a template
- In the Supabase panel, click + next to Generate a Query. The Add Supabase Function dialog opens.
- Click Query Templates ("CRUD operations": create, read, update and delete). If you see No Tables Found, click Fetch Tables. Created a table after you connected? Open ⋮, then Tables, which refreshes the list. Connected with Use Keys and still no tables after Fetch Tables? Authorize Nowa once with Connect (see Connect with keys).
- Click a template from the table below.
- Click the table you want. You can search the list.
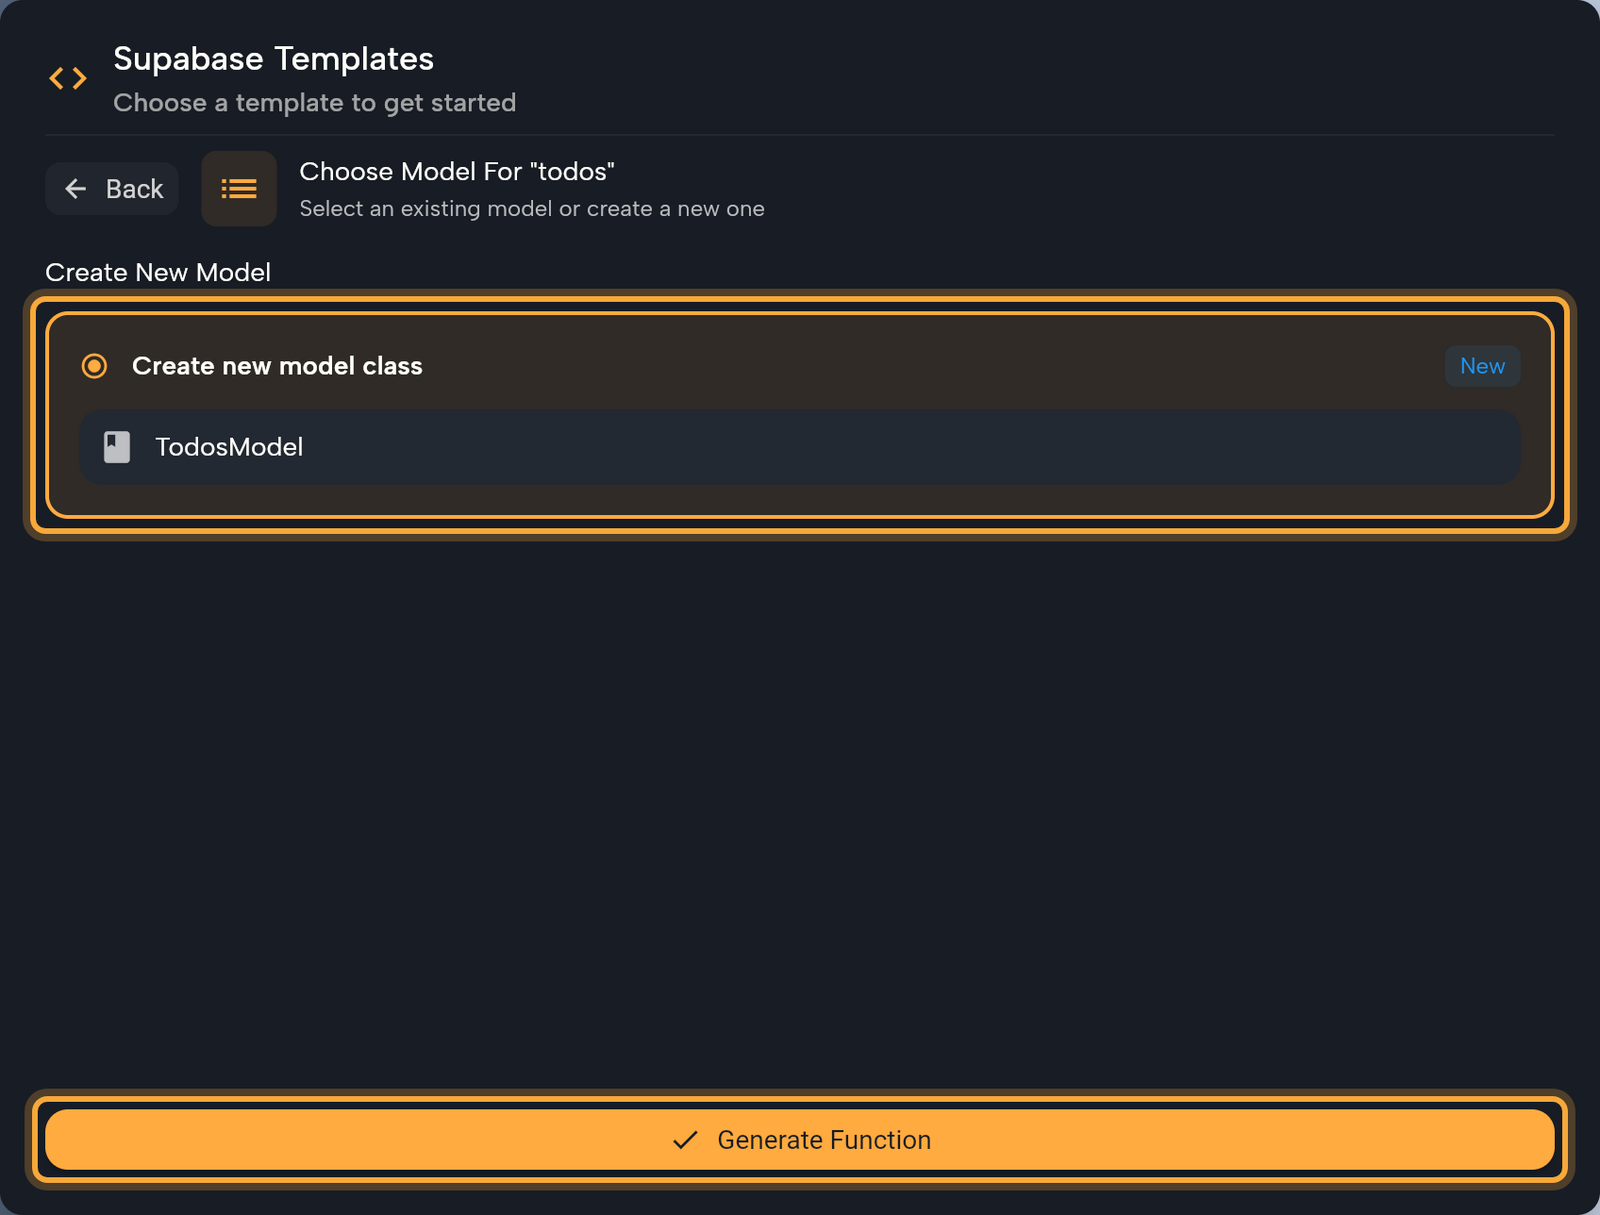
- Choose a model. Click Create new model class (Nowa suggests a name such as
TodosModel) or pick one under Use Existing Model. Nothing is selected until you click. - Click Generate Function. The message
Function "getAllTodos" generated successfully!appears, and the function shows up under Queries, ready to test.
| Template | What it does | Function for a table called todos |
|---|---|---|
| Get All Records | Fetches all records from a table | getAllTodos() returns a list of your model |
| Get Record by ID | Fetches a single record by its ID | getByIdTodos(id) returns one model, or nothing if no row matches |
| Create Record | Creates a new record in the table | createTodos(data) returns the new row |
| Update Record | Updates an existing record by ID | updateTodos(id, data) returns the updated row |
| Delete Record | Deletes a record by ID | deleteTodos(id) |
Each function is named after its action and the table, with the first letter of the table name capitalized. That's the name you'll pick in Circuit and in a Data Builder. The ID templates look for a column named id, and its type decides whether id is a number or text.
The templates don't filter, sort or page the results. For that, ask Nowa AI (see the next section) or change the code with Edit Code. Generating the same template for the same table again replaces the earlier function. For the other templates on that table, pick the model you already made under Use Existing Model, so they share it.
A data model describes one row of your table: it has one field per column, so your screens can show title or done directly. Nowa maps each column by the type Supabase reports: string columns become String (text), integer columns int (whole numbers) and boolean columns bool (yes or no). Any other type becomes dynamic, which can hold any value, and every field can be empty. Use Existing Model lists the data models already in your project. See Data models.
Before you test Create Record or Update Record, know that they send every field of the data model, including the ones you leave empty, and Supabase doesn't fill in an empty field for you. So on a table where Supabase fills in some columns itself, such as the automatic id, the creation time or the owner, the test can fail. To add or change rows, a function from Nowa AI that only sends the columns you need is often simpler (see the next section).
Ask Nowa AI for other queries
Templates cover the basics. For anything else, such as a filtered list, a sorted feed, or several queries at once, ask Nowa AI in Agent mode. Ask for the functions in SupabaseService, so they show up in the panel with the right badge, ready to test. With the Supabase connector on, Nowa AI can also look at your tables. Try:
- "Add a function to SupabaseService that adds a todo with a title for the signed-in user."
- "Create functions to update a todo's title, mark a todo as done, and delete a todo."
- "Change getAllTodos so it only returns todos that aren't done, newest first."
- With the connector on, both steps at once: "Create a todos table where each user only sees their own rows, then add a function that lists them."
Then test each new function, as the next section shows.
Test a function
- Click a function in the Supabase panel. A panel opens at the bottom of the editor, titled with the function's name, for example Testing getAllTodos.
- Under Testing values, fill in one field for each input of the function. A function without inputs shows "No parameters to test". For a function that needs a row's ID, copy it from your table in Supabase's Table Editor.
- Click Run to run the function on your real project. Until then the result area says "Run test to see result".
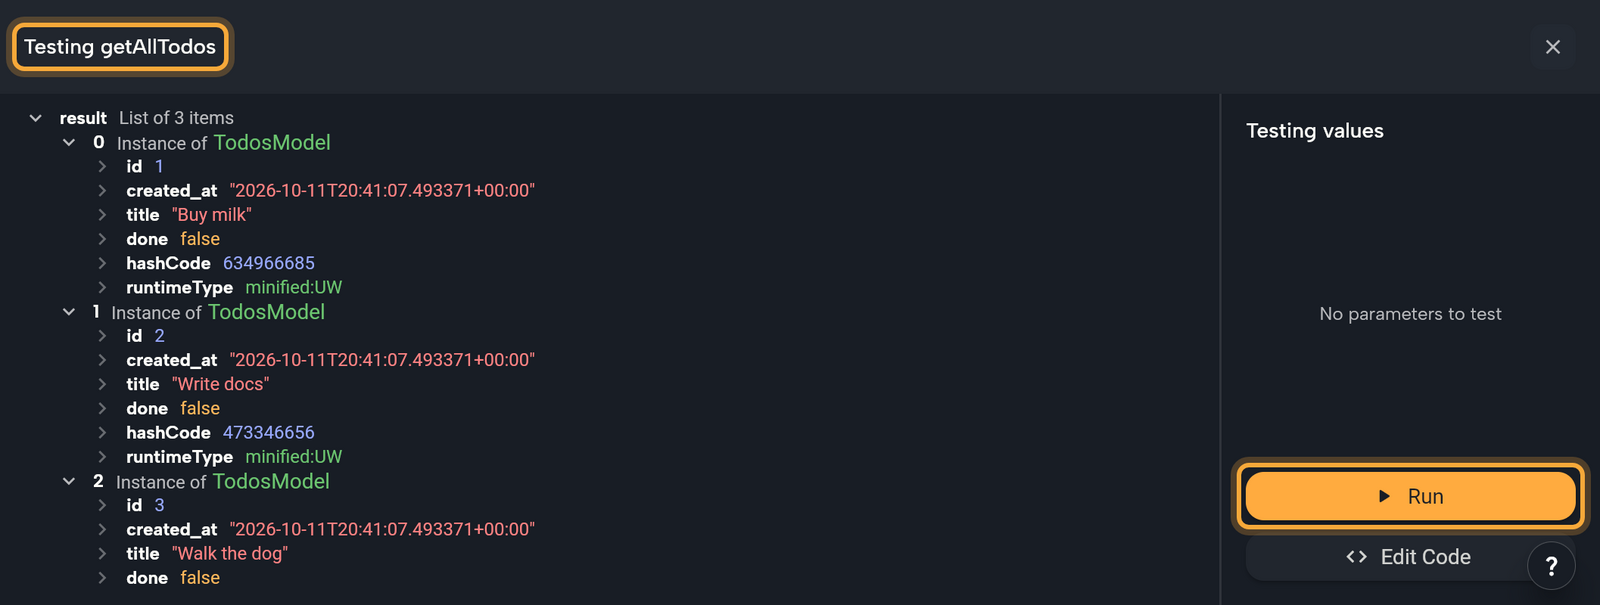
Ran a function that adds, changes or deletes rows? Open the table in Supabase's Table Editor (⋮ → Open Supabase) to see the change for yourself.
What the result area can show:
| You see | What it means |
|---|---|
| The result | The data your function returned. |
| Error: and a message | Supabase or the function returned an error. |
| RLS Policy Error | Supabase refused the query. Usually a Row Level Security policy doesn't allow it; on newer projects the table may also not be shared with your app yet (see Create a table). Follow the steps shown (today's Supabase dashboard lists policies under Database → Policies), or click Open Supabase Dashboard. Sign in first if the policy needs a user. |
| Empty Result - Possible RLS Filtering | The query returned an empty list. If the table has rows, RLS may be hiding them: click Check RLS Policies. If the table is empty, you can ignore it. |
| Streaming over a colored border | A live query. See Live queries. |
Tests run against your real Supabase project. Running a create, update or delete function changes real data.
Change a function's code
The easiest way to change a function is to ask Nowa AI, as in Ask Nowa AI for other queries. If you edit code yourself, click Edit Code in the test panel:
- Change the code in Query Source Code. Discard and Save appear once you change something.
- Click Save.
- Click Test Function to go back to the test view and run it.
If you rename the function in the code, the new name replaces the old function. If Nowa can't find the function's name in your code, it shows "Could not parse function name from the code".
Live queries
A live query keeps your screen up to date: when a row changes in Supabase, your app shows the change without a refresh, which is handy for a shared shopping list or a chat. It's a function that returns a Stream (data that keeps updating), and it shows a STREAM badge under Queries. No template creates one.
- Turn on Realtime for the table in Supabase, because new tables start with it off. Open your project's Publications settings (Database → Publications), and under
supabase_realtime, turn on your table. - Ask Nowa AI in Agent mode, for example: "Add a function that streams my todos, so the list updates live." If you edit code yourself, see What Nowa adds to your code.
- Click the function and click Run. The panel shows Streaming and updates as rows change. It keeps listening until you run it again or close the panel.
RPC and other functions
Two sections fill up from code, not from templates:
- RPC lists functions that run a database function, a small program stored in your Supabase database, for example one that totals an order.
- Other Functions lists functions that call a Supabase Edge Function, a small program that runs on Supabase's servers, for example one that sends a welcome email.
Ask Nowa AI to create them with the Supabase connector. You test them and use them in your app like any other function.
Show the results in your app
A Data Builder shows a function's result in your UI, for example your to-dos in a list. The steps below are the Supabase part. See Show data in your UI for the rest.
- Select the widget that should show the rows, often a List View. Click Add Wrapper and choose Data Builder.
- Set Source to Supabase. Next to Query, click the button (it reads
noneat first) and pick your function in Select Supabase Functions. Fill in its inputs, if it has any. - Inside the builder, link widgets to
data, which holds what the function returned. ForgetAllTodos,datais a list ofTodosModel.
On the board, you see placeholder values built from your model. To see real data, click Play on the screen, or run the app. See Play your app on the board. The function must return a Future (data that arrives once, a moment later) or a Stream (data that keeps updating).
To change data, call the function from an event, such as a button's On Pressed. Sign users in with Supabase shows the same steps with signIn.
To open a detail screen when someone taps a row, load that row with Get Record by ID. See Open a detail screen when a list item is tapped.