Connect Figma and Supabase to Nowa AI
Connectors let Nowa AI reach beyond your project. With the Supabase connector, it can build and change your backend, the online part of your app that stores data and signs people in. With the Figma connector, it can bring in the images, icons, colors and text styles of your design. In the app they're labeled MCP (Model Context Protocol), the standard way an AI agent connects to another service.
How connectors work
Two icons sit in the chat field next to +: the Supabase icon and the Figma icon. Their tooltip is Enable MCP when a connector is off and Manage MCP when it's on.
- Connectors work in Agent mode only. Design and Plan modes don't use them, even when they're on. See Design, Plan and Agent modes.
- A connector switches off when you reopen the project, so turn it on again when you need it.
- Nowa AI asks for your approval before it runs a connector action, unless you turn on Auto-approve tools. See Approve what a connector does.
Connect Supabase
Before you start, sign in to Nowa. Nowa AI reaches your Supabase project through Supabase's own MCP server, with your permission.
- Click the Supabase icon in the chat field.
- Follow what Nowa asks for:
- If the project isn't connected to Supabase yet, authorize Nowa in the browser window that opens. Then choose Create New Project to make a Supabase project for this app, or click Select next to one you already have. See Connect Supabase for the details.
- If you connected the project with Use Keys, Nowa first asks OAuth Authentication Required, because the connector needs your permission on your Supabase account, not only your app's keys. Click Authenticate and approve in the browser.
- If the project is already connected, there's nothing more to do.
- When the icon is highlighted and its tooltip reads Manage MCP, the connector is on. Switch to Agent mode and describe what you want.
Click the highlighted icon to open its menu:
| Menu item | What it does |
|---|---|
| Connected: <project ref> | Shows which Supabase project Nowa AI works on, by its project ref (the short ID Supabase gives every project). |
| Switch project… | Opens the project picker. The project you choose becomes the Supabase project for your app and for Nowa AI. |
| Turn off MCP | Turns the connector off. |
With the connector on, Nowa AI can look at your database and change it:
- Look at your tables and read or change their data. It writes the database commands (SQL) for you.
- Create tables and change them.
- Set up Row Level Security (RLS) policies: rules that decide who can see or change each row, such as "each person sees only their own tasks".
- Create database functions and triggers (actions the database runs on its own when data changes, such as creating a profile when someone signs up).
- Deploy and manage Edge Functions: small pieces of code that run on Supabase's servers instead of in your app.
- Apply migrations: saved, step-by-step changes to the structure of your database.
- Set up Storage buckets, the folders where your app keeps files such as profile photos, and the rules for who can upload or see them. See Store files in Supabase.
It also connects your app to what it built, so your screens can show and save that data. Describe the result you want: you don't need to know how tables or rules work. For example:
- "Create a tasks table where each person sees only their own tasks, then list them on the home screen."
- "Build a chat screen where signed-in people send each other messages. Store the messages in Supabase so each person sees only their own conversations."
If your project isn't connected to Supabase, or the connector is off, Nowa AI tells you to connect it from the Supabase panel or the Supabase icon, then stops.
Working in the code? See What Nowa adds to your code.
Connect Figma
- Click the Figma icon in the chat field.
- If your Nowa account isn't linked to Figma yet, a browser window opens. Approve access there. Nowa waits with Waiting for Authorization... for up to 2 minutes, then shows "Authorization timed out. Please try again." Click Cancel to close the dialog, whether it's still waiting or timed out.
- When the Figma icon turns on, switch to Agent mode and ask.
When you click the Figma icon, Waiting for Authorization... shows but no browser window opens, so you can't link Figma yet. Click Cancel. The steps above describe how connecting works once the problem is fixed. See Known issues.
With the connector on, Nowa AI can:
- Bring in images and icons from your Figma design as project assets, including SVG icons, which stay sharp at any size.
- Turn your Figma colors and text styles into your app's theme.
For example: "Bring the icons from my Figma design into the project and use its colors and text styles as the theme." Nowa reloads your app's theme when the colors and text styles come in, so open the Themes panel to check the result. Figma works in cloud and local projects.
Click the Figma icon again to open its menu: Connected, Auto-approve tools and Turn off MCP.
The Figma link belongs to your account, not to one project, so you link it once. To link or unlink Figma outside the chat, open your account settings, go to Account Details, and use Connect or Disconnect next to Figma under Connected Accounts. See Account settings.
Approve what a connector does
You stay in control of everything a connector does. Before a connector action runs, an Approval Required card appears in the conversation. It shows the tool's name (the action Nowa AI wants to take) after Tool:, and its Arguments (the details it will use), open so you can read them. Click Arguments to collapse them.
- Read what the action will do.
- Click Approve to run it, or Deny to skip it. Nowa AI is told the action wasn't allowed and carries on without it.
The card then reads Tool Request, with an Approved or Denied badge. If you stop the request, pending approvals are dropped.
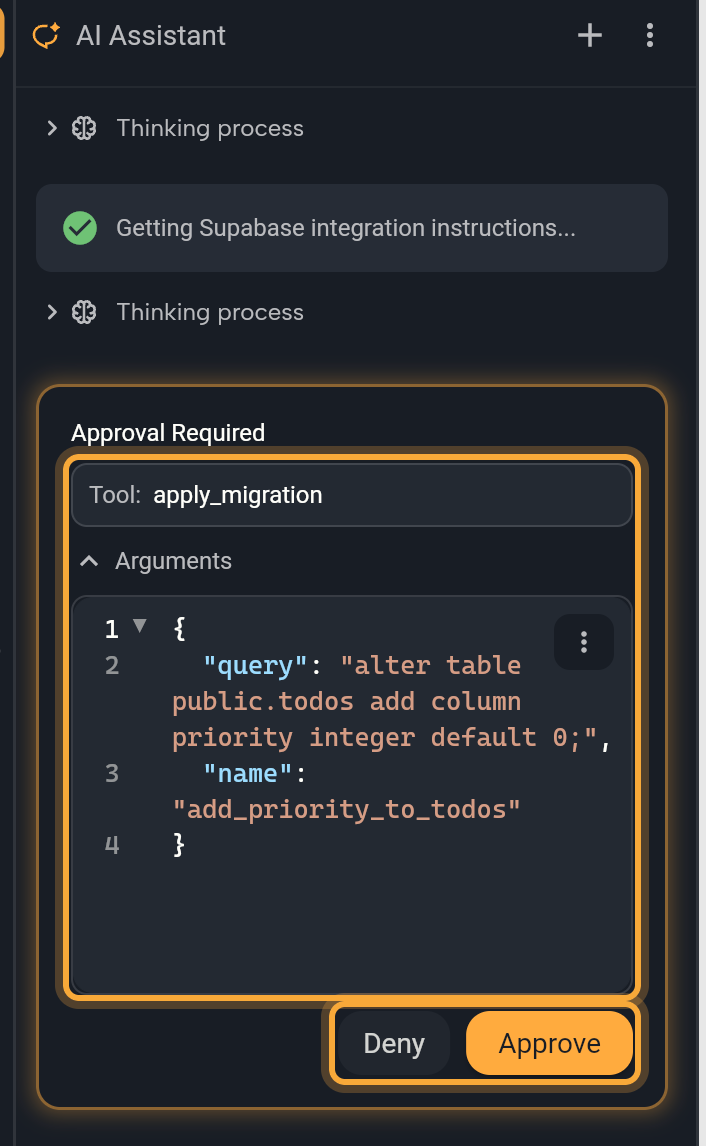
The Supabase connector works on your real Supabase project, and a restore in Nowa doesn't undo changes there. If real people already use your app, take a moment over each approval. Supabase advises connecting AI tools to a project with real users' data only when you need to, so a separate test project is the safest place to try bigger backend changes. See Supabase's MCP guide.
To skip the cards, use Auto-approve tools. The switch lives in the Figma menu, so turn the Figma connector on, click its icon, then click Auto-approve tools. To turn it off, open the menu and click Auto-approve tools again.
One switch covers every connector in the project, Supabase included. Its check mark is highlighted while it's on, and Nowa remembers the setting for the project on this device.
With Auto-approve tools on, connector actions run without asking, including changes to your Supabase backend such as tables, policies and functions. Turn it on only when you trust the request.
Turn a connector off
Click the connector's icon, then Turn off MCP. Nowa AI stops sending that connector with your requests, so it can't reach that service until you turn it on again.