Accept payments with Stripe
Stripe lets your app take payments by card, Apple Pay and Google Pay. Nowa builds the server side in your Supabase project for you (the payment tables, the functions that talk to Stripe and a webhook) and gives your app a StripePaymentService that your buttons can call. Most of the setup is copying a few keys between Stripe and Nowa.
Before you start
- A Stripe account. While you build, work in a sandbox, Stripe's test environment, where no real money moves.
- Supabase connected with Connect. Use Keys isn't enough: Nowa creates tables, deploys functions and saves secrets in your Supabase project through that authorization. See Connect Supabase.
- Users who sign in with Supabase Auth. The payment functions refuse anyone who isn't signed in. See Sign users in with Supabase.
- For One-Time and Consumable: a Supabase table with one row per item you sell, a unique ID column and a price column. See Create a table. For Subscription: a price created in Stripe (you need its Price ID).
- If your app goes on the App Store or Google Play and sells digital goods, credits or subscriptions, read the store rules first: Follow Apple's rules and Follow Google Play's rules.
Get your Stripe keys
Stripe gives you two keys, and Nowa needs both:
- The publishable key (starts with
pk_) identifies your Stripe account. It's made to be built into apps, so it's safe on your users' phones. - The secret key (starts with
sk_) can do anything in your Stripe account, so it must never be in your app. Nowa keeps it on the server, in Supabase.
You find both on the API keys page of your Stripe Dashboard. In a sandbox, they start with pk_test_ and sk_test_. Live mode keys start with pk_live_ and sk_live_ and take real money, so keep them for when you go live. See Stripe's API keys guide.
Turn on Stripe and add your keys
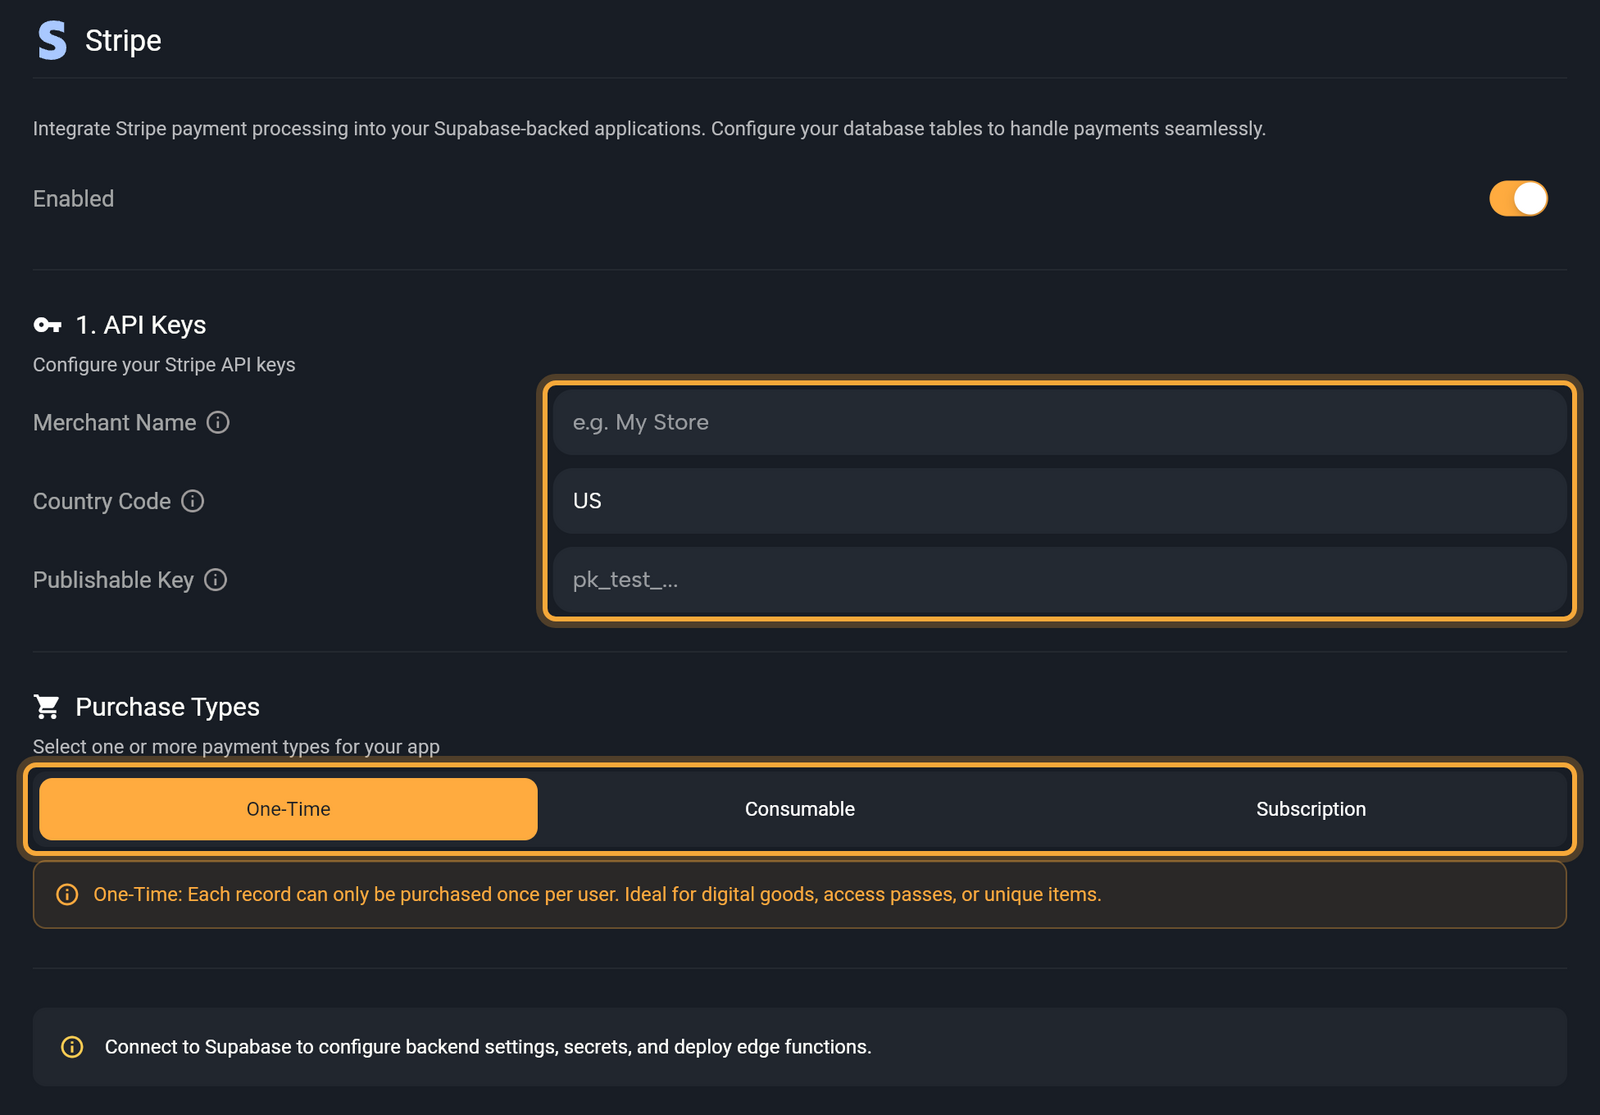
- Click the gear in the top bar (Settings) or press Ctrl/Cmd + ,. Under Integrations, click Stripe.
- Turn on Enabled. Nowa adds Stripe to your project, so the rest of the page opens up.
- Under 1. API Keys, fill in Merchant Name (the name customers see), Country Code (your business's two-letter country code; it starts as
US, but it can be empty when you come back to the page, so check it) and Publishable Key. Press Enter or click the send icon (Submit) after each one. A check mark confirms the save. - Under Purchase Types, select what your app sells.
| Purchase type | Use it for | How it works |
|---|---|---|
| One-Time | Digital goods, access passes, unique items | Each record can be bought once per user, like a premium unlock or an ebook. Selected by default. |
| Consumable | Credits, tokens, in-app currency | Records can be bought many times, like extra lives in a game. |
| Subscription | Memberships, plans, premium access | Recurring billing using a Stripe Price ID, like a monthly fitness plan. |
You can select more than one type, and at least one always stays selected. You can also start with one and add more later.
Nowa saves the purchase types, and the table and field choices below, when you click Deploy Configuration or submit a field under 1. API Keys. If you leave the page before that, choose them again.
Nowa keeps the three values from step 3 in Constants (Settings → General) and builds them into your app. That's fine, because none of them is secret.
Add your secret key and webhook
These fields appear once Supabase is connected. Until then the page shows "Connect to Supabase to configure backend settings, secrets, and deploy edge functions."
A webhook is how Stripe tells your Supabase project that a payment went through or failed, so the payment's record can be updated. You create it in Stripe and point it at the address Nowa gives you.
- Paste your Secret Key (starts with
sk_) and submit it. Nowa saves it as a Supabase secret, never in your app. - Click the copy icon (Copy webhook URL) next to Webhook URL.
- In your Stripe Dashboard, open the Webhooks tab in Workbench and click Create an event destination.
- Select Your account.
- For the payload format, choose Snapshot, not the recommended Thin: Nowa's webhook reads the full event, which only snapshot events include. Stripe then asks for an API version; you can keep your account's default.
- Select the events in the table below, click Continue, choose Webhook endpoint as the destination type and click Continue again.
- Paste the address from Nowa into Endpoint URL, add a description if you like, and create the destination.
- On the destination's settings page, click Reveal secret and copy the signing secret (it starts with
whsec_). - In Nowa, paste it into Webhook Secret and submit it.
| You selected | Events to send |
|---|---|
| One-Time or Consumable | payment_intent.succeeded, payment_intent.payment_failed |
| Subscription | customer.subscription.created, customer.subscription.updated, customer.subscription.deleted, invoice.paid, invoice.payment_failed |
Saved secrets are never shown again, so both fields are empty when you reopen the page. The webhook function exists only after you deploy (see below). Stripe's webhook guide has more on event destinations.
Choose payment methods
Cards work without extra setup. To add wallets, use 2. Payment Methods. Both wallets need the Country Code from step 3. Your app offers the payment methods that are turned on in your Stripe Dashboard's Payment methods settings, so check that the wallets you want are on there too.
Google Pay. Turn on Google Pay. Nowa sets it up in Google's test environment, which is right while you test (on a real Android phone: Google Pay can't be tested on an emulator). Before it can take real payments, Google has to approve your app (see Go live) and you switch it to production. To switch, ask Nowa AI in Agent mode, for example "Switch Google Pay in my Stripe payment service from the test environment to production". If you edit code yourself, see What Nowa adds to your code. Do this after your last Deploy Configuration, because deploying again puts it back to test.
Apple Pay. Turn on Apple Pay and enter your Apple Merchant ID. Apple only lets apps take Apple Pay with a merchant ID and a payment certificate, so you set those up once:
- In your Apple Developer account, open Certificates, Identifiers & Profiles, click Identifiers, then the add button (+). Select Merchant IDs and click Continue.
- Enter a description and an identifier, such as
merchant.com.yourcompany.yourapp, click Continue, then Register. Type the same identifier into Apple Merchant ID in Nowa. - In Stripe, open the iOS certificate settings, click Add new application and download the certificate signing request (CSR) file Stripe gives you.
- In Apple Developer, go to Identifiers, filter by Merchant IDs and select yours. Under Apple Pay Payment Processing Certificate, click Create Certificate, then Continue. Click Choose File, pick Stripe's CSR file, click Continue and Download the certificate (a
.cerfile). - Back in Stripe, upload the
.cerfile to finish adding the application. - Your app's own identifier needs Apple Pay too: in Identifiers, edit your app's identifier, turn on Apple Pay, choose your merchant ID and save. If you haven't registered the identifier yet, see Register your bundle ID.
Nowa adds the Apple Pay setting your iOS app needs once a merchant ID is set. The payment certificate expires every 25 months, so make a new one before then. Each CSR from Stripe makes exactly one certificate, and if you switch merchant IDs, get a new CSR. See Apple's Configure Apple Pay and Stripe's Apple Pay guide.
Connect your table
Skip this section if you only chose Subscription.
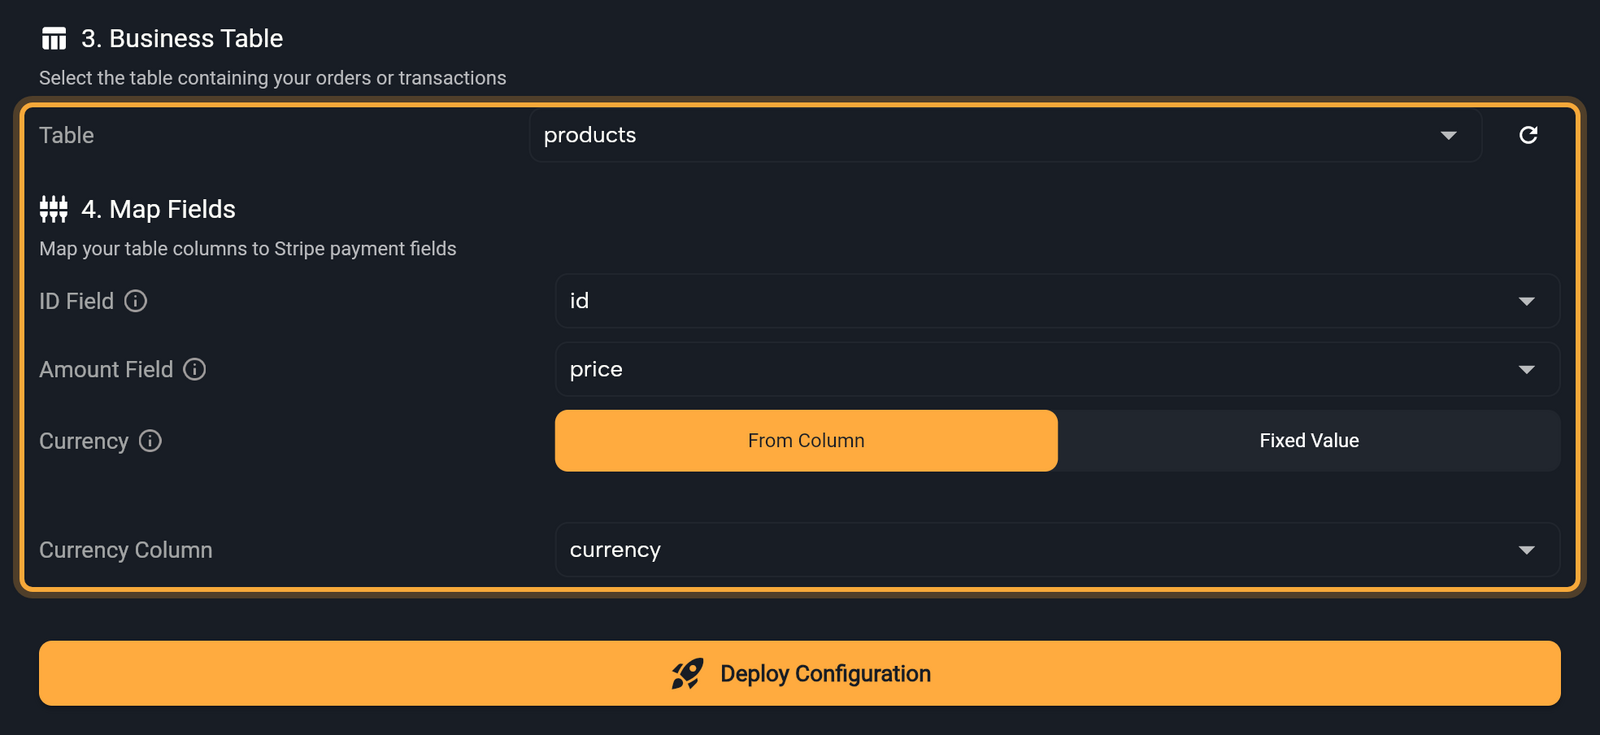
- Under 3. Business Table, open Table and pick the table that holds your items, such as
products. If you see "No tables found", click Refresh. After you add a table in Supabase, click the refresh icon (Refresh tables) next to Table. - Under 4. Map Fields, which appears once you pick a table, set ID Field to the column that identifies each row and Amount Field to the column with the price.
- Set Currency to From Column and pick a Currency Column, or to Fixed Value and type a Fixed Currency. Currencies use three-letter codes, such as
USD,EURorAED. If all your items share one currency, Fixed Value is the simplest choice. In a currency column, write the codes in lowercase (usd): Stripe asks for lowercase codes, and Nowa passes the column's value on as it is.
If you leave the page before you deploy, pick the table and fields again.
Your app sends only the row's ID. The function reads the price (and the currency, when it comes from a column) from your table as the signed-in user, so nobody can change the amount from the app. Your row-level security rules (Supabase's rules for who can read which rows) must let signed-in users read these rows.
Nowa multiplies the Amount Field by 100 before it sends the amount to Stripe. Store prices in whole currency units (9.99), not in cents, or customers are charged 100 times too much.
In Nowa 3.13 this also happens for currencies that have no cents, such as the Japanese yen: a price of 500 yen is charged as 50,000. Check Stripe's list of zero-decimal currencies before you sell in one.
Deploy the configuration
Click Deploy Configuration. It stays disabled until the required fields are set: the Apple Merchant ID when Apple Pay is on, and, for One-Time and Consumable, a table, ID Field, Amount Field and a currency. Deploying takes a moment. Messages show progress and "Deployed successfully!" appears at the end. Errors Nowa catches show in red under the button.
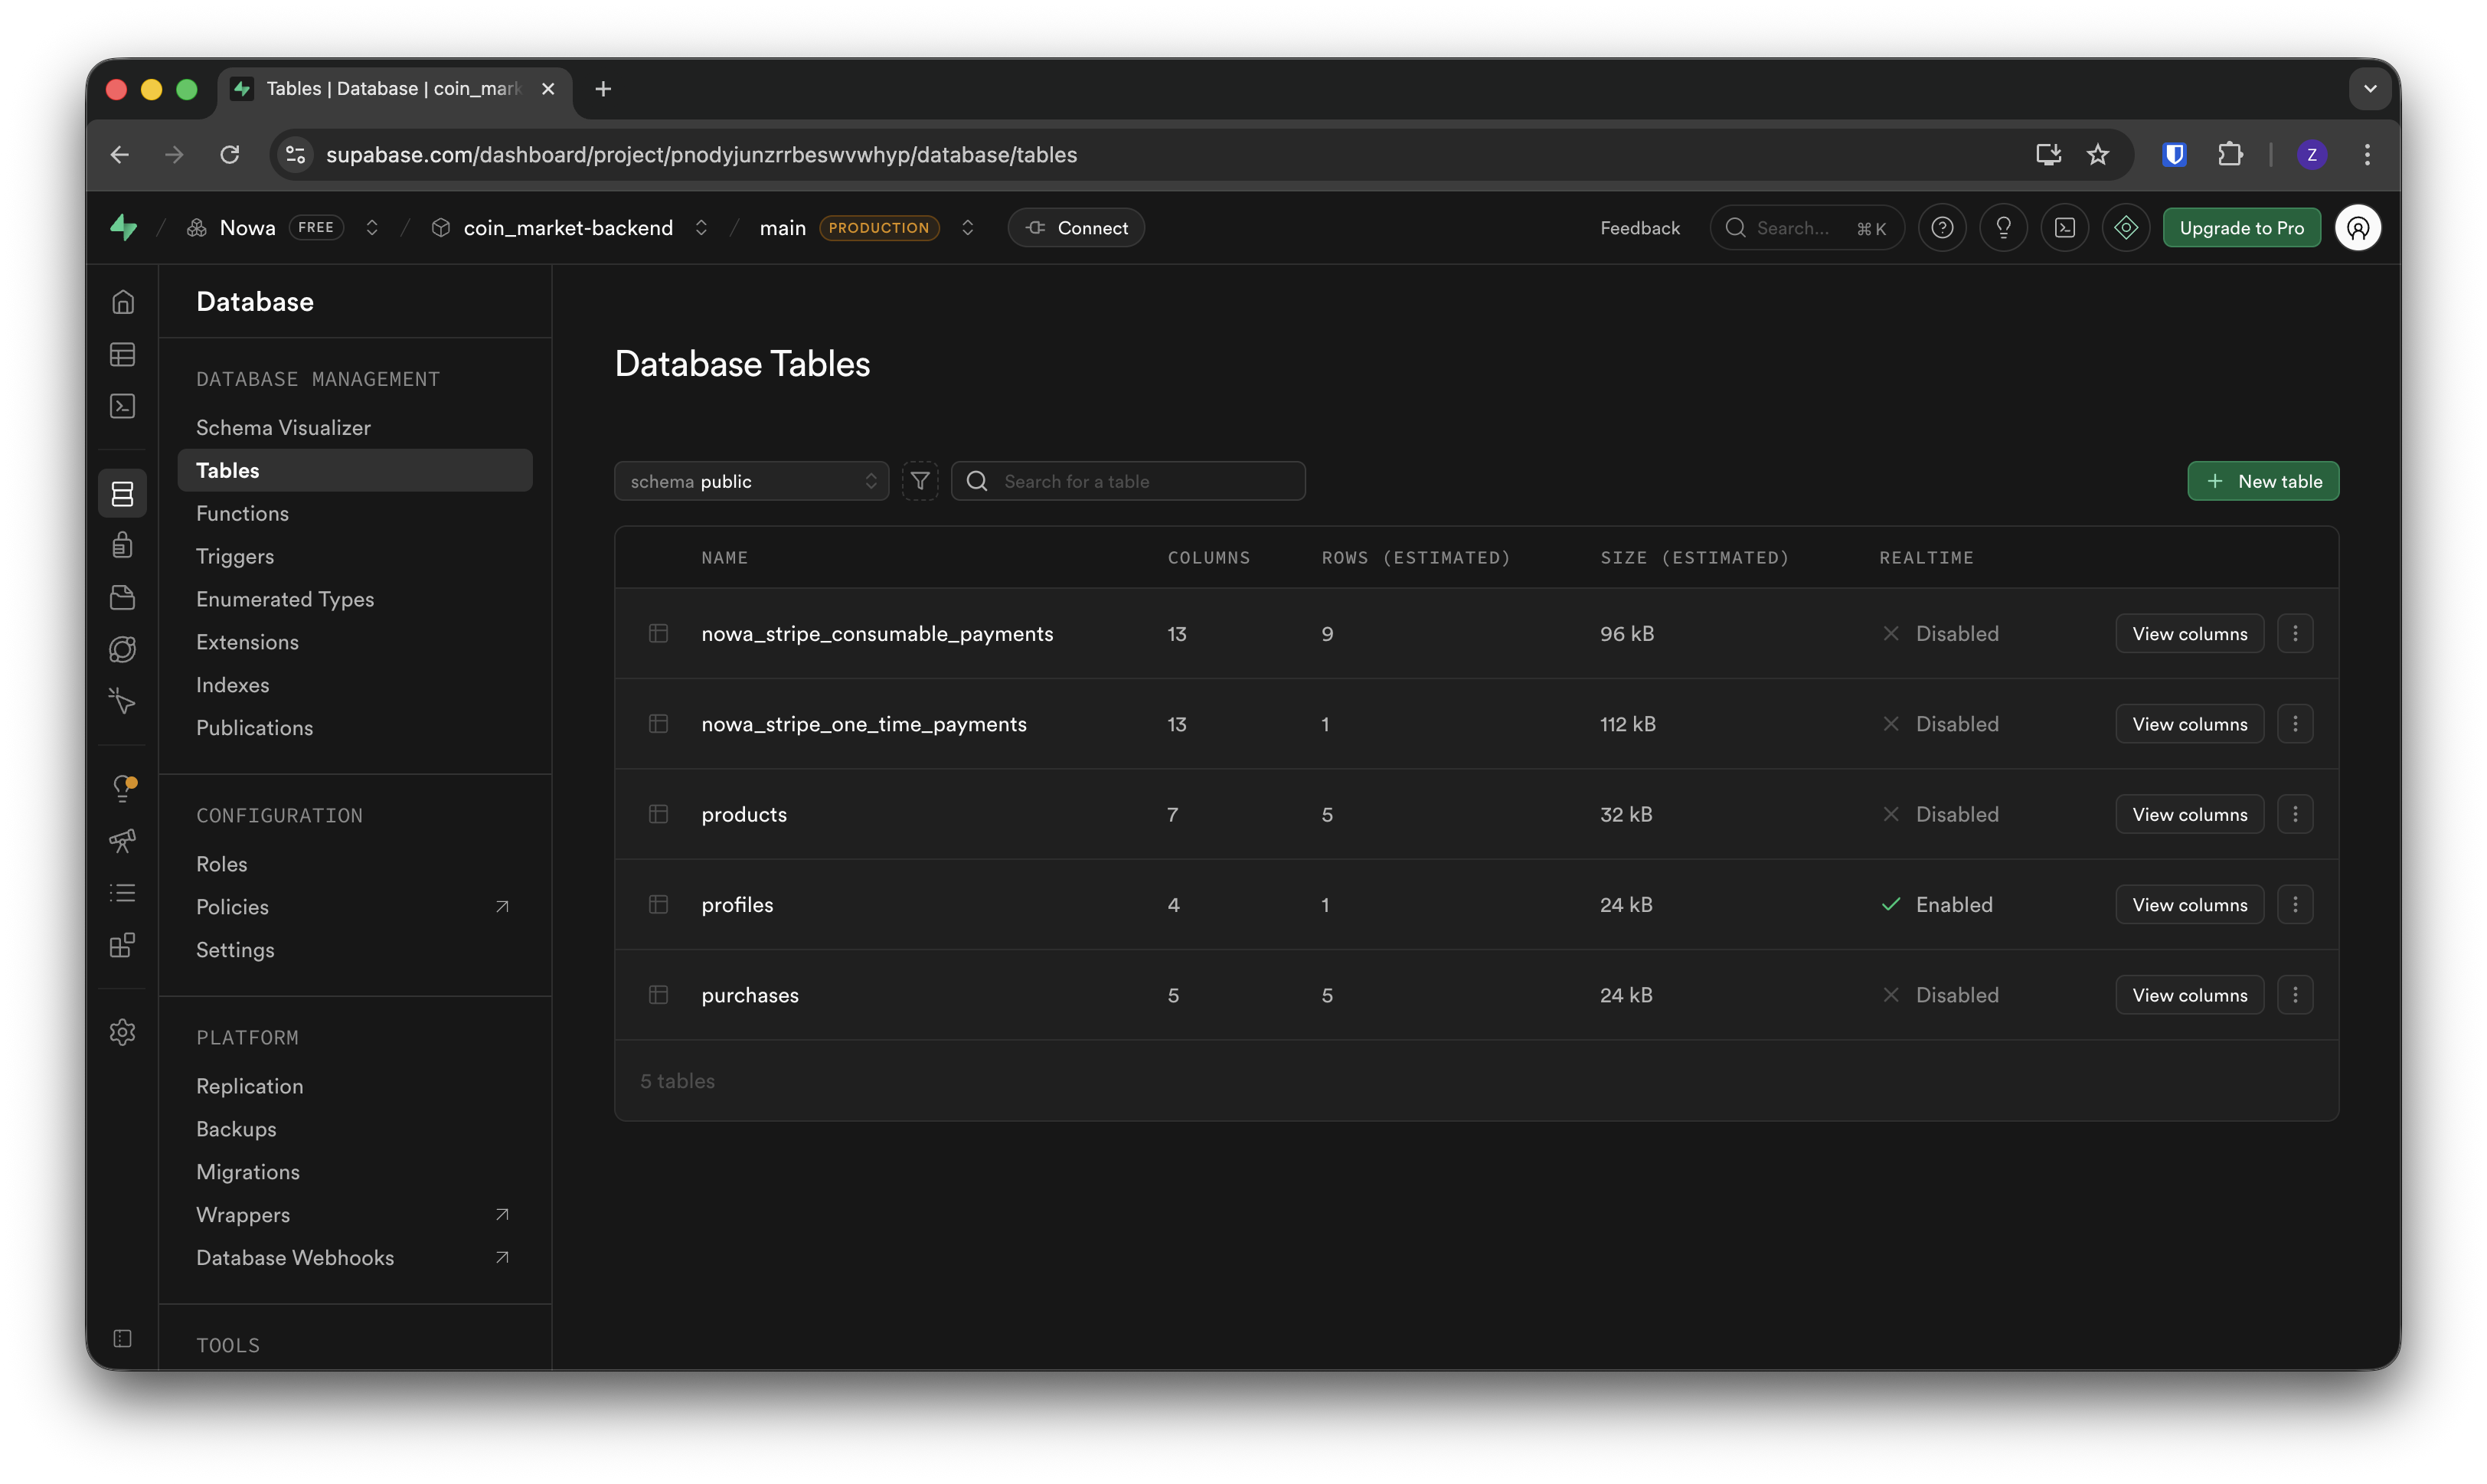
You'll find these in your Supabase project afterwards:
| You selected | Table | Edge functions |
|---|---|---|
| One-Time | nowa_stripe_one_time_payments | stripe-one-time-payment-intent |
| Consumable | nowa_stripe_consumable_payments | stripe-consumable-payment-intent |
| Subscription | nowa_stripe_subscriptions | stripe-create-subscription, stripe-cancel-subscription |
| Any type | stripe-webhook |
In your app, Nowa adds the StripePaymentService your buttons call and prepares the Android and iOS versions for Stripe's payment screen. That includes turning on the iOS Camera permission.
A failed Supabase step doesn't always show an error, so open your Supabase dashboard and confirm that the tables, the functions and your two secrets (STRIPE_SECRET_KEY and STRIPE_WEBHOOK_SECRET) are there.
After any change, such as a new purchase type or a different table, click Deploy Configuration again. Nowa keeps your existing payment tables and the payments in them.
Take a payment from a button
- Select your button, such as Buy. In Details, click the button next to On Pressed. Circuit opens (Respond to taps and other events).
- Hover the dot under the top node and click +. In All nodes for this circuit, search for
StripePaymentService, pick it, then pickprocessPayment(orsubscribe). See Build logic in Circuit. - In Details, click the Record Id label and link it to the item's ID, the value of your ID Field column (Expressions and conditions). For
subscribe, set Price Id to your Stripe Price ID. - Under Future Options, add logic to onValue for a successful payment, such as a thank-you message, and to onError for a failed one.
Stripe's payment sheet opens in your app. Test it on a device or emulator while your keys are in a sandbox, with Stripe's test cards: for example 4242 4242 4242 4242, any future date such as 12/34 and any three-digit CVC. Don't use real card details while testing. Running on a device needs the desktop app. See Run on a device or emulator.
After you deploy, ask the agent to wire the button, for example: "When the user taps Buy, charge the selected product with StripePaymentService.processPayment and show a snackbar when it succeeds." Then try it with a test card.
StripePaymentService has these methods, depending on the types you selected:
| Method | What it does |
|---|---|
processPayment(recordId:) | Opens the payment sheet for one item. Named processOneTimePayment and processConsumablePayment if you selected both types. |
getPaymentStatus(recordId), getPaymentDetails(recordId) | Return the signed-in user's payment status (pending, succeeded or failed) or full record for the item. Same naming rule. |
subscribe(priceId:) | Starts a subscription for a Stripe Price ID and opens the payment sheet. |
getSubscriptionStatus(), getSubscriptionDetails() | Return the status or full record of the user's latest subscription. |
cancelSubscription() | Cancels the user's subscription at the end of the billing period. In Nowa 3.13 it fails: see Fix common problems. |
Go live
Once test payments work, switch to real ones:
- In your Stripe Dashboard, switch from your sandbox to live mode. Live mode works only once you've verified your business with Stripe: see Activate your account. Then, on the API keys page, copy the live publishable key (
pk_live_), and click Reveal live key to copy the secret key (sk_live_). - In Nowa, submit them in Publishable Key and Secret Key.
- Sandbox and live mode each have their own webhooks. Create the event destination again in live mode, with the same steps and events, and submit its signing secret in Webhook Secret.
- If you use Google Pay, request production access from Google, choosing Gateway as the integration type: see Stripe's Go live with Google Pay. Once Google approves your app, switch Google Pay to production, as described above.
- Publish your app again. The publishable key is built into your app, so people need the new version.
Fix common problems
| Message or symptom | Cause and fix |
|---|---|
| "User must be authenticated to make payments" or "User not authenticated" | The user is not signed in with Supabase Auth. Sign them in before they pay. |
| "Payment already completed for this order" | A One-Time item can be bought once per user. Use Consumable for items people buy again. |
A payment stays pending | The webhook is not reaching Supabase. Check the endpoint URL, the events selected in Stripe, that the destination sends Snapshot events, and Webhook Secret. |
| Payments fail although everything is set up | Check your keys. Nowa saves them exactly as you paste them, so a space before or after a key breaks it. Also make sure all keys and the webhook come from the same mode (sandbox or live). |
cancelSubscription() always fails | In Nowa 3.13 the cancel function Nowa deploys to Supabase has an error, so it can't run, even when Deploy Configuration says "Deployed successfully!". Until a fix ships, cancel subscriptions in your Stripe Dashboard. The webhook then updates the subscription's record. |
Remove Stripe
First remove any buttons or logic that use StripePaymentService, so nothing in your app still points at Stripe. Then turn Enabled off. Nowa takes the Stripe settings and StripePaymentService out of your app.
Nowa also undoes the changes Stripe made to your Android and iOS app settings, such as Apple Pay, but in Nowa 3.13 only if you ran Deploy Configuration since you last opened the project. If you didn't, those settings stay. Ask Nowa AI in Agent mode to clean them up, for example: "Remove the Android and Apple Pay settings Stripe added to my app." Then run your app on a device to check it still starts. People who code can follow the checklist in What Nowa adds to your code.
The iOS Camera permission (Settings → General → Permissions) and your values in Constants stay. Your Supabase project isn't touched. Delete its tables, functions and secrets yourself if you no longer need them.