Run on a device or emulator
Seeing your app on a real phone is the best test there is. Run it on your own phone, an Android emulator, the iOS Simulator or your computer, and you see how it really looks and feels there. It updates every time you save, so you can tweak a screen in Nowa and check it on the phone a moment later.
Desktop appIt works for cloud projects and local projects alike. The first run needs a little setup on your computer, and this page walks you through it.
What your computer needs
Nowa builds your app on your own computer with a few free tools. You don't need to learn any of them: Nowa runs them for you in the background, and it can install Flutter and the Android tools for you.
| Tool | What it is | Do you need it? |
|---|---|---|
| The Nowa desktop app | Nowa in its own window, for macOS, Windows and Linux. | Yes. The web app can't reach the devices on your computer. |
| Flutter | Google's free toolkit that turns your project into a real app. Nowa uses it to build your app and start it on the device. | Yes. Nowa can download it for you. |
| Android toolchain | Google's tools for building Android apps. They're also what notices your Android phone when you plug it in. | For an Android phone or emulator. Nowa can download it for you. |
| Android emulator | A virtual Android phone in a window on your computer, so you can test without a real phone. | Optional. Nowa can set one up for you. |
| Xcode | Apple's free app for building iPhone, iPad and Mac apps. It includes the iOS Simulator, a virtual iPhone on your Mac. | For an iPhone, an iPad or the iOS Simulator. Mac only. |
| Android Studio | Google's app for Android developers. | Optional. Use it to create more emulators, such as a tablet or an older Android version. |
Your computer itself also shows up as a device, which runs your app as a desktop app. That needs your system's own build tools: Xcode on a Mac, Visual Studio with Desktop development with C++ on Windows (Visual Studio, not VS Code), or a few build packages on Linux. Flutter's Windows and Linux guides list them. For phones, emulators and Chrome, the tools in the table are all you need.
Set up your computer
- Install the Nowa desktop app and sign in.
- On a Mac, install Xcode from the Mac App Store, then open it once so it can finish setting up. On that first launch, Xcode lists the simulators it comes with and the ones you can download. If iOS isn't built in, download it there, or later under Xcode → Settings → Components with Get. See Install Xcode first.
- In Nowa, open Local Setup: in a project, click the arrow next to Run, then Local environment settings. Click Set up automatically, tick the box that accepts the licenses, and click Install next to Flutter. Nowa downloads Flutter for you.
- Click Next. To test on Android, click Download next to "Android isn't set up" on the Verify step, then install the Android toolchain. Want an emulator too? Install the Android emulator right after it, on the same screen: in Nowa 3.13 that screen doesn't come back once the toolchain is installed.
Set up Flutter walks you through every screen of the setup. You don't have to do it ahead of time, though: if Flutter isn't set up when you pick a device, Nowa opens Local Setup for you.
No desktop app?
In the web app, the Run on menu has no devices: its row reads iOS & Android devices with "Download the desktop app". You can still see your real app on your phone, with no setup at all.
- Click Run. The Embedded preview builds your app and shows it in a phone frame. See Run your app.
- Once the app is running, click Open on Mobile (the QR icon) in the top bar. A Scan the QR code drops down.
- Scan the code with your phone's camera. The running app opens in your phone's browser.
This runs your app as a web app in the phone's browser, which is great for a quick look. To install the app itself on a phone, test a debug build on Android, or send an iOS build to App Store Connect and try it with TestFlight, Apple's app for testing apps before they're in the App Store. Both need a cloud project on a paid plan.
Run on a device
- Click the arrow next to Run to open the Run on menu.
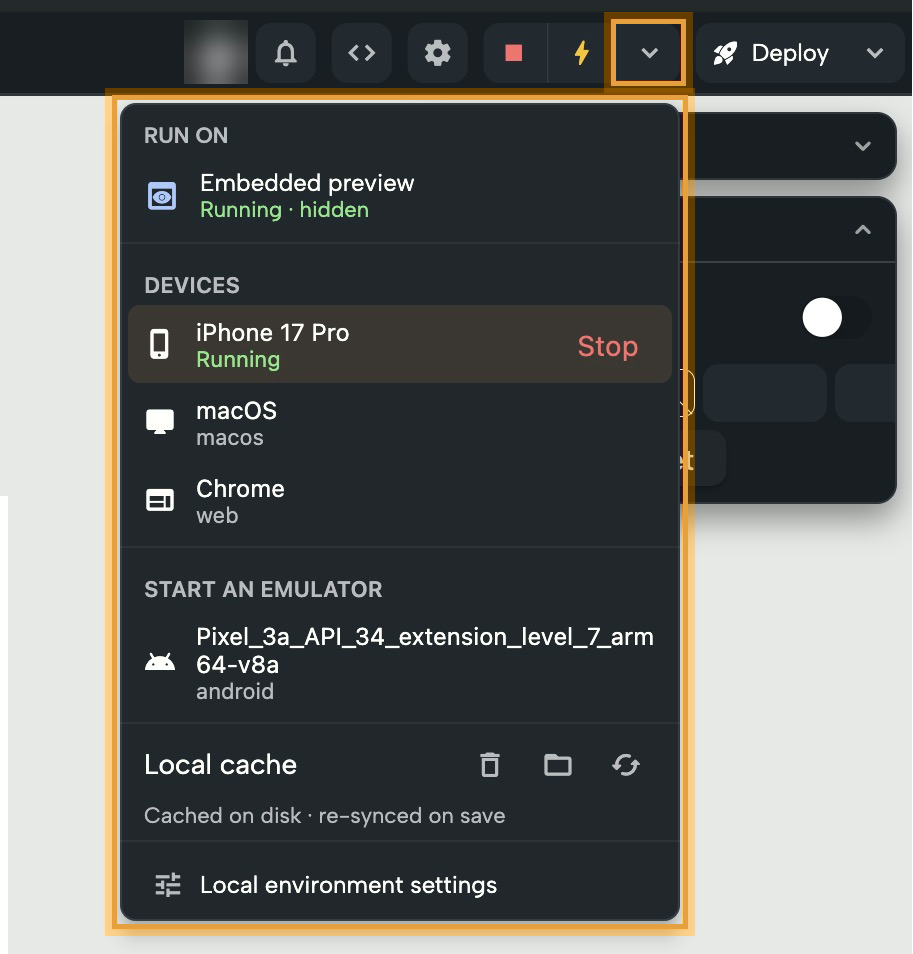
- Look under DEVICES. Nowa lists everything Flutter can run your app on right now: a phone you plugged in, an emulator that's running, a browser such as Chrome, or your computer itself. While it searches, you see "Looking for devices…". If it says "No devices connected", plug in a phone or start an emulator.
- Click your device. Nowa builds your app and starts it there. From then on, Run shows the device's name, so one click runs it on the same device again.
- Wait for the first build, which is the slowest. The top bar shows a spinner and a Cancel button while it builds. Once the app is running, you see Stop, a lightning bolt (Hot restart) and an arrow (Run target).
- Change something in Nowa and save. The app on the device reloads with your change. If a change doesn't show up, such as a new theme color, click the lightning bolt to restart the app.
- Click Stop when you're done.
Is a device missing? In Nowa 3.13 the list doesn't always refresh, so a phone or emulator you started after opening the project may not show up. Open another project and come back to refresh the list.
If you unplug the selected device, Run goes back to the Embedded preview. Build and app messages go to the Logs tab of the Console, and if the run can't start, the Log panel opens by itself so you can see why. See Read the logs. Nowa AI can read those logs too: in Agent mode, try "The app closes when I tap Book on my phone. Check the logs and fix it."
Start an emulator or simulator
An emulator is a virtual phone that runs in a window on your computer. Apple calls its version the iOS Simulator. Emulators are a quick way to try your app on Android and iPhone without owning both.
The Run on menu lists the emulators Flutter knows about under Start an emulator (shown as START AN EMULATOR). That's the Android emulator Nowa set up for you (its name starts with "Nowa"), any you made in Android Studio, and, on a Mac with Xcode, iOS Simulator. One that's already running shows under DEVICES instead.
- Click an emulator. It opens in its own window.
- Wait for it to show up under DEVICES. Nowa then picks it as your run target.
- Click the run button, which now shows that device's name.
No emulators listed?
When there are no devices and no emulators to start, the menu says "No devices connected. Plug in a device or set up an emulator." Here's how to get one:
- Android, the quick way: install the Android emulator in Nowa's automatic setup, on the screen where you install the Android toolchain (its Install unlocks once the toolchain is in). Nowa then creates a virtual Android phone for you. In Nowa 3.13 that screen only opens while the toolchain is missing, so if you already have it, create an emulator in Android Studio instead.
- More Android models: in Android Studio, open Device Manager (on the welcome screen: More Actions → Virtual Device Manager), click Create Device, pick a phone or tablet and a system image (the Android version it runs), and click Finish. If Nowa installed your Android toolchain, an emulator you make in Android Studio may not show up under Start an emulator. Start it from Android Studio's Device Manager with Launch instead: once it's running, it shows under DEVICES. See Android's guide to virtual devices.
- iPhone and iPad: iOS Simulator shows up once Xcode is installed and set up. To choose another model or iOS version, open Xcode's simulators yourself. In Xcode 27 they live in Device Hub (Xcode → Open Developer Tool → Device Hub), and earlier versions use the Simulator app. See Apple's guide to Device Hub.
If a run on the iOS Simulator or an iPhone stops with a message about CocoaPods, your Mac needs one more free tool. CocoaPods adds the iPhone side of your app's packages, the ready-made add-ons for things like maps or sign-in. Flutter's iOS setup guide shows how to install it.
Run on your Android phone
Your own phone shows your app as your users will see it. Android asks you to flip one switch first, so your computer is allowed to install apps on it. You only do this once. Make sure the Android toolchain is installed on your computer too (see What your computer needs).
- Turn on Developer options. On the phone, open Settings → About phone and tap Build number seven times, until you see "You are now a developer!". Some phones tuck Build number away, for example under Software information on Samsung phones.
- Go back to Settings, open Developer options (on Android 9 and later, it's under System → Advanced) and turn on USB debugging.
- Connect the phone to your computer with a USB cable.
- When the phone asks whether to allow debugging from this computer, accept. Until you do, Nowa can't see the phone.
- In Nowa, open the Run on menu. Your phone shows under DEVICES. Click it, and Nowa installs your app on the phone and opens it.
On Windows, a phone that doesn't show up may need its maker's USB driver: see Android's Install OEM USB drivers. Android's Run apps on a hardware device has more help.
Run on your iPhone or iPad
An iPhone takes more setup than an Android phone, because Apple only runs apps that are signed with an Apple Account (signing proves who made the app). That one-time setup happens in Xcode, so it suits people who are comfortable there. If that's not you, there are easier ways to see your app on an iPhone: the iOS Simulator, or, for a cloud project, Open on Mobile (No desktop app?) or a TestFlight build (Publish to iOS).
If you're comfortable with Xcode:
- Connect the iPhone to your Mac with a cable. When it asks whether to trust this computer, tap Trust.
- Turn on Developer Mode in Settings → Privacy & Security, and tap Restart. After the restart, tap Enable and enter your passcode. If the switch isn't there, open Xcode with the phone connected and unlocked, and it appears.
- In Xcode, add your Apple Account under Xcode → Settings → Apple Accounts. Then open your app's iOS project and choose your account as the team under Signing & Capabilities. A free Apple Account works for testing on your own phone.
- In Nowa, click the iPhone under DEVICES.
- If the app doesn't open on the phone the first time, trust your developer certificate on it: in Settings, open VPN & Device Management, tap the certificate under Developer App and tap Trust.
For details, see Apple's Running your app on simulated or physical devices and Flutter's iOS setup guide.
Run a cloud project on a device
Cloud projects run the same way. Behind the scenes, Nowa keeps a temporary copy of your project on your computer and runs that copy, so there's nothing for you to download or manage.
- The first run downloads the project, so it takes longer. The top bar shows each step, from "Saving project…" to "Syncing files…", with a Cancel button. A first build for the iOS Simulator can take a couple of minutes.
- After that, Nowa skips the download and only syncs your project's files, so later runs start faster.
- The Local cache row in the Run on menu shows where the copy stands: "Created on the first device run" or "Cached on disk · re-synced on save".
When a copy exists, the Local cache row shows three icon buttons. Hover one to read its name.
| Action | What it does |
|---|---|
| Clear the local cache | Deletes the copy and its build files. Stop the app first. The next device run downloads everything again. |
| Show in folder | Opens the copy's folder on your computer. |
| Re-download everything and run again | Replaces the copy with a fresh download, then runs again. Use it after big changes, such as adding a package that needs extra setup on the phone. |
Nowa removes copies you haven't used for 14 days, so they don't pile up on your disk. Local projects need no copy: they run straight from your project folder.
To change your Flutter setup later, click Local environment settings at the bottom of the Run on menu.
Next steps
- Run your app: run inside Nowa, no device needed.
- Find and fix problems: see why a build or run failed.
- Work with local projects: keep your project in a folder on your computer.