Connect a REST API
Lots of services share their data through an API: a weather service, a shop's product list, your own server or a backend tool like Xano. Connecting one lets your app show that live data and send things back, like a new order or a message. In Nowa you group the requests for each API into a collection, try each one on the spot, and turn its answer into a model your widgets can use.
Already have a Swagger, Postman or cURL description of your API? Import it instead of building requests by hand.
How an API request works
You'll meet a few words on this page and in your API's own documentation. Here's what they mean:
| Word | What it means | Example |
|---|---|---|
| Request | One message your app sends to the API. In Nowa, each request becomes a step you can use on screens and in logic. | "Give me today's forecast" |
| Base URL and endpoint | The base URL is the API's main address. The endpoint is the part after it that points at one thing. | https://api.example.com and /products |
| Method | What the request does: GET reads, POST sends something new, PUT and PATCH change something, DELETE removes it. | GET /products lists the products |
| Header | An extra line of information sent with the request, written as a key and a value. | Accept: application/json asks for JSON |
| API key or token | A password-like code that tells the API who's asking. It usually goes in a header. | Authorization: Bearer abc123 |
| Body | The data a request sends along. | A new to-do item |
| JSON | The text format most APIs use: names and values in curly braces, lists in square brackets. | {"title": "Buy milk", "done": false} |
| Response | What comes back: a status code that says how it went, and usually some JSON. | 200 and a list of products |
| Parameter | A value that changes from one call to the next. | The word someone searches for |
Create a collection
A collection holds all the requests for one API, so they can share its address and settings.
- Click Api in the left sidebar. The Collections panel opens.
- Click + (Add Collection), then New Collection.
- In the Create New Collection dialog, delete the suggested name (
ApiCollection) and type your own, such asWeather. Below the name, Nowa shows the Class name, which is the name you'll pick in Circuit, and the Path, where the collection is saved in your project. - Click Submit. The collection appears in the panel, ready for its first request.
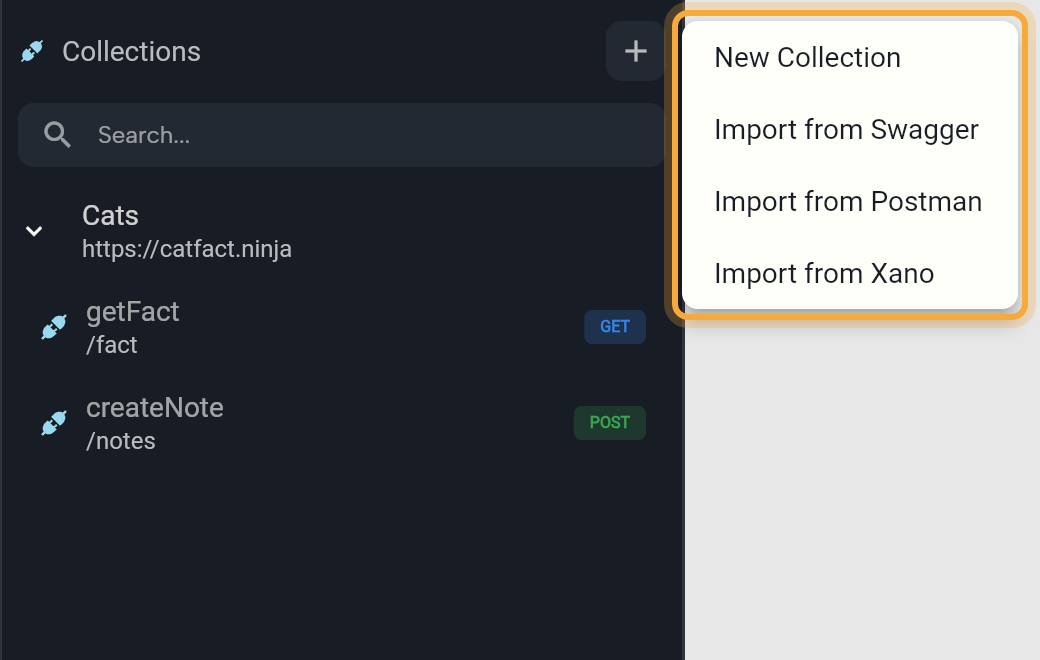
You can also use API Collection... in the Add (+) menu of the Library. Working in the code? See What Nowa adds to your code.
Set the base URL, headers and sign-in
Hover the collection and click the gear icon. Whatever you set here applies to every request in the collection, so you only type it once.
| Setting | What it does |
|---|---|
| Name | Renames the collection. |
| Base URL | The start of every address, for example https://api.example.com. Your requests then only need the endpoint. |
| Auth Key | The name under which your app saves each user's sign-in token on their device. Leave it empty if the API doesn't use user tokens. |
| Headers | Click Add header for headers every request needs. Type the header's name under KEY and its value under VALUE. |
For example, many APIs answer in JSON when you add the header Accept with the value application/json. Changes save when you leave a field. Click Close when you're done.
Use Auth Key when each person who signs in to your app gets their own token, for example from your login request. Save that token on the device right after sign-in with the SHARED PREFERENCES → set step in Circuit, using the same Key and the Type string (see Save values on the device). From then on, every request in the collection sends it as Authorization: Bearer followed by the token, the format most APIs expect.
Add an API key or token
Most APIs want to know who's calling. Their documentation tells you what to send, usually a header such as Authorization: Bearer YOUR_KEY. The text before the colon is the header's key, and the text after it is the value.
- One key for your whole app, from the API provider: add it as a header on the collection (gear icon → Add header), with
Authorizationunder KEY andBearer YOUR_KEYunder VALUE. Every request then sends it. For a single request only, add it in that request's Headers tab instead. - A token for each signed-in user: use Auth Key (see above).
The Base URL and every header value you type, on the collection or a single request, are saved in your app's code and ship inside your app, where anyone who has it could dig them out. That's fine for keys meant to be public, but a secret key, such as one that's billed per use, belongs on a server. Auth Key is only a name, so it puts no token in your app.
To keep a secret key on a server with Supabase, ask Nowa AI in Agent mode with the Supabase connector on: "Move this API call into a Supabase edge function that keeps the API key on the server, and call that function from my app." The key then goes on your Supabase project's Edge Function Secrets page instead of into your app (see Manage your Supabase backend). Try the screen with Play afterwards to check that the answers still arrive.
Add a request
- Hover the collection, click +, then New Request.
- Delete the suggested name (
newRequest), type yours and click Create. Nowa shows the function name it makes from it, such asgetCats. The request appears under the collection. - Click the request. It opens in a panel at the bottom of the editor.
- Pick the method, such as GET, POST, PUT, DELETE, PATCH or HEAD, and type the endpoint. With a base URL set, you only type the rest of the address, for example
/v1/items. - To send headers with this request only, open the Headers tab and click Add header. Headers from the collection are listed there too, read-only.
- To send data, open the Body tab and choose a body type.
| Body type | Use it for |
|---|---|
| none | Requests without a body, such as most GET requests. |
| JSON | Data as JSON, which is what most APIs expect. Hover the status icon in the corner to see Valid JSON or Invalid JSON. Nowa saves the body only while it's valid. Click ⋮ for a row of buttons (point at one for its name): Wrap (line wrapping on or off), Compress (one line), Prettify (indented) and Copy. |
| raw | Plain text or another text format the API asks for. Pick Text, XML or HTTP next to it. |
| form-data | Form fields and files. Click Add + for each field, give it a key and pick a type: String (text), int (whole number), double (decimal number), bool (yes or no) or MultipartFile for a file. Connect links a value to a parameter. A file field has Filename and Bytes instead of a single value. |
| x-www-form-urlencoded | Data the way classic web forms send it. You write the body in the same editor as JSON, with the same validity check. |
Choosing a body type also sets the content type for you (the header that tells the API which format you're sending), and replaces the current body with a fresh one. You won't see that header under Headers.
Send values that change
Use a parameter for anything that changes between calls, such as a search word or the text someone typed.
- In the right panel, point at Params and click the + that shows up. A new text parameter named
paramappears. Click it to rename it or change its type under Edit parameter. - In the address, type
$and pick the parameter. For a search, write it into the address, for example/search?q=${query}. - In a JSON body, drag the parameter's chip from Pass Parameters in Body onto a value, or type
${query}yourself.
A quick way to write the body: copy the example from your API's documentation, paste it into the JSON editor and swap the values that change for your parameters. Params are all of your request's inputs, so there's no separate tab for search words.
{
  "title": "${title}",
  "done": false
}
Rename, remove and search
- Rename a request: right-click it in the Collections panel and choose Rename. The name turns into a text box. Type the new name and press Enter.
- Remove a request: right-click it and choose Remove. It goes right away, without a question.
- Remove a collection: right-click it and choose Remove. If something in your app uses the collection, Nowa lists those places first (Cancel or Remove). Then it asks Are you sure you want to delete "cats.api.dart"?, naming the collection's file, with Cancel and Yes.
- Search: type in the Search... box at the top of the panel. It filters the requests of every collection by name or endpoint.
Test a request
Testing sends the request for real, right from the editor, so you can check the answer before you build a screen around it.
- Click Test next to the address. The panel switches to the test view. Nothing is sent yet.
- Fill in Testing values for each parameter. If the collection has an Auth Key, paste a token in Auth token value. Nowa keeps that token for testing only, not in your app.
- Click Run Test.
- Check the result. The header shows the full address and the status. Under Body, switch between Json (the raw answer) and Object (what the request hands to your app, such as your model with its fields). Headers lists the response headers.
The status tells you how it went: 200 means it worked, 401 means the API doesn't know who's asking (the key or token is missing or wrong), 403 means your key isn't allowed to do this, 404 means the API found nothing at that address, and 500 means the API's server ran into a problem.
If the body has a file field (MultipartFile), the right panel also shows Upload File. Pick the file to test with. Nowa uses it for this test only.
Click Back to Request to return to the editor. To test faster, hover a request in the Collections panel and click the play icon (Run Query). It opens the test view and sends the request at once.
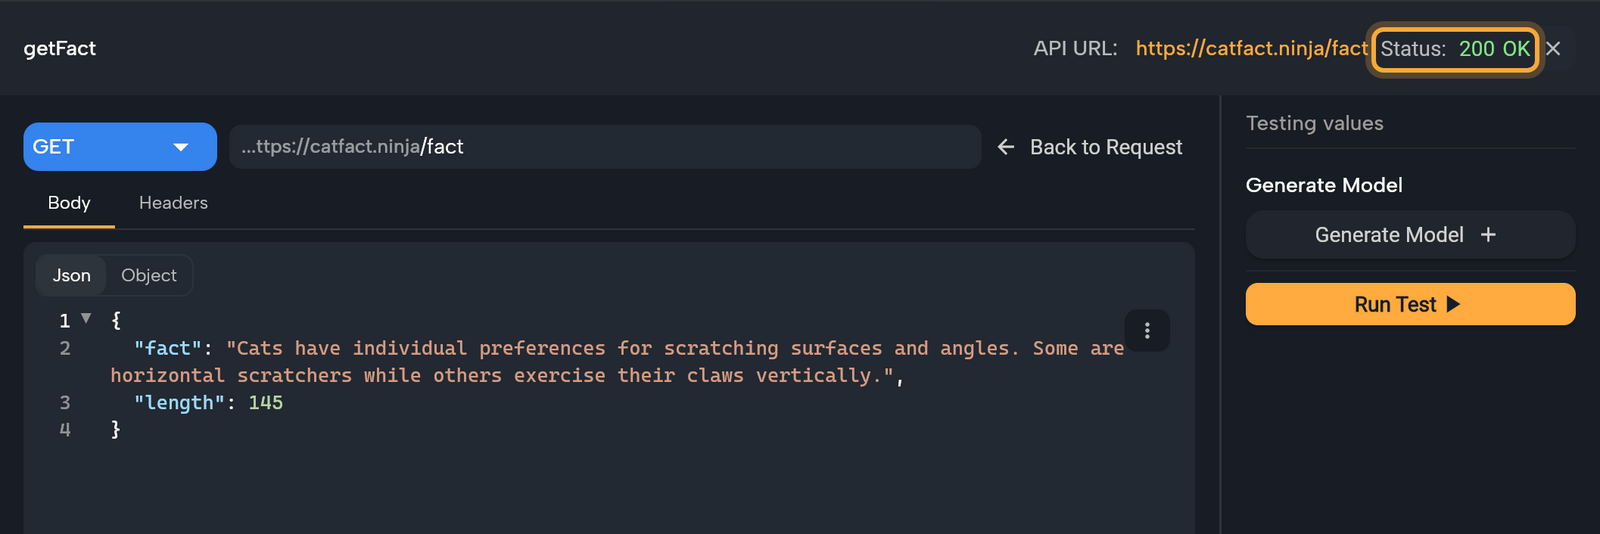
If a test works in the desktop app but fails in the web app, see API requests blocked in the browser.
Turn the response into a model
An answer often holds much more than you need. A model keeps the parts you pick and gives them names, so your widgets can show title or price instead of raw JSON. It also lets the board show placeholder values shaped like your data.
- Run a successful test, then click Generate Model in the right panel. The answer is already in the Content step. Click Next.
- In Select Data, untick the fields you don't need. Click Next.
- In Generated Models, check the Name and the Path (the folder where the model is saved). Click Save.
The request now returns the model. Click Back to Request: the Model row in the right panel shows its name. Generate Model is hidden when the last test failed.
Click the button next to Model for more choices:
- Generate from Schema: paste JSON yourself and build a model from it, without a test.
- Select Model: pick an existing model or a basic type.
- Return as Response Object: go back to the plain response. It appears once the request returns a model or a basic type.
Use a request in your app
- Show it on a screen: wrap a widget in a Data Builder and choose the source API Request. See Show data in your UI.
- Call it from logic: add it as a step in Circuit, for example when someone taps a button. Circuit lists your collections in your app's own category, named after your package (for example PACKAGE:MY_APP). The example below walks through it. See also Respond to taps and other events and Build logic in Circuit.
Example: send what someone types and show the answer
Say your app has an "Ask a question" screen that sends what someone types to an AI service and shows the reply. The same steps work for any request that sends data, such as a contact form or a new order.
- Set up the request first: method POST, the endpoint, the API key header, and a parameter named
questionplaced in the JSON body where the text goes, such as"content": "${question}". Test it with a sample question, then generate a model from the answer. - On your screen, add a Text Field for typing and a Button to send. Nowa links the text field to a variable named
textthat holds what's typed. See Text fields and forms. - Select the button. In Details, click the button next to On Pressed to open Circuit.
- Hover the dot under the top node and click +. Search for your collection's Class name and click it. Its requests are listed: pick yours.
- In Details, each parameter of the request has a field named after it. Click the Question label, open LOCALS and pick
text(your text field's variable), thentextagain (what's typed in it). The request now sends whatever was typed. - Still on the request step, turn on await and set Store result to New Variable. The answer lands in
var1as soon as it arrives. See Wait for a result. - Add a
showDialogstep below it. In its Builder row, click the brush next to AlertDialog (tooltip Edit AlertDialog), then the brush next to Title, the dialog's "Hello World" text (see Show a dialog). Click its Text label, open LOCALS and clickvar1. Your model's fields open next: pick the one that holds the reply, and click + to go deeper if it sits inside another field (see Reach deeper with +). - Click Play on the screen, type a question and tap the button. The reply opens in a dialog.
In Agent mode, Nowa AI can create a collection and request from a cURL command (the one-line example request many API docs show), test it and build the response model. Try: "Add an API request for this cURL command and show the results in a list: curl https://api.example.com/items".
Next steps
- Import an API from Swagger, Postman, Xano or cURL
- Show data in your UI
- Keys and constants