Build a complete app, start to finish
Go from one sentence to a published app with sign-in, a list and a detail screen. You'll build Recipe Box: people sign in, see a list of recipes and tap one to read it.
You'll build it the way most Nowa apps get built: ask Nowa AI for each piece, check the result, and fine-tune it visually. You never write code. Each step also shows how to do it yourself with the visual tools, so you understand what Nowa AI did and can change it. Swap in your own idea whenever you like.
Before you start
- A Nowa account, because Nowa AI needs one. See Create your account.
- A Supabase account. Supabase is the online service that will store your recipes and sign people in.
- To publish: a cloud project on a paid plan. See Get ready to publish.
1. Describe the app
On the dashboard, keep the Design chip and describe the whole app in the box under What do you want to build?:
A recipe box app. People sign in with email and password. The home screen lists recipes with a title and a short description. Tapping a recipe opens a detail screen with the ingredients and the steps.
Click the send button (tooltip Build it). Nowa AI designs the screens on your board with demo data. Answer any Questions card, then wait for Your app design is complete.
Design mode builds the look and flow only, so nothing works yet: no one can sign in and the recipes are made up. You'll make it work from step 3 on, one feature at a time, so you can check each piece. (Make it real on the design card is the shortcut: Nowa switches to Agent mode and starts with the feature Nowa AI recommends.) Unsure what to ask at any point? Switch to Plan mode: Nowa AI writes a plan you can review and changes nothing until you click Implement this plan.
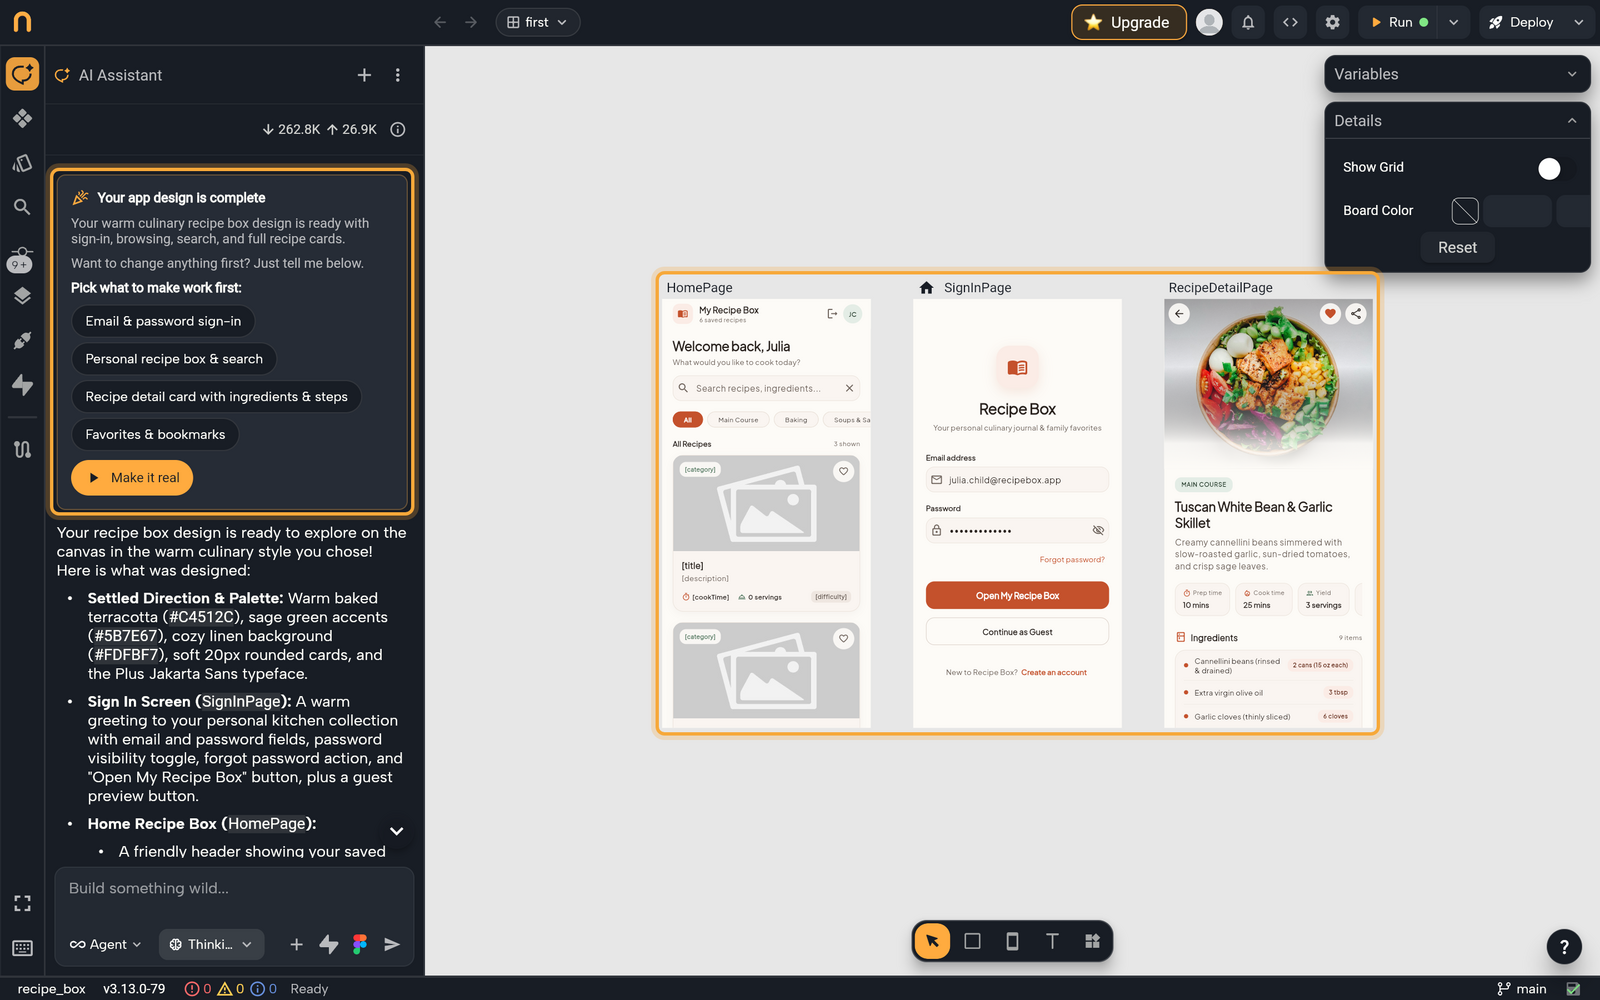
Details: Build your first app, Design, Plan and Agent modes.
2. Make it look like yours
- Open Themes, set your colors and text styles, and link your widgets to them. From then on, changing a theme color restyles every screen. Details: Create and edit themes, Use theme colors and text styles.
- Turn the recipe card into a component, so every card in the list is the same piece: select it, right-click and choose Create component. Name it
RecipeCard. Add the paramsid,titleanddescription(params are the values each copy receives, so every card shows its own recipe), and link the card's texts to them. Details: Build reusable components. - Set text fields and cards to Expand so they fill the width, then try the Size presets to see your screens at other device sizes. Details: Design for every screen size.
- Hover a screen's title and click Play to tap through it.
Prefer to ask? Select the card and tell Nowa AI in Agent mode: "Turn this card into a component called RecipeCard with id, title and description params, and use it in the recipe list." To check it, look for RecipeCard among the components in the Library.
3. Connect Supabase
Next, give your app somewhere to keep its recipes and accounts. This part happens in the Supabase panel, because you need to approve the connection yourself.
- Click Supabase in the left sidebar, then Connect.
- Approve Nowa in the browser window that opens.
- Click Create New Project and fill in the form to make a Supabase project for this app, or click Select next to one you already have.
Nowa sets up everything your app needs to talk to Supabase, including ready-made sign-up, sign-in and sign-out actions: signUp, signIn and signOut, listed under Authentication in the panel.
Nowa has no table editor, so ask Nowa AI to create the recipes table (or create it in Supabase yourself). Switch to Agent mode, click the Supabase icon in the chat field to turn on the connector, and ask:
Create a recipes table with a uuid id, a title, a description, ingredients and steps. Signed-in people can read it but not change it. Add three sample recipes.
A uuid is a long unique ID for each row. Read each action Nowa AI asks about, then approve it. "Signed-in people can read it but not change it" asks for Row Level Security (RLS): rules on the table that decide who can read and write each row. To check the result, click ⋮ in the Supabase panel, then Tables, and look for your recipes table.
Details: Connect Supabase, Connect Figma and Supabase to Nowa AI.
4. Add sign-in
First, create a test user so you have someone to sign in as:
- In the Supabase panel, click
signUpunder Authentication. Type an Email and a Password under Testing values and click Run. - Run
signInwith the same values, after you confirm the email if Supabase asks. It asks by default, and its built-in email sender only writes to your Supabase team's addresses, so use your own email here. See Decide whether new users confirm their email. The section now reads Testing as: and your email.
Then ask Nowa AI in Agent mode, with the Supabase connector on:
Make the sign-in screen work with Supabase: sign people in with their email and password, open the recipe list when it works, and show a message when it fails. Make the sign-in screen the first screen of the app.
To check it, hover the login screen's title, click Play, and sign in with your test user. Try a wrong password too: you should see a message that says what went wrong.
Or do it yourself:
- Use the login screen Nowa AI designed, or add the Authentication Template with the Screen tool. Its two screens, login and register, come without routes (the addresses that open screens in your app), so give each screen you use a route in the Router panel: see Give a screen a path.
- Select the login button and click the button next to On Pressed in Details. Circuit opens. Hover the dot under the top node, click +, search for
SupabaseService(the group that holds your Supabase actions) and picksignIn. - Link Email and Password to what people type: click each label, open LOCALS, pick the matching text field's controller (it holds what the user typed), then choose
text. - Signing in takes a moment, so the
signInnode has Future Options (a Future is something that finishes later). Select the node, find Future Options in Details and click + next to onValue, which runs when sign-in works. In the Circuit that opens, add a GoRouter node of typegowith the list screen's path in Location.goreplaces the login screen, so Back doesn't lead back to it. - Select the
signInnode again and click Edit next to onError, which runs when sign-in fails. Add Show snackbar so people see what went wrong. - Select the login screen and click Make home screen, so your app opens on it.
Want signed-in people to skip the login screen? Make the recipe list your home screen instead, then give its route Redirect Logic that sends everyone else to the login screen. See Start on the login screen or the home screen.
For a sign-out button, call signOut and open the login screen in onValue.
Details: Sign users in with Supabase, Start from a template, Navigate between screens.
5. Show the recipes
Now replace the made-up recipes with the real ones from your table. Ask Nowa AI in Agent mode:
Show the recipes from my Supabase recipes table in the home screen's list, one RecipeCard per recipe. Show a loading indicator while they load.
To check it, play the login screen, sign in with your test user, and look for your three sample recipes in the list.
Or do it yourself:
- In the Supabase panel, click + next to Generate a Query, then Query Templates. If it says No Tables Found, click Fetch Tables. Choose Get All Records, pick your recipes table, click Create new model class and Generate Function. A model describes one recipe's fields, so Nowa knows each recipe has a title, a description and so on. Repeat for Get Record by ID and pick your model under Use Existing Model. Nowa names each function after its action and your table, so a
recipestable givesgetAllRecipesandgetByIdRecipes. - Make sure Testing as: shows your email, then click
getAllRecipesand Run. The result lists your sample recipes, so you know the query works before you build on it. - Select the recipe List View (or add one), click Add Wrapper and choose Data Builder, the wrapper that loads data and shows it when it arrives. Set Source to Supabase and Query to
getAllRecipes. - Select the List View. If Type shows Normal, choose Builder, so the list makes one row per recipe. Click List, open LOCALS and pick
data, the recipes the Data Builder loaded. - Set Item Builder to
RecipeCardwith Pick Widget, then link each of its params to the matching field ofelement, the recipe that row shows.
The Data Builder shows a progress circle while it loads and the error if the call fails.
Details: Read and write Supabase data, Show data in your UI, Lists and grids.
6. Open the detail screen
The last piece: tapping a card opens that recipe. Ask Nowa AI in Agent mode:
When someone taps a recipe card, open the detail screen for that recipe and load its ingredients and steps from Supabase.
To check it, play the login screen, sign in and tap a recipe card: the detail screen should show that recipe. If something's off, the Problems count in the status bar is the first place to look.
Or do it yourself:
- Give the detail screen an
idparam, so it knows which recipe to load. Its Type must match theidthatgetByIdRecipestakes: keep String (text), the default, because the table'sidis a uuid. If the types differ, Problems shows an error. - Open the Router panel and select the detail screen's route (if it has none, see Give a screen a path). Type
/recipe/:idin Path and press Enter. The:idpart is a placeholder, so every recipe gets its own address. Then drag theidchip onto the screen'sidparam under Screen Parameters. - Open
RecipeCardon its own: in the Library, double-click it, or select it and press Enter. Select its main widget, click Add Wrapper and choose Gesture Detector, which makes any widget react to a tap. - Click the button next to On Tap and add a GoRouter node of type
push.pushopens the detail screen on top of the list, so Back returns to it. Type/recipe/in Location, then type$(it lets you insert a value) and pick theidparam, so each card opens its own recipe. - On the detail screen, wrap the content in a Data Builder with Source set to Supabase and Query set to
getByIdRecipes. Link itsidinput to the screen'sidparam, then show the fields ofdata.
Details: Open a detail screen when a list item is tapped.
7. Test it
- Hover the login screen's title and click Play. Sign in, open a recipe and go back.
- Click Run to try the real app in a phone frame. The red number in the status bar counts the errors in Problems. If you see one you don't understand, ask Nowa AI in Agent mode: "Check my project for problems and fix them."
- Try it on a phone. In a cloud project, Open on Mobile shows a QR code. In the desktop app, pick your device in the Run on menu.
Details: Preview and test, Run on a device or emulator.
8. Publish
Cloud projects Paid plansFirst, set the basics in Settings → Project Details: App Name, Bundle Identifier (your app's unique ID in the stores, such as com.yourname.recipebox: replace the com.example start), Build version, Build number and App Icon. Under Permissions, switch on what the app needs.
- Web: click Deploy, then Deploy on the Web row. Nowa builds the site and shows its address, ready to share.
- Google Play: open Settings → Deployment → Android. To test, turn on Debug mode and click Build for an
.apk, a file you can install on an Android phone. For the store, turn Debug mode off, click Generate for a signing key (it proves that every update comes from you), download the key and keep it safe, click Build, then upload the.aab, the file Google Play asks for, in Google Play Console. - App Store: open Settings → Deployment → iOS, save your App Store Connect credentials and a distribution certificate, then click Build. Nowa sends the build to App Store Connect, where you submit it for review.
Details: Publish to the web, Publish to Google Play, Publish to the App Store. Before you publish, work through the publish checklist.
Next steps
That's the whole loop, from the first prompt to a published app. Keep going:
- Let people add, edit and delete recipes once your table's rules allow it. Ask Nowa AI in Agent mode for the functions, or start from the Create Record, Update Record and Delete Record templates. The templates send every field, even empty ones, so on a table that fills in columns such as
idby itself, the Nowa AI way is often simpler. See Add a query from a template. - Polish the result with the Design tips, and keep your data safe with the Data and state tips.
- To update a published app, publish again. For Google Play and the App Store, raise Build number first. See Ship an update.
Working in the code? See What Nowa adds to your code.