Displaying API Response in the UI
In the previous sections, we covered how to:
- Create a collection and an API request.
- Generate a model from the API response by running a test.
Now, we'll move on to displaying the data retrieved from the API in your app's user interface (UI). In this example, we'll use the getAllPosts request to fetch all posts from a specific WordPress blog and display them in the UI.
Steps to Display Data in the UI
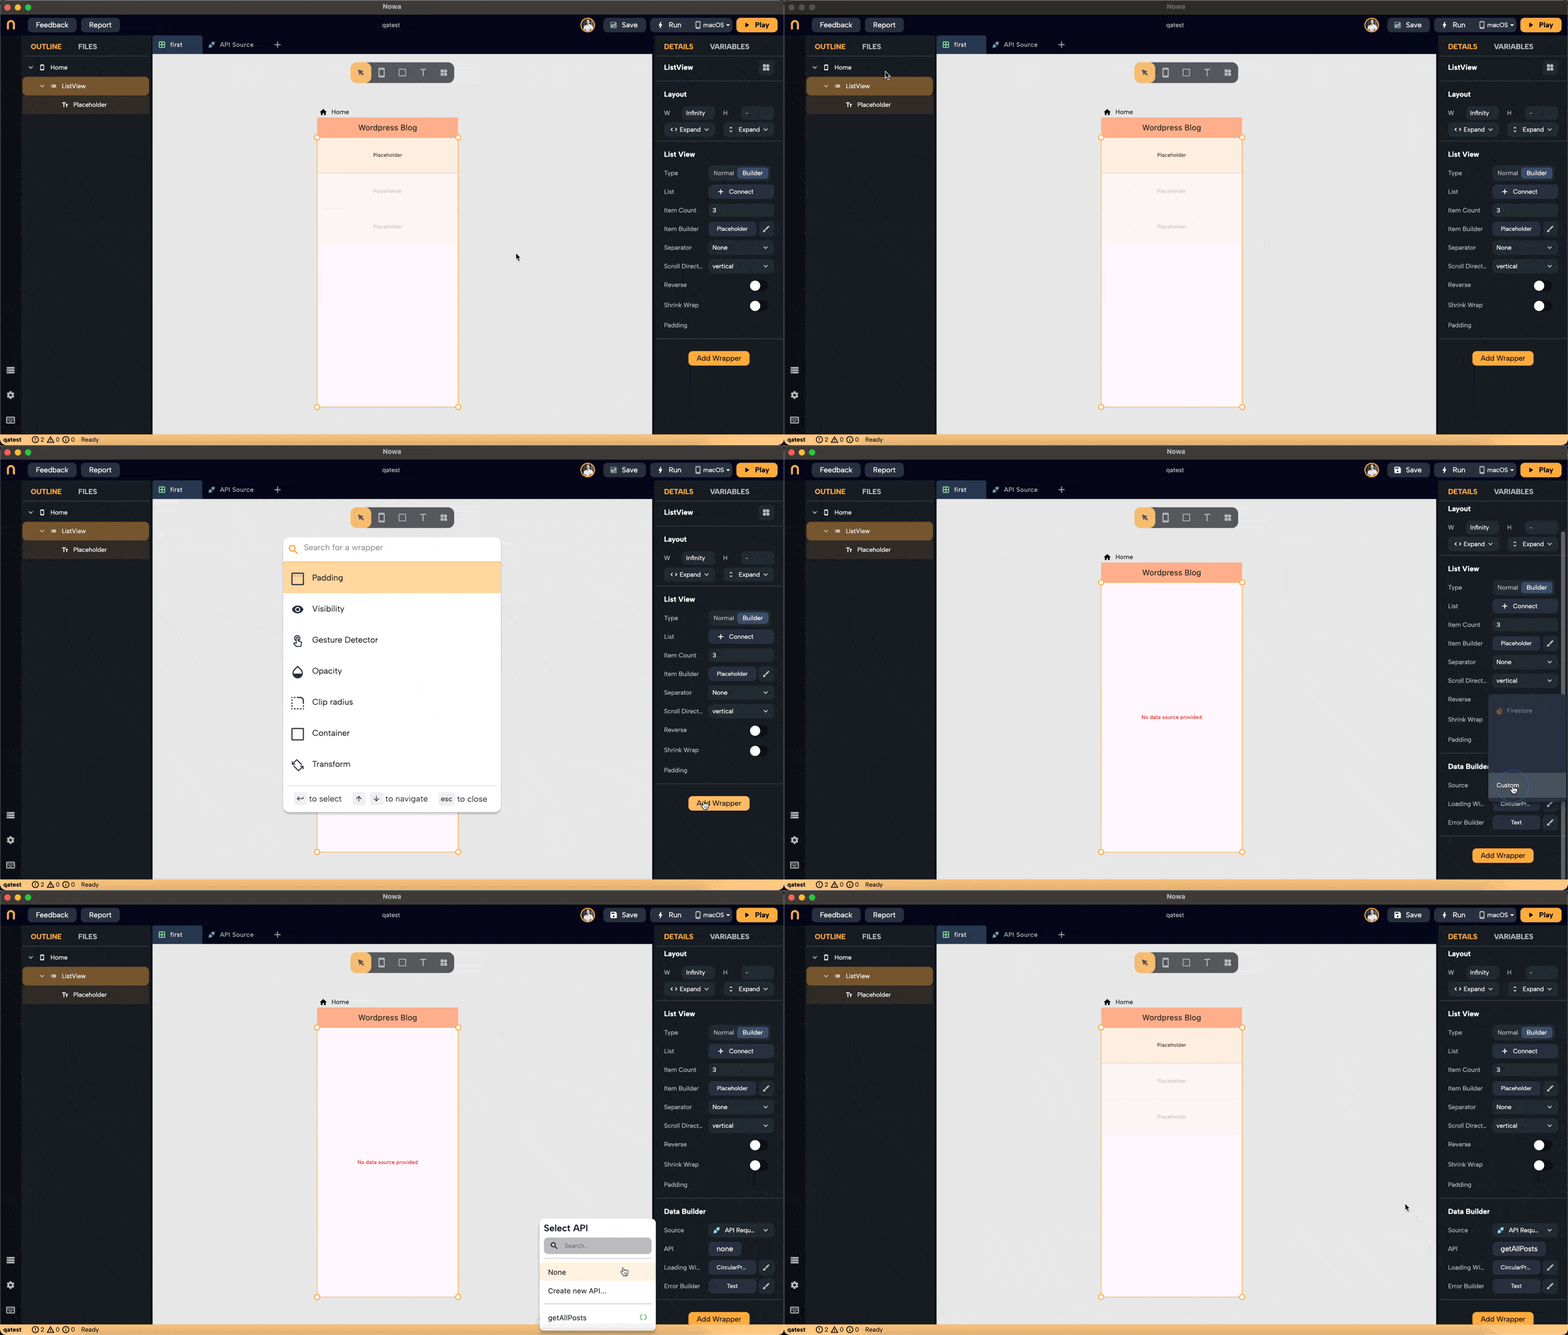
To display the API data in your UI, we'll use the Data Builder wrapper in Nowa. This wrapper allows you to inject the results of an API request into your widgets seamlessly.
1. Add a Data Builder Wrapper
What is a Data Builder?
The Data Builder wrapper is a tool that:
- Injects the results of an API request into the UI.
- Provides access to a variable called
datafor all widgets nested under it. - Automatically fires the API request when the screen loads.
- Displays a loading indicator until the data is received.
How to Add It:
-
Navigate to the UI Editor:
- Open the screen where you want to display the data.
-
Add the Target Widget:
- For this example, we'll display blog titles in a
ListView. - Drag and drop a
ListViewwidget onto your screen.
- For this example, we'll display blog titles in a
-
Wrap with Data Builder:
- Select the
ListViewwidget. - Click on
Add Wrapperin the widget properties panel. - Choose
Data Builderfrom the list of wrappers. - The
ListViewis now wrapped with a Data Builder, and widgets under it can access thedatavariable.
- Select the

2. Configure the Data Builder
-
Select the API Request:
- With the Data Builder selected, go to its properties panel.
- Under
Request Type, chooseAPI Request. - Select the
getAllPostsrequest from the list.
-
Understand the
dataVariable:- The
datavariable now contains the results of thegetAllPostsrequest. - Its type is
List<GetAllPostsModel>, which is the model we generated earlier.
Note: If you didn't generate a model, the
datavariable would be of typeResponse, a generic JSON model. It's recommended to generate a specific model for easier data handling. - The
3. Bind Data to the ListView
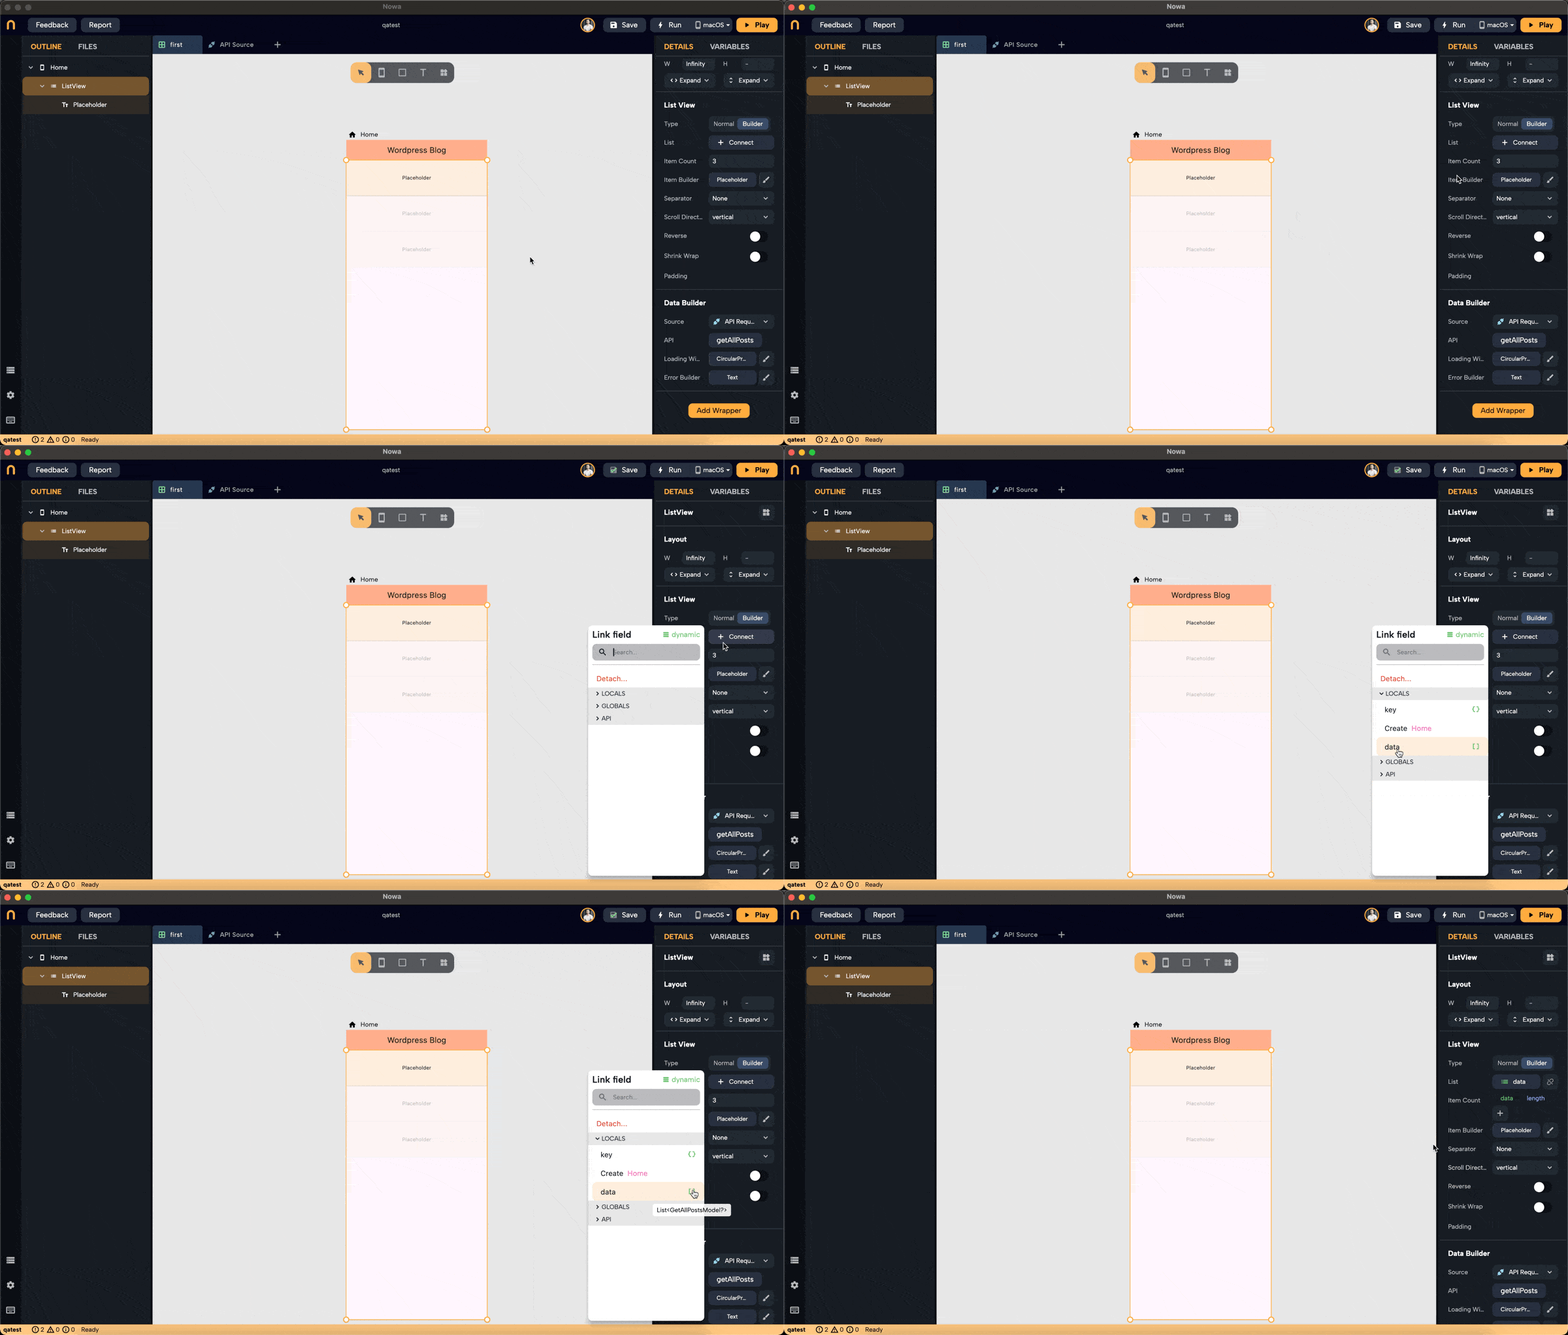
-
Connect the Data to the ListView:
- Select the
ListViewwidget. - In the properties panel, find the
Listproperty. - Bind the
Listproperty to thedatavariable from the Data Builder.
- Select the

-
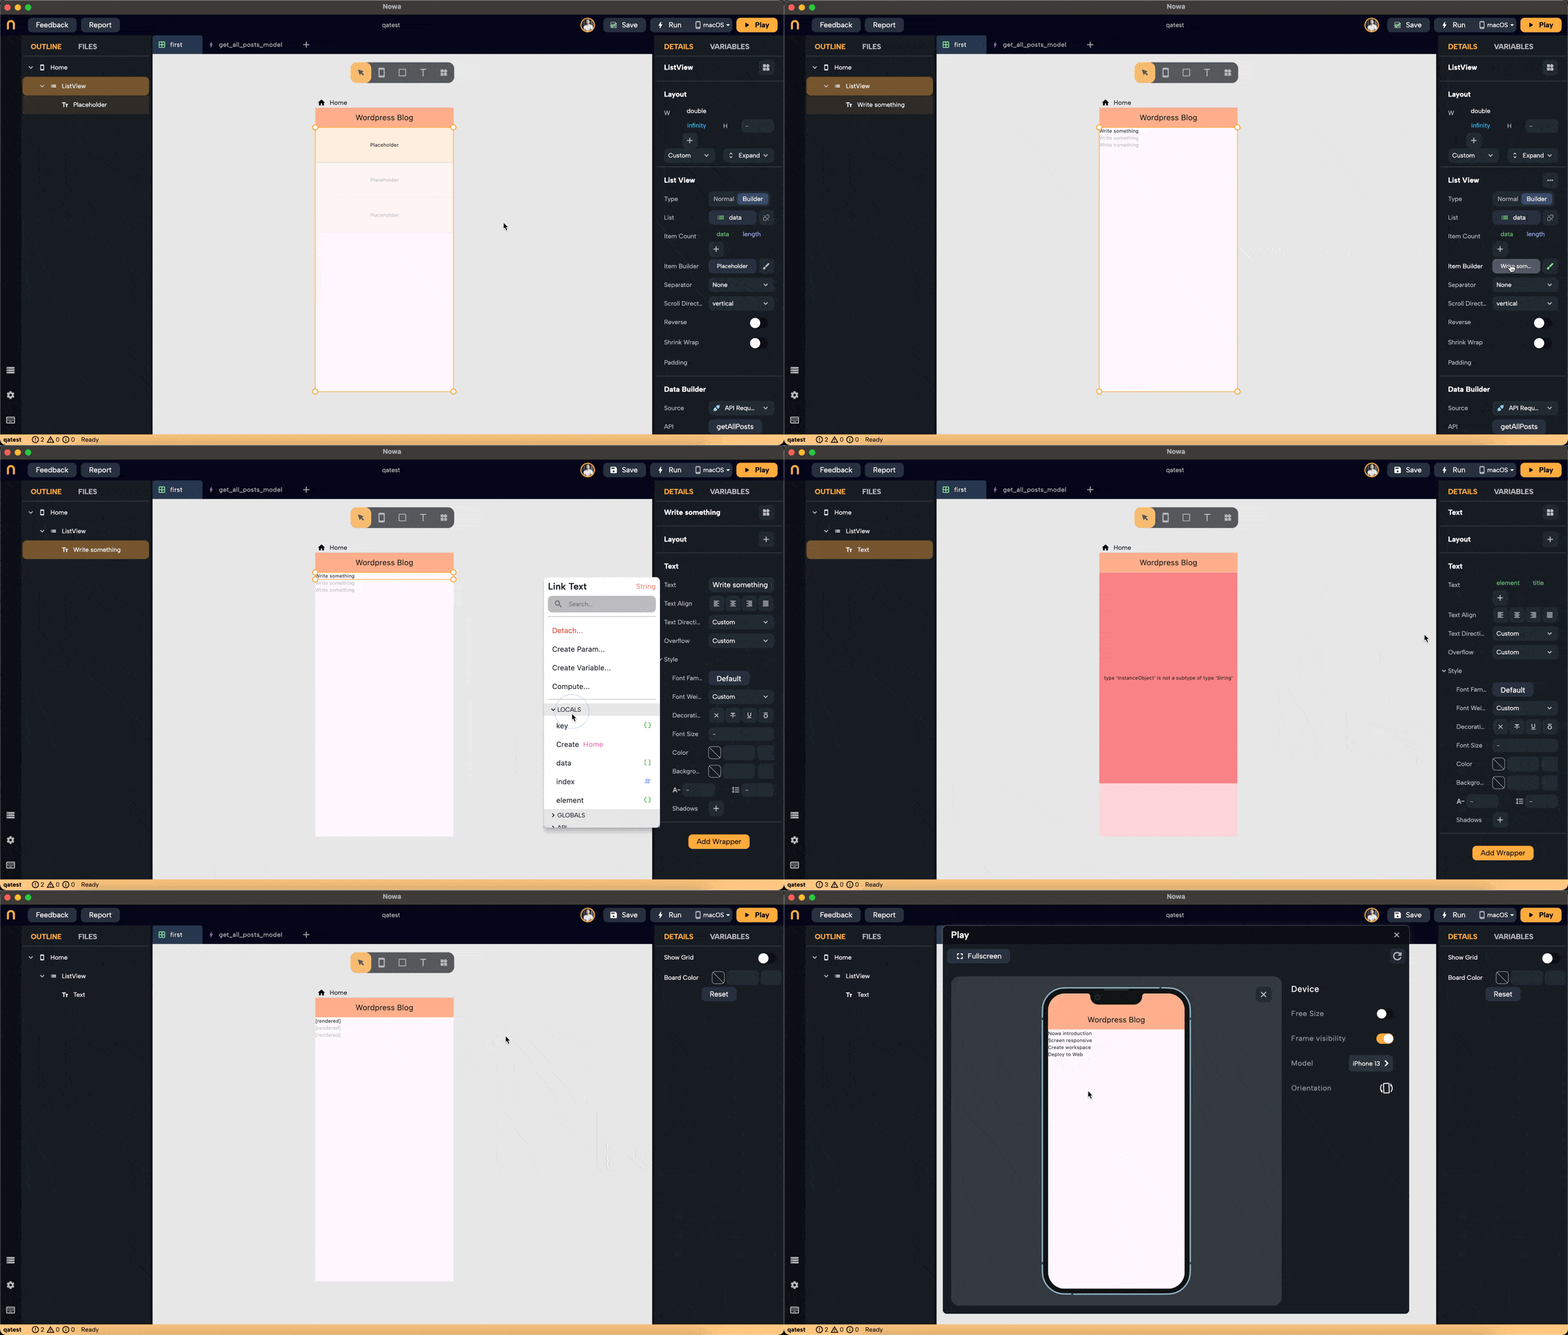
Set Up the Placeholder Widget:
- The
ListViewrequires a placeholder widget to represent each item in the list. - For simplicity, we'll use a
Textwidget as the placeholder. - Add a
Textwidget inside theListView.
- The
4. Display Data in the Placeholder Widget
-
Access Individual Elements:
- The
ListViewwill iterate over thedatalist. - Each item in the list is accessible via the
elementvariable. - The
elementvariable is of typeGetAllPostsModel, representing a single blog post.
- The
-
Bind Data to the Text Widget:
-
Select the
Textwidget (the placeholder). -
In the
textproperty of the widget, bind it toelement.title.rendered.How to Do This:
- Click on the binding icon next to the
Textproperty. - Choose
elementfrom the variables. - Navigate to
titleand thenrendered. - This path corresponds to how the model is structured.
- Click on the binding icon next to the
-
-
Preview the Data:
-
In the UI designer, you might see placeholder text like
[rendered]. -
This is due to the mock data generated when the model was created.
-
To see the actual data:
- Click on
Playto run the app in preview mode. - The
Data Builderwill fetch real data from the API. - The
ListViewwill display the actual blog titles.
- Click on
-

Understanding the Process
-
Data Flow:
- Data Builder Wrapper: Fetches data from the API and provides it to child widgets via the
datavariable. - ListView Widget: Uses the
datalist to create multiple instances of the placeholder widget. - Placeholder Widget: Displays individual data items by accessing properties of the
elementvariable.
- Data Builder Wrapper: Fetches data from the API and provides it to child widgets via the
-
Variable Types:
data: A list ofGetAllPostsModel.element: A singleGetAllPostsModelinstance within thedatalist.
-
Model Structure:
-
Each
GetAllPostsModelcontains:- A
Titleobject with arenderedstring. - A
Contentobject with arenderedstring.
- A
-
Tips and Best Practices
-
Generate Models for API Responses:
- Always generate a model for your API responses. This makes data binding easier and your code cleaner.
- If you see the
datavariable as aResponseobject, go back and generate a model, then reselect the request in the Data Builder to update thedatavariable.
-
Use Mock Data for Design-Time Preview:
- Nowa generates mock data automatically when you create a model.
- This allows you to see sample data in the UI designer without making actual API calls.
- Mock data helps in designing and testing the UI effectively.
Next Steps�
In the next section, we'll delve deeper into working with Mock Data. We'll learn how to customize mock data and use it to enhance the design and testing phases of your app development.
Proceed to the next section to learn more about using and customizing Mock Data in your app.