Integrating Stripe in Nowa
Accepting payments in your app is one of the most exciting milestones — it means your app is ready to generate real revenue. Nowa makes this possible by integrating directly with Stripe, one of the world's most trusted payment platforms.
This guide walks you through the full setup process, step by step, so you can start accepting payments with confidence — no deep technical knowledge required.
Are you a video type of person? Great, then check out this YouTube video to see quickly how to integrate with Stripe!
Before You Begin
Stripe in Nowa works exclusively with a Supabase backend. If you haven't set that up yet, make sure Supabase is connected to your project and that the Supabase MCP is enabled before proceeding. You can find instructions for that here.
Once that's in place, you're ready to go.
Even if you're managing Supabase yourself, enabling and deploying the Stripe configuration requires an MCP connection — Nowa uses it to automatically generate the necessary tables inside your Supabase project.
Step 1 — Enable Stripe in Your Project
Head to Settings → Stripe in your Nowa project and toggle Enable to turn on the Stripe integration.
This opens the Stripe configuration flow, which you'll complete over the next few steps.
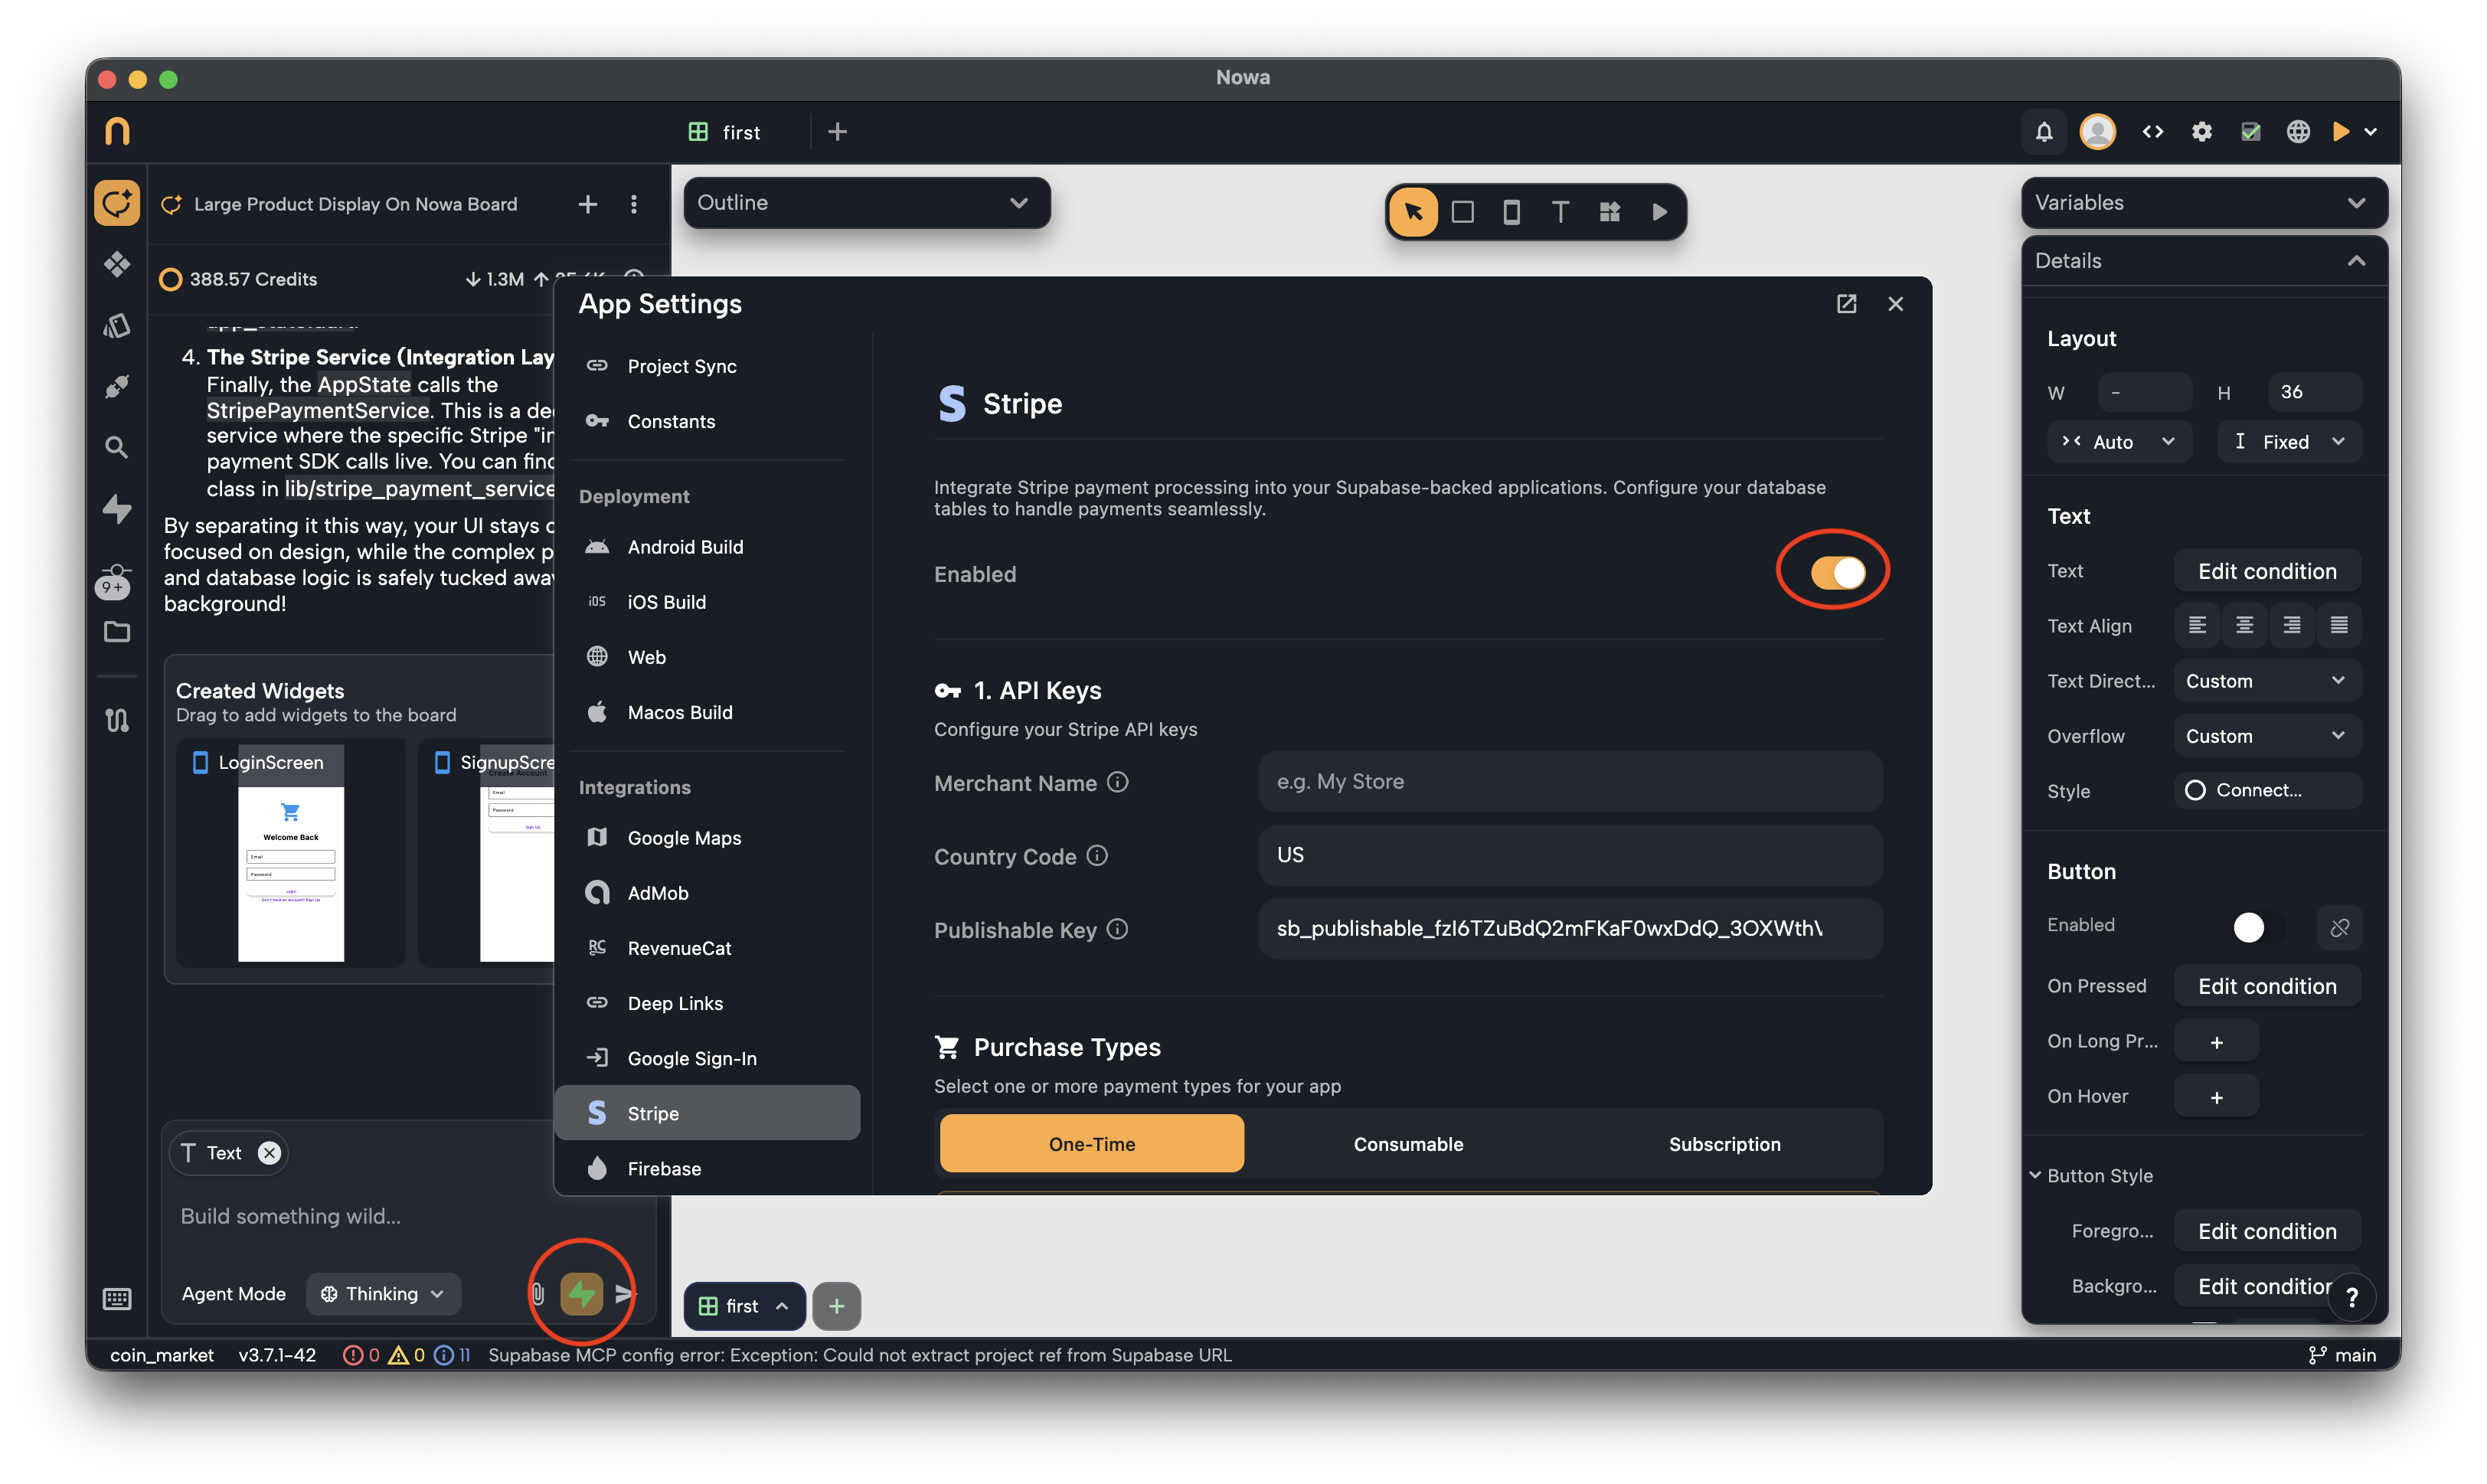
Step 2 — Enter Your Basic Business Information
No matter what type of payments you plan to accept, Stripe needs a few details about your business first:
- Merchant Name — The name of your business or app.
- Country Code — The two-letter code for your country.
- Publishable Key — Found in your Stripe Dashboard. It starts with
pk_.
In your Stripe Dashboard, go to Developers → API Keys. Your publishable key starts with pk_live_ for production, or pk_test_ if you're still testing.
Your publishable key is safe to use here — it identifies your Stripe account without exposing any sensitive information.
Step 3 — Choose Your Purchase Types
Nowa supports three types of purchases. You can enable one or more depending on what your app offers:
One-Time Purchase A product the user buys once and owns permanently. Think of a premium app unlock or a digital book — once purchased, they never need to buy it again.
Consumable A product that can be purchased repeatedly. Common examples include in-app credits, extra lives in a game, or a bundle of messages.
Subscription A recurring charge on a time-based cycle. Great for apps offering ongoing access to content or features, like a fitness app or a productivity tool.
You can start with one purchase type and add more later. Just keep in mind that adding a new type requires redeploying your configuration — your existing data and tables won't be affected.
Step 4 — Add Your Secret Keys
This step connects Nowa directly to your Stripe account so payments can be processed securely.
Secret Key
Find this in your Stripe Dashboard under Developers → API Keys. It starts with sk_. Copy it and paste it into the Secret Key field in Nowa.
Webhook Secret Key
This one takes a couple of extra steps, but don't worry — here's exactly what to do:
- In Nowa, copy the Webhook URL that's been generated for your project.
- Go to your Stripe Dashboard and navigate to Search → Webhooks → Add Destination.
Setting up the webhook destination:
First, you'll need to select the events Stripe should send to Nowa. Add the following 9 events:
| Category | Events |
|---|---|
payment_intent | canceled, payment_failed, processing, succeeded |
invoice | paid, payment_failed |
customer.subscription | created, deleted, updated |
The customer.subscription events are only required if you're using the Subscription purchase type.
Next, set the Destination Type to Webhook Endpoint and press Continue.
Give your destination a name and description of your choice, then paste the Webhook URL you copied from Nowa into the Endpoint URL field. Press Create Destination.
Once created, open the destination in your Stripe Dashboard. You'll see a Signing Secret — click Reveal, copy it, and paste it into the Webhook Secret Key field in Nowa.
Step 5 — Set Up Payment Methods
You can choose to accept payments via Google Pay, Apple Pay, both, or neither — regular card payments work out of the box regardless.
Google Pay
Toggle Google Pay on in Nowa, then make sure it's also enabled on Stripe by going to: Settings → Payments �→ Payment Methods → Google Pay → Enable
That's all it takes for Google Pay.
Apple Pay
Toggle Apple Pay on in Nowa, and enable it in Stripe the same way: Settings → Payments → Payment Methods → Apple Pay → Enable
Apple Pay requires a few extra steps because Apple needs to verify that you're authorized to process payments through their system. Here's what to do:
1. Create an Apple Merchant ID
Go to the Apple Developer portal and create a new Merchant ID. Once created, copy it and paste it into the Merchant ID field in Nowa.
2. Set Up a Payment Processing Certificate
Open the Merchant ID you just created and select Create Certificate under Payment Processing Certificate. Apple will ask you to upload a signing certificate — don't create one yet, you'll get it from Stripe in the next step.
3. Get the Signing Request from Stripe
In Stripe, go to: Settings → Payments → Payment Methods → Apple Pay → Configure iOS Certificates → Add New Application
Stripe will download a file called stripe.certSigningRequest.
4. Complete the Certificate Exchange
Head back to Apple Developer and upload the stripe.certSigningRequest file where Apple asked for the signing certificate. Apple will generate a file called apple_pay.cer.
Download that file, go back to Stripe, upload apple_pay.cer, and submit the new application.
The certificate exchange between Apple and Stripe is a one-time setup. Once it's done, Apple Pay will work seamlessly without any further configuration.
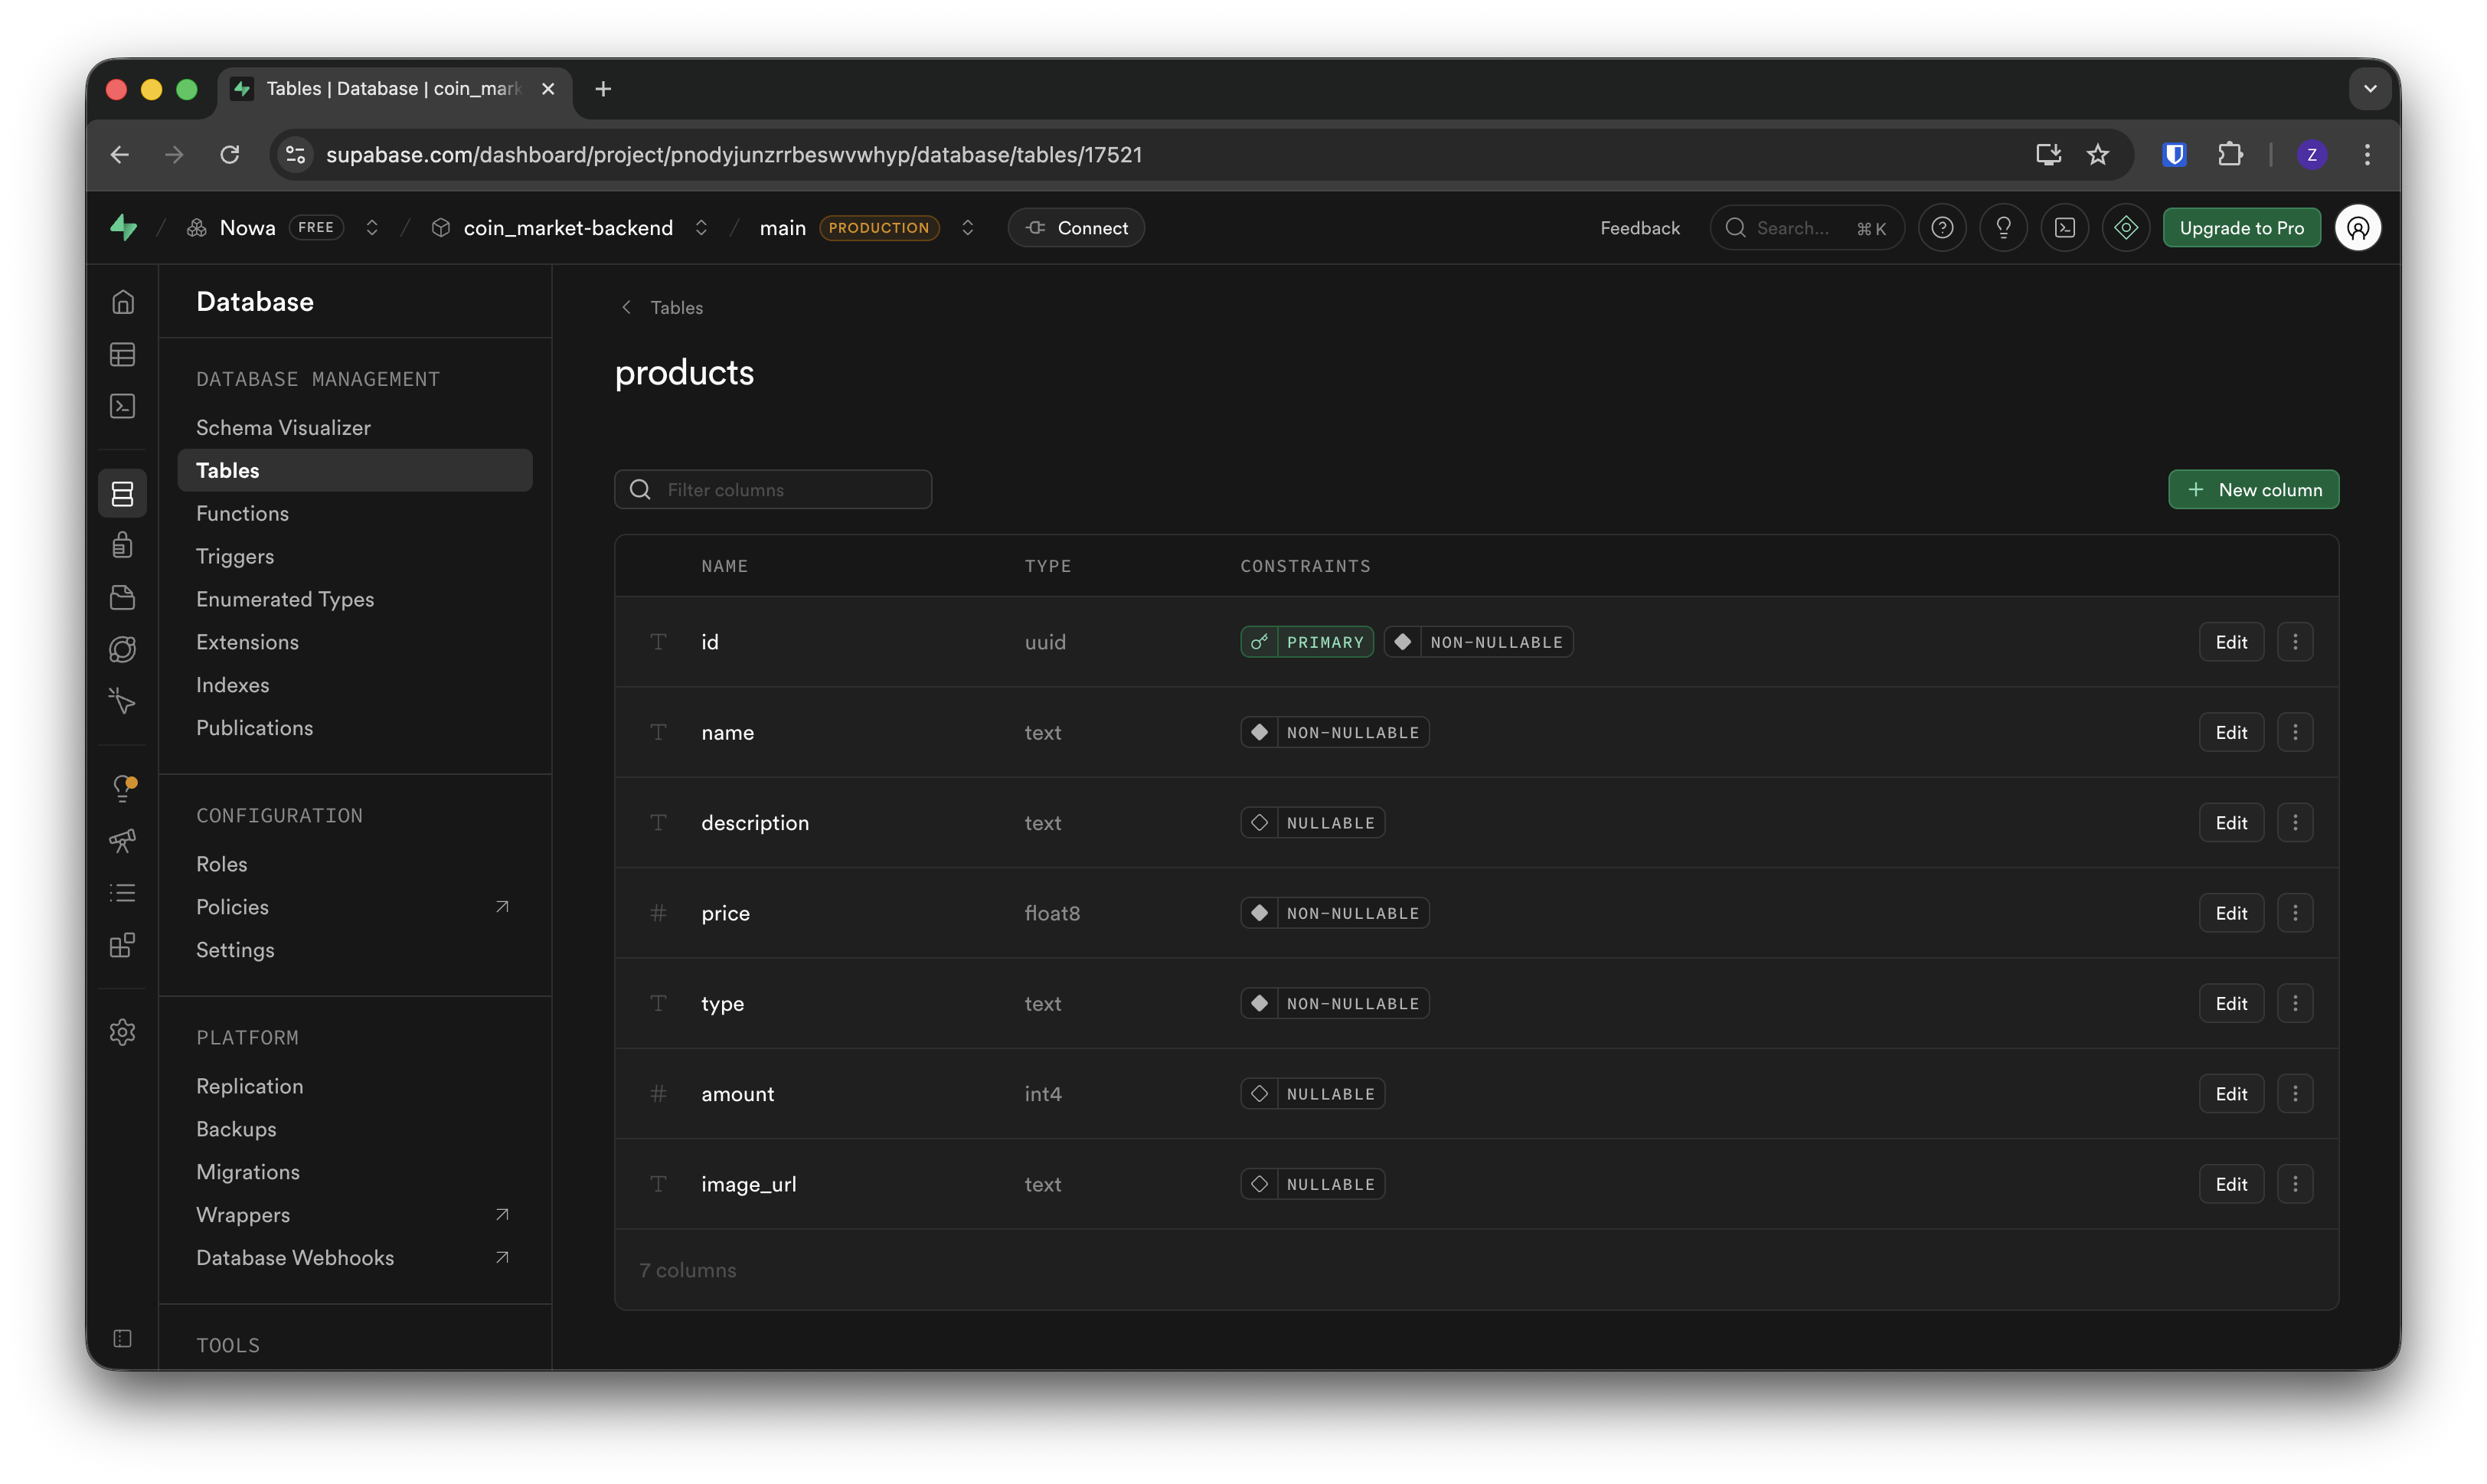
Step 6 — Connect Your Products Table
Nowa needs to know where your products live in your Supabase database. This step is called the Business Table setup.
Select the Supabase table that contains your products. At a minimum, that table should have a unique identifier (like id), a name, a price, and a type.
If you're selling products across multiple purchase types (e.g., both one-time and subscriptions), make sure your table has a type column so Nowa can correctly distinguish between them.
If your products are priced in different currencies, add a currency column to your table — you'll be able to map it to Nowa in the next step.
Mapping Your Fields
Once you've selected your table, you'll map your columns to the right fields in Nowa:
- ID Field → The column that uniquely identifies each product.
- Amount Field → The column that holds your product price.
- Currency → Either map it to a column in your table, or set a fixed currency that applies to all products.
Currency uses standard 3-letter codes like USD, EUR, or AED. If all your products share the same currency, the Fixed Value option is the simplest choice.
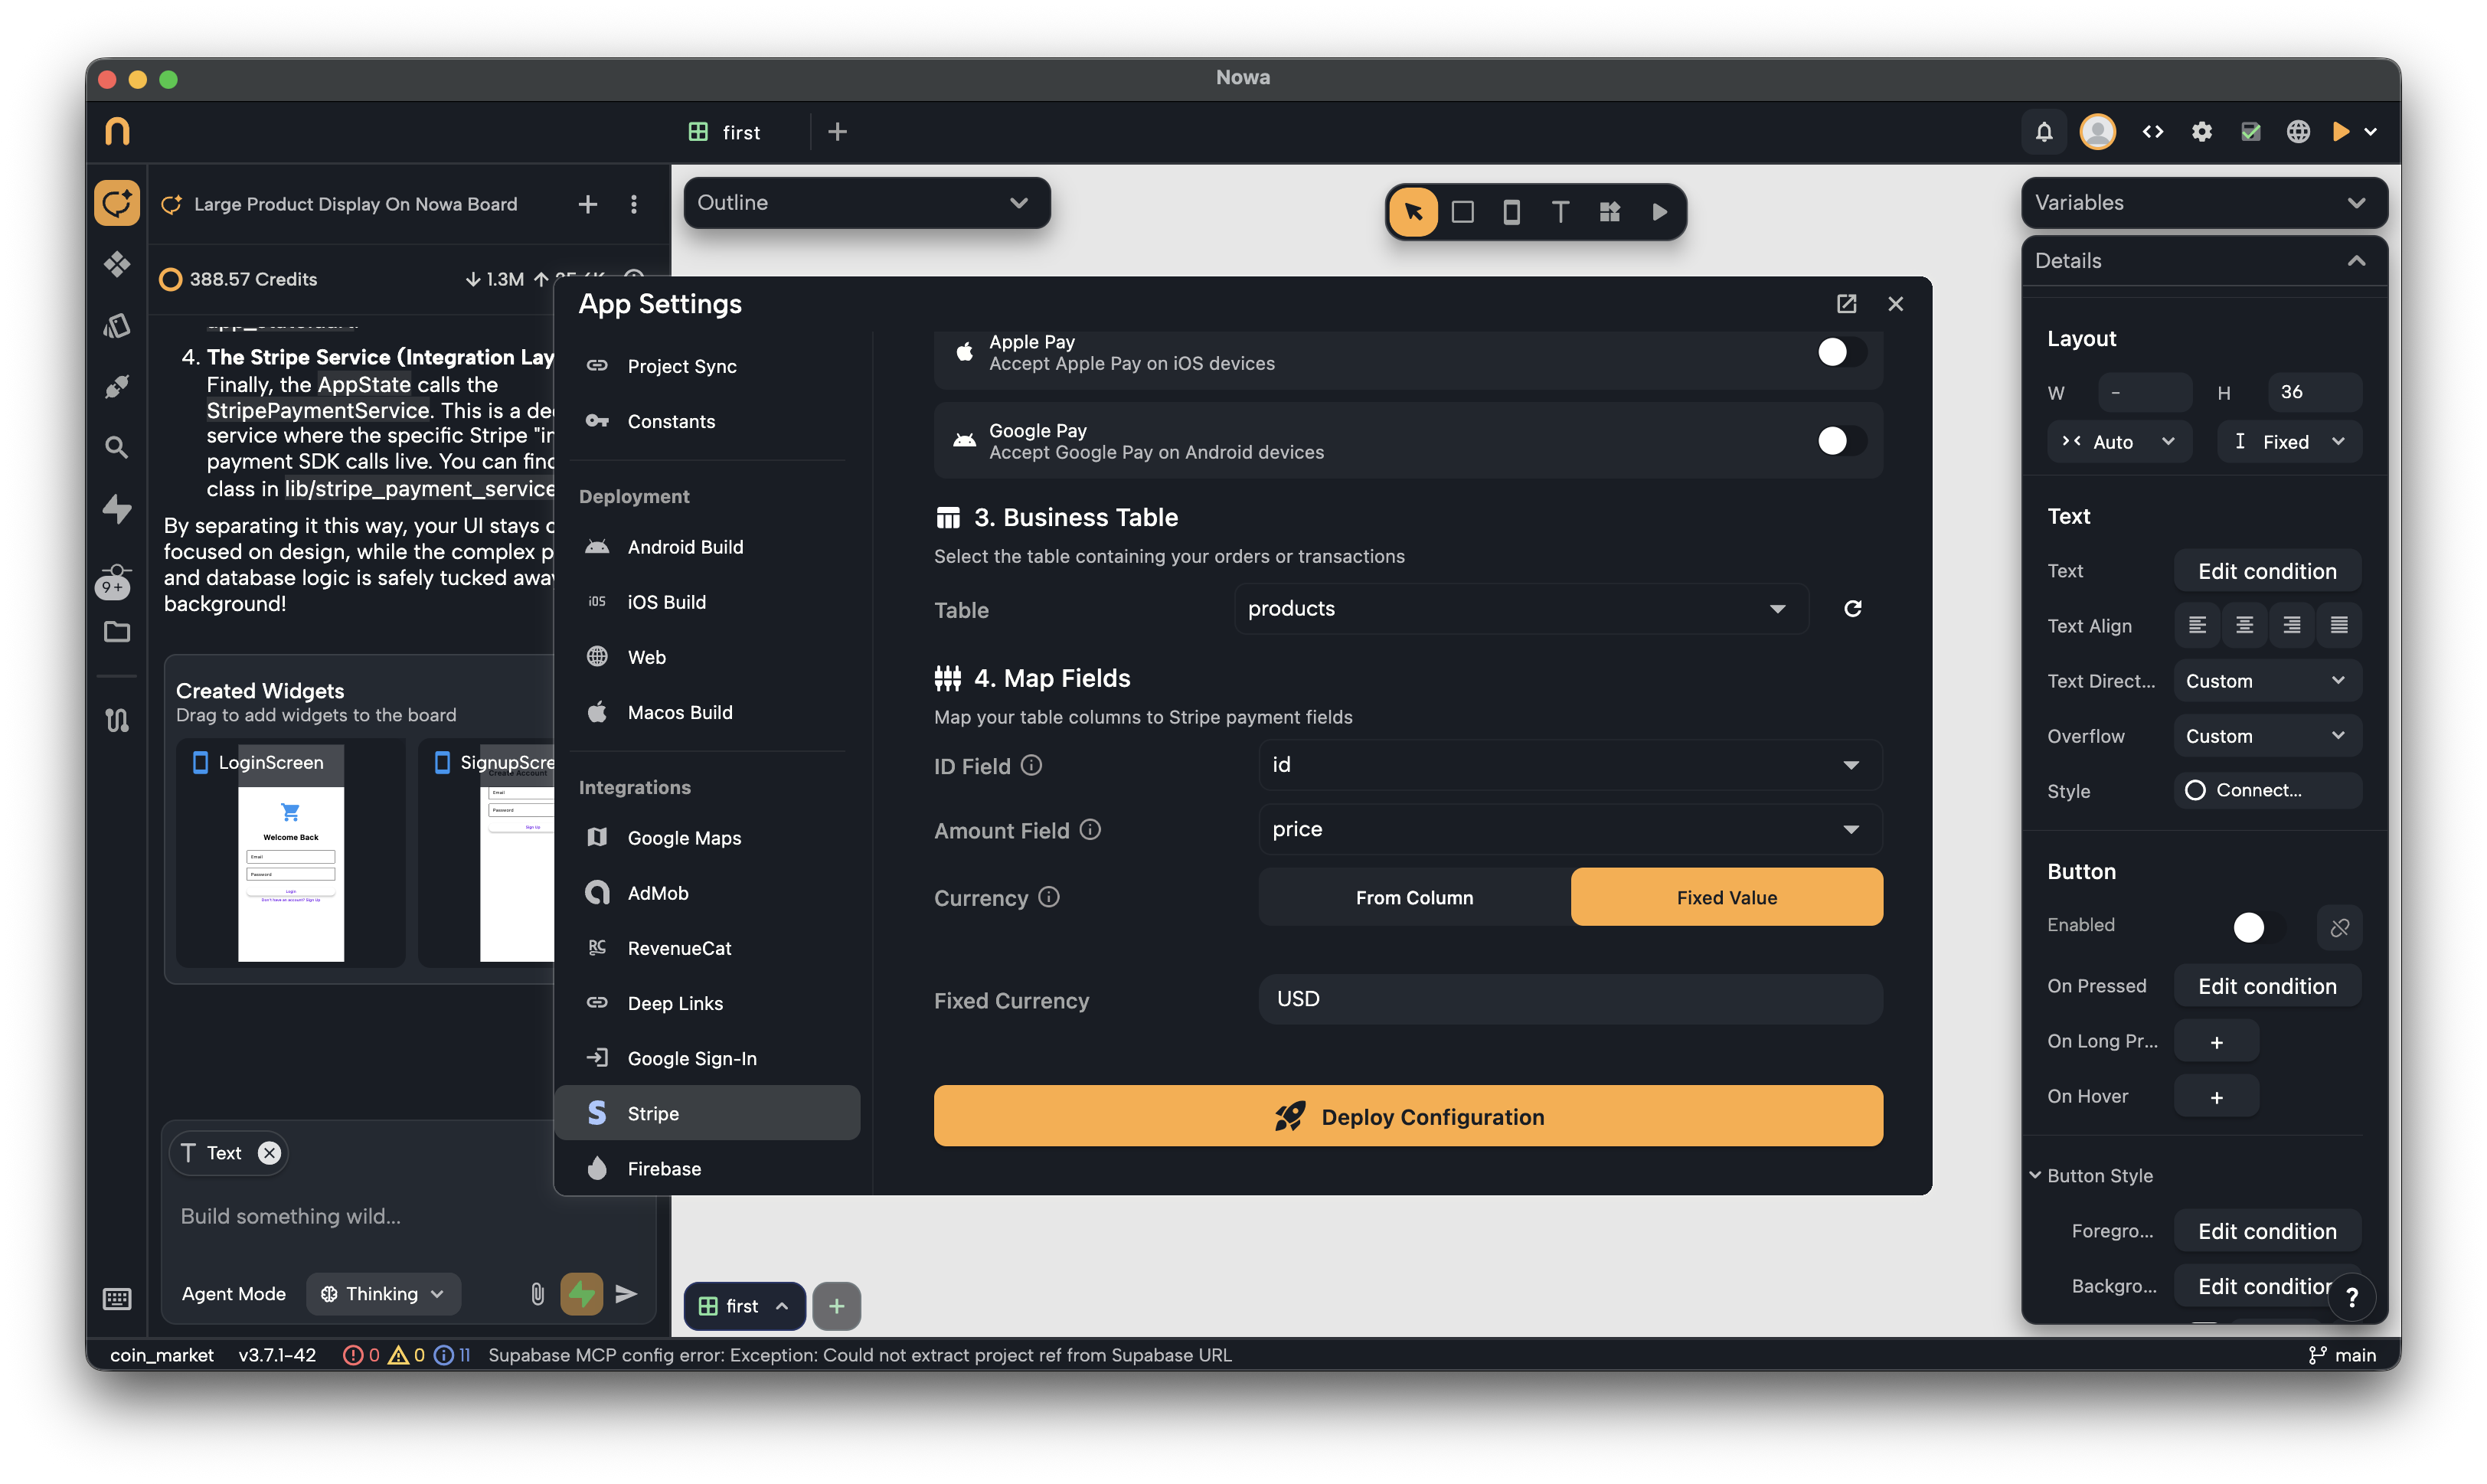
Step 7 — Deploy Your Configuration
Once everything is mapped, press Deploy Configuration.
Nowa will automatically:
- Create a dedicated database table for each payment type you selected
- Deploy a payment processing function for each purchase type
- Set up a unified webhook handler to manage all incoming payment events
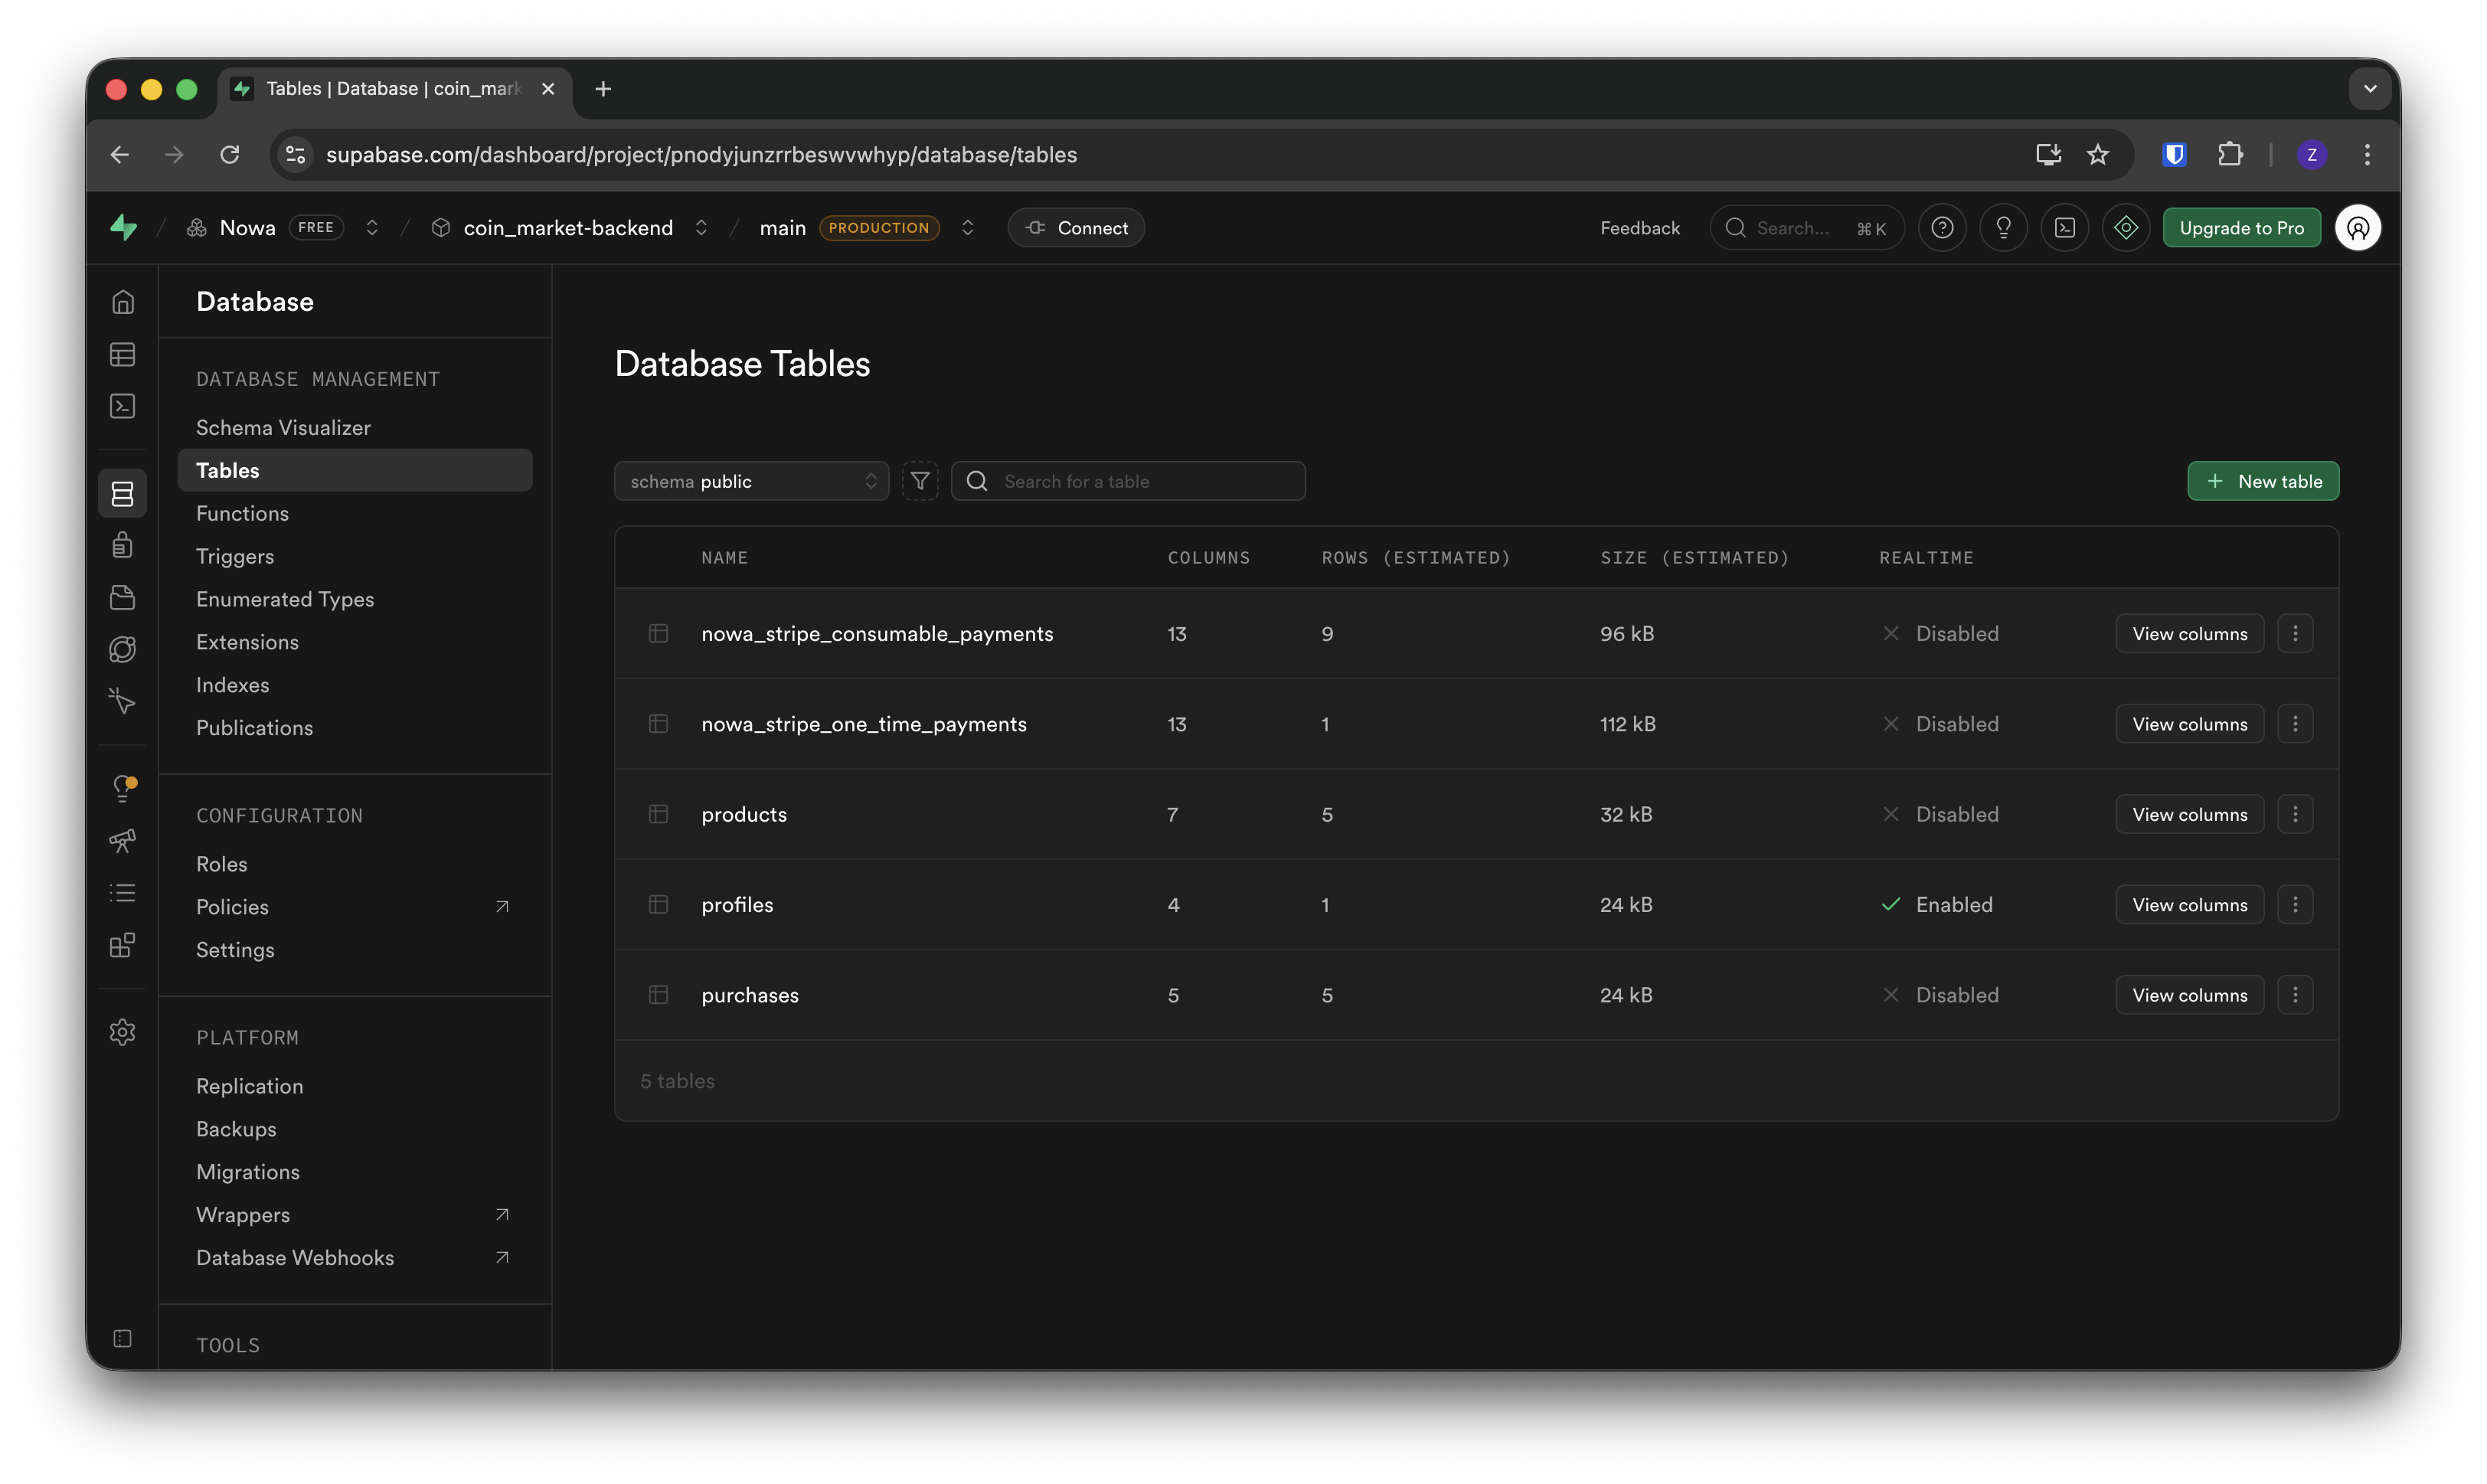
Deployment may take a moment. Once it's complete, the generated tables will be visible inside your Supabase project.
When the deployment is complete, Stripe is live in your app. You can now add your products and make them purchasable.
You're All Set 🎉
You've just connected a professional, production-ready payment system to your app — without writing a single line of code.
If something isn't working, double-check that your Supabase MCP is enabled and that your Stripe keys were copied correctly with no extra spaces. Most setup issues come down to one of these two things.
If you need help, the Nowa support team is always here. Happy building!