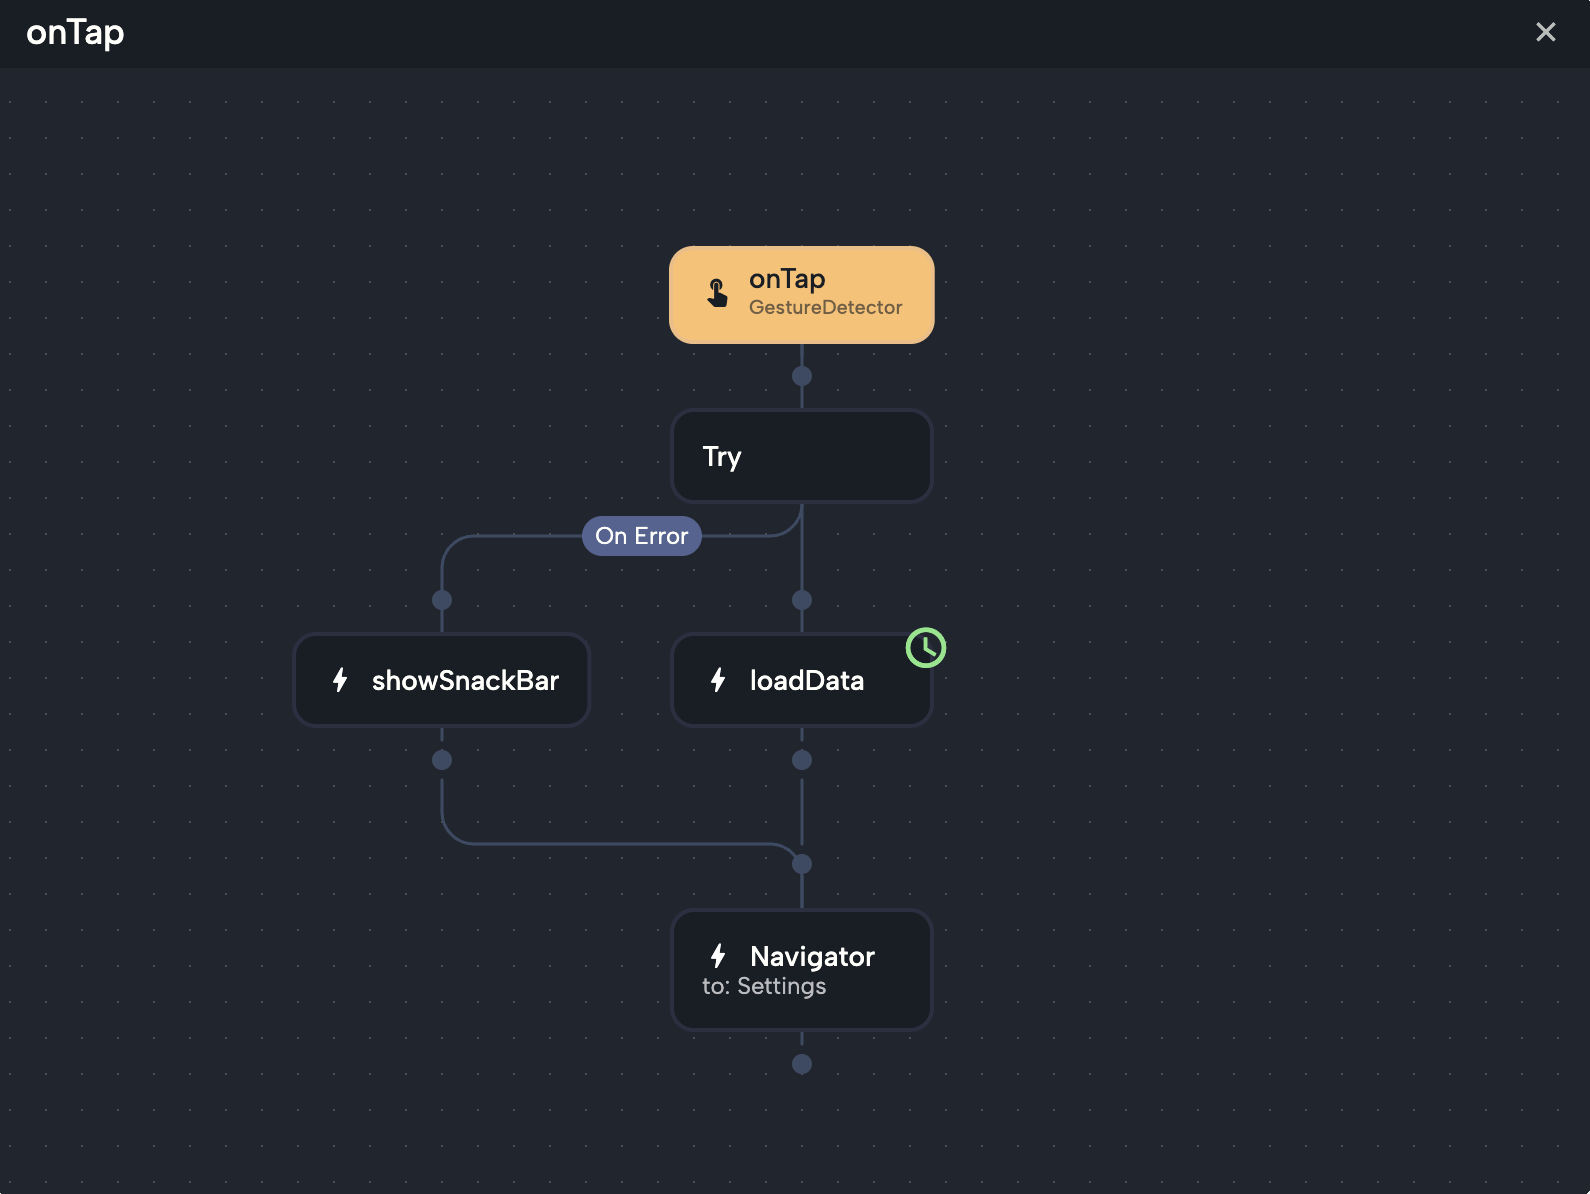
Try Node
The Try node in Nowa is a special compound node used to handle situations where something might go wrong during execution. It’s useful for actions that may fail—like calling an API or accessing local data—so your app doesn't crash and can show helpful feedback instead.
🧯 What is an Exception?
An exception is a problem that happens while your app is running. For example, if your app tries to connect to the internet but there's no connection, it might throw an exception. Without handling it, the app could crash or behave unexpectedly.
Using the Try node, you’re telling your app:
"Try to run this, and if something goes wrong, do this instead."
⚡ Common Situations to Use a Try Node
You can use a Try node in many real-life scenarios. Here are three common ones:
- API requests: For example, calling a weather API. If there’s no internet connection, the request might fail.
- Reading or writing to local storage: If the app tries to load saved data but it's not there or not accessible.
- Running custom Dart code: Sometimes custom logic or calculations can fail, especially if they depend on user input or external services.
🔧 What the Try Node Includes

The Try node is made of three parts:
1. The Try Node Itself
- When you select the Try node, you’ll see an “Error Name” field in the details panel on the right.
- This is where you define the name of the variable that will store the error message if something goes wrong.
- You can then use this variable to show the error to the user or take action based on it.
- Example: set the error name to
error, and you’ll find it in the Locals section. You can then use it when you add a node to the "On Error" branch to display it to the user
2. The Main Branch
- This is the main line inside the Try node.
- It’s where you place the main actions you want to run.
- If everything works fine, the app continues with this branch.
- But if any node inside it fails, the flow automatically switches to the “On Error” branch.
3. The On Error Branch
- This lower branch runs only if something fails in the main branch.
- You can use the error variable here to display a message or perform a backup action.
- It’s the place to handle problems in a smooth way.
➕ How to Add a Try Node
- Hover over the point in the Circuit where you want to add the Try node.
- Click the + button that appears.
- Choose the Try node from the list.
- You’ll now see two branches inside it:
- One for the main actions
- One for what happens if there’s an error
- Add your main nodes (like an API request) to the main branch or line (on the right).
- Add backup actions (like showing an error message) to the "On Error" branch (on the left)
✅ Example: Calling an API with Error Handling
Let’s say you’re making an API call and want to show a message if it fails.
- Add a Try node and name the error variable
error. - In the main branch:
- Add an API request node.
- Store the response in a variable like
var.
- In the On Error branch:
- Add a Snackbar node from the Globals category.
- Set its text to show the
errorvariable using the expression editor.- You’ll find
errorunder Locals.
- You’ll find
Now, if the API request fails, the app will display the error message in a Snackbar, like "No internet connection."
💡 Things You Can Add to the On Error Branch
In the On Error branch, you can add:
- Snackbar to show a quick message (from
Globalscategory) - Bottom Sheet or Dialog (from the
Nowacategory) - Actions to reset variables or redirect the user
- Logs for debugging
You can search for these when adding new nodes inside the On Error branch.
Using the Try node helps your app respond gracefully when things go wrong. It gives you full control over how your app behaves in real-world scenarios—so users always get a smooth and professional experience.