Git operations on Cloud projects
After connecting your GitHub remote repository to your cloud projects in Nowa, you're now ready to manage your project's source code using Git operations. This guide explains everything you need to know to commit, push, pull, discard changes, stage files, and manage branches within Nowa’s Git interface.
Opening the Git Panel
- To access the Git features, click on the Git icon next to the Files panel on the left sidebar.
- This panel is your central hub for performing all Git operations, including committing, pushing, pulling, discarding, and branching.
Committing Changes
When you commit changes, you're essentially saving a snapshot of your project at a specific moment. Each commit has a descriptive message so you can easily track your project's history.
How Committing Works:
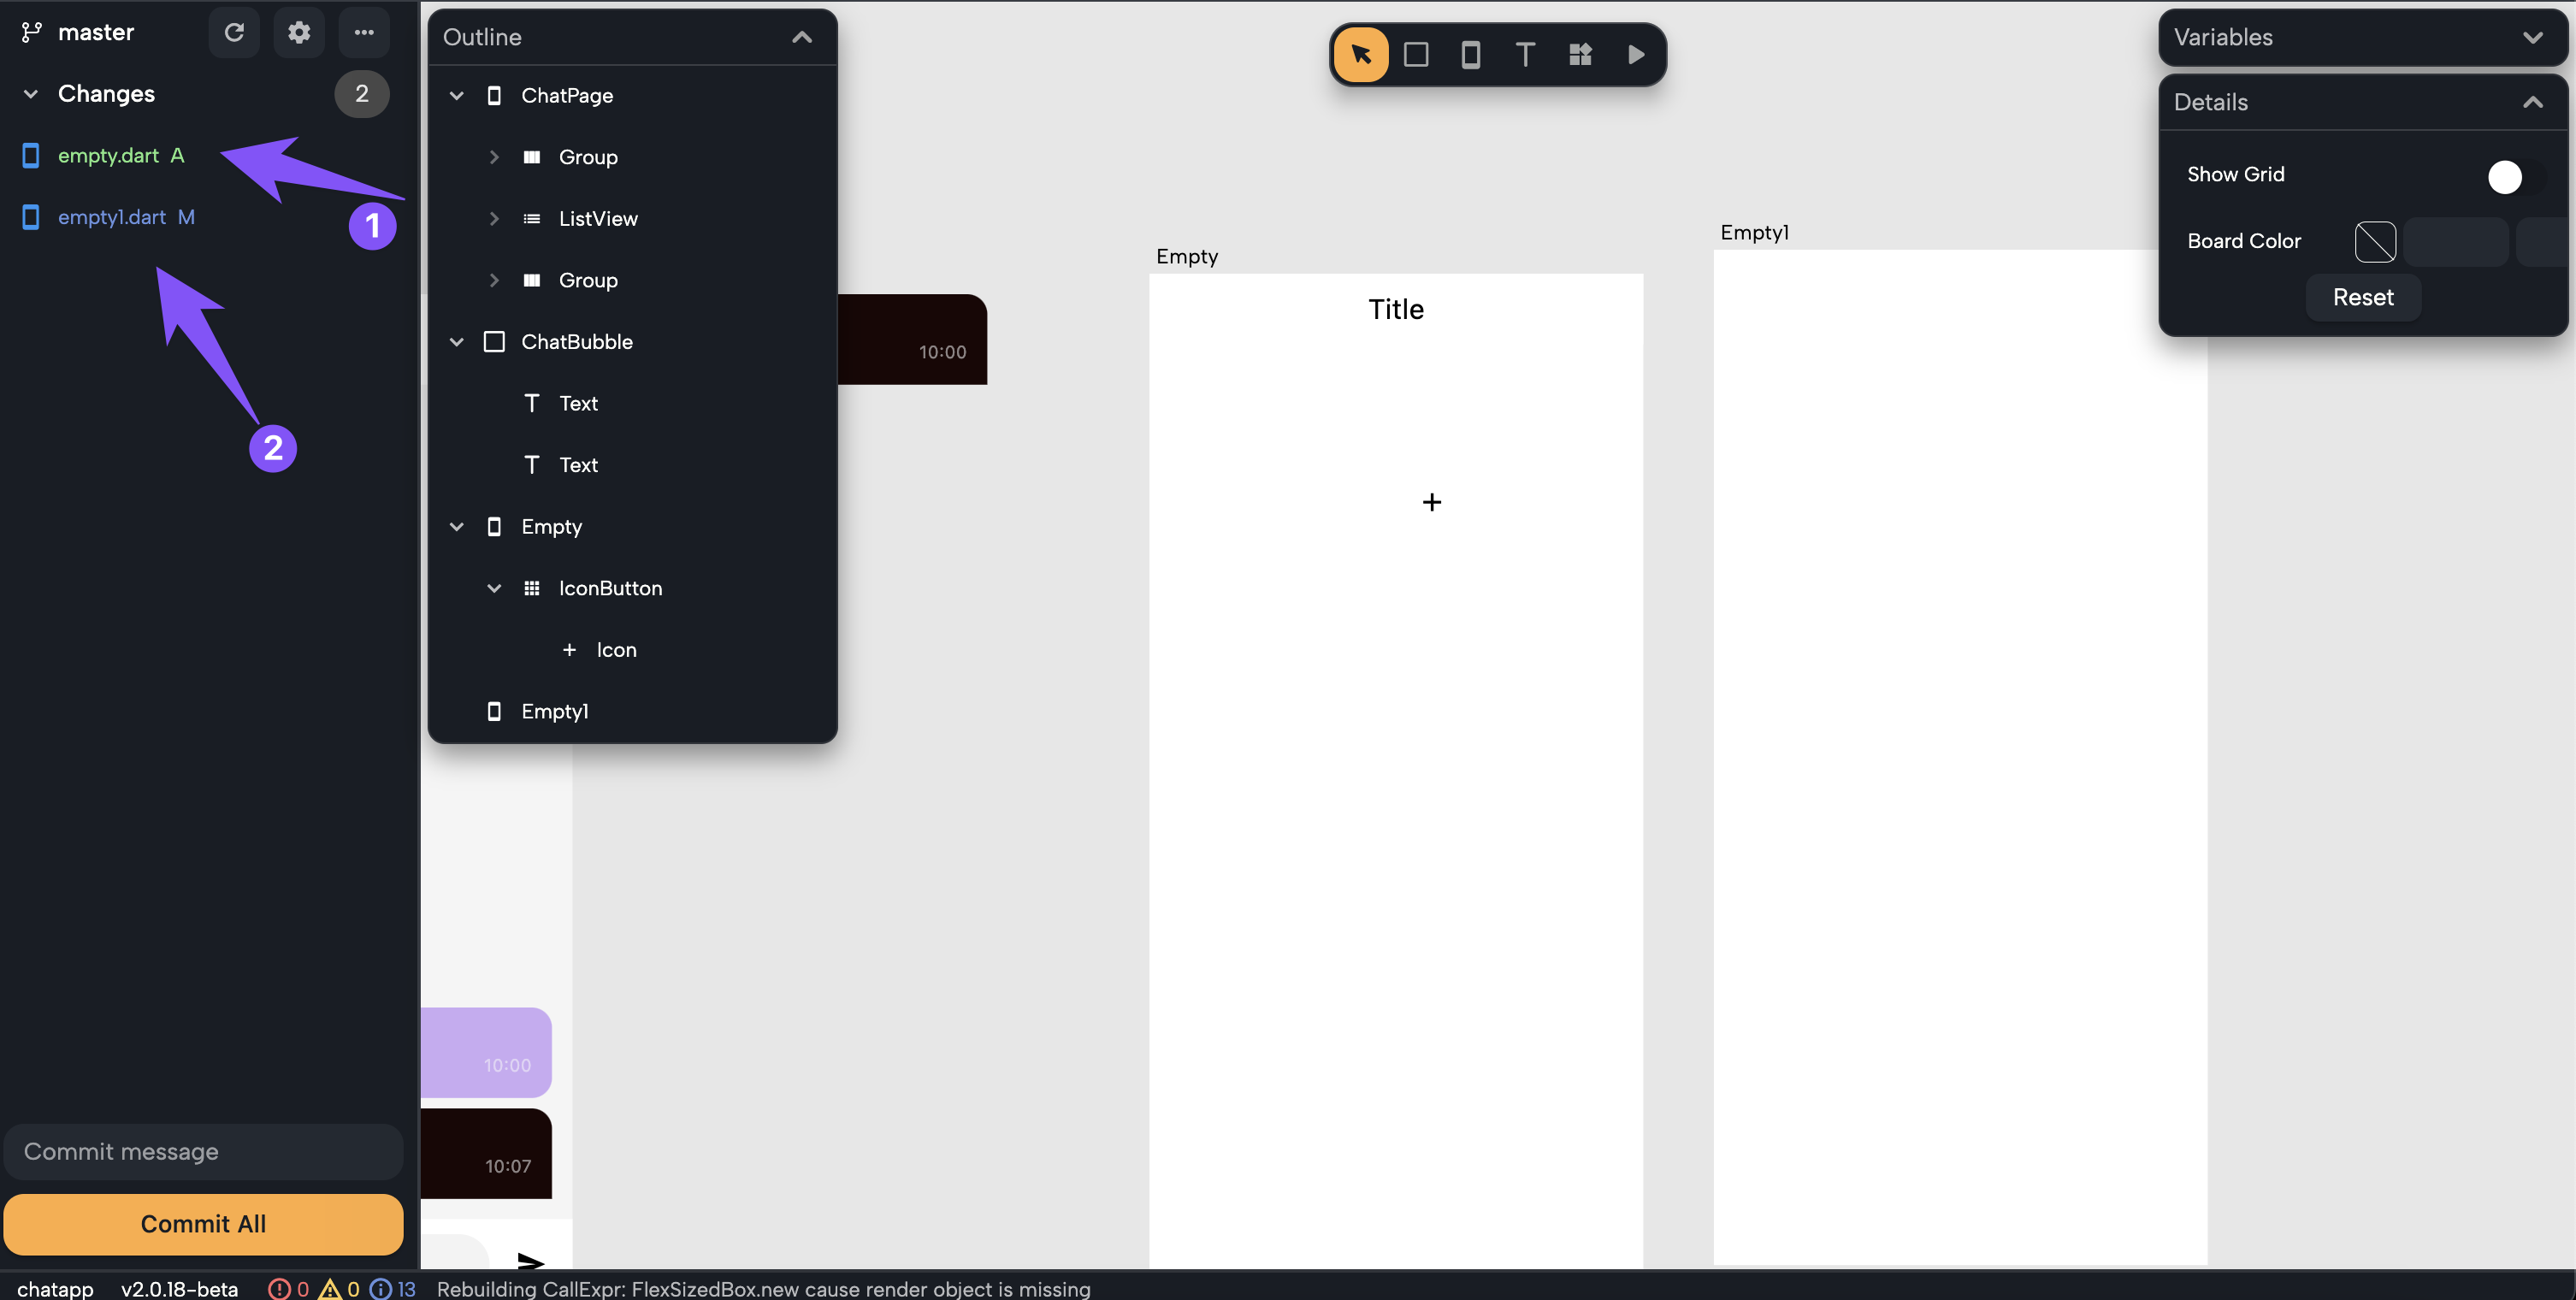
- Whenever you add, modify, or delete a file, Nowa tracks these changes and lists them in the Git panel under the Changes section:
- New files appear in green (#1 in the below screenshot)
- Modified files appear in blue. (#2 in the below screenshot)
- Deleted files appear in red.

To Commit Your Changes:
- Click "Commit All" at the bottom of the Git panel.
- Enter a meaningful commit message, e.g., "Adding a chat screen".
- Click Commit to save these changes into your Nowa cloud repository.
In the following video, we changed one of the colors of the chat bubble component. After the change, you can see that the chat_bubble.dart file (the component's file) appeared under "Changes" highlighted in blue since it was modified. Next, we clicked on "Commit all", gave it a descriptive message, and committed the changes. After committing, we noticed the "Sync" button appeared with the number 1 beside it, indicating there's exactly one commit difference between the Nowa cloud repo and the GitHub remote repository. Clicking "Sync" pushed this commit to GitHub.
After committing, your changes exist only in your Nowa cloud repository. To synchronize them with your remote GitHub repository, you must Push or Sync the changes.
Syncing Changes with GitHub
-
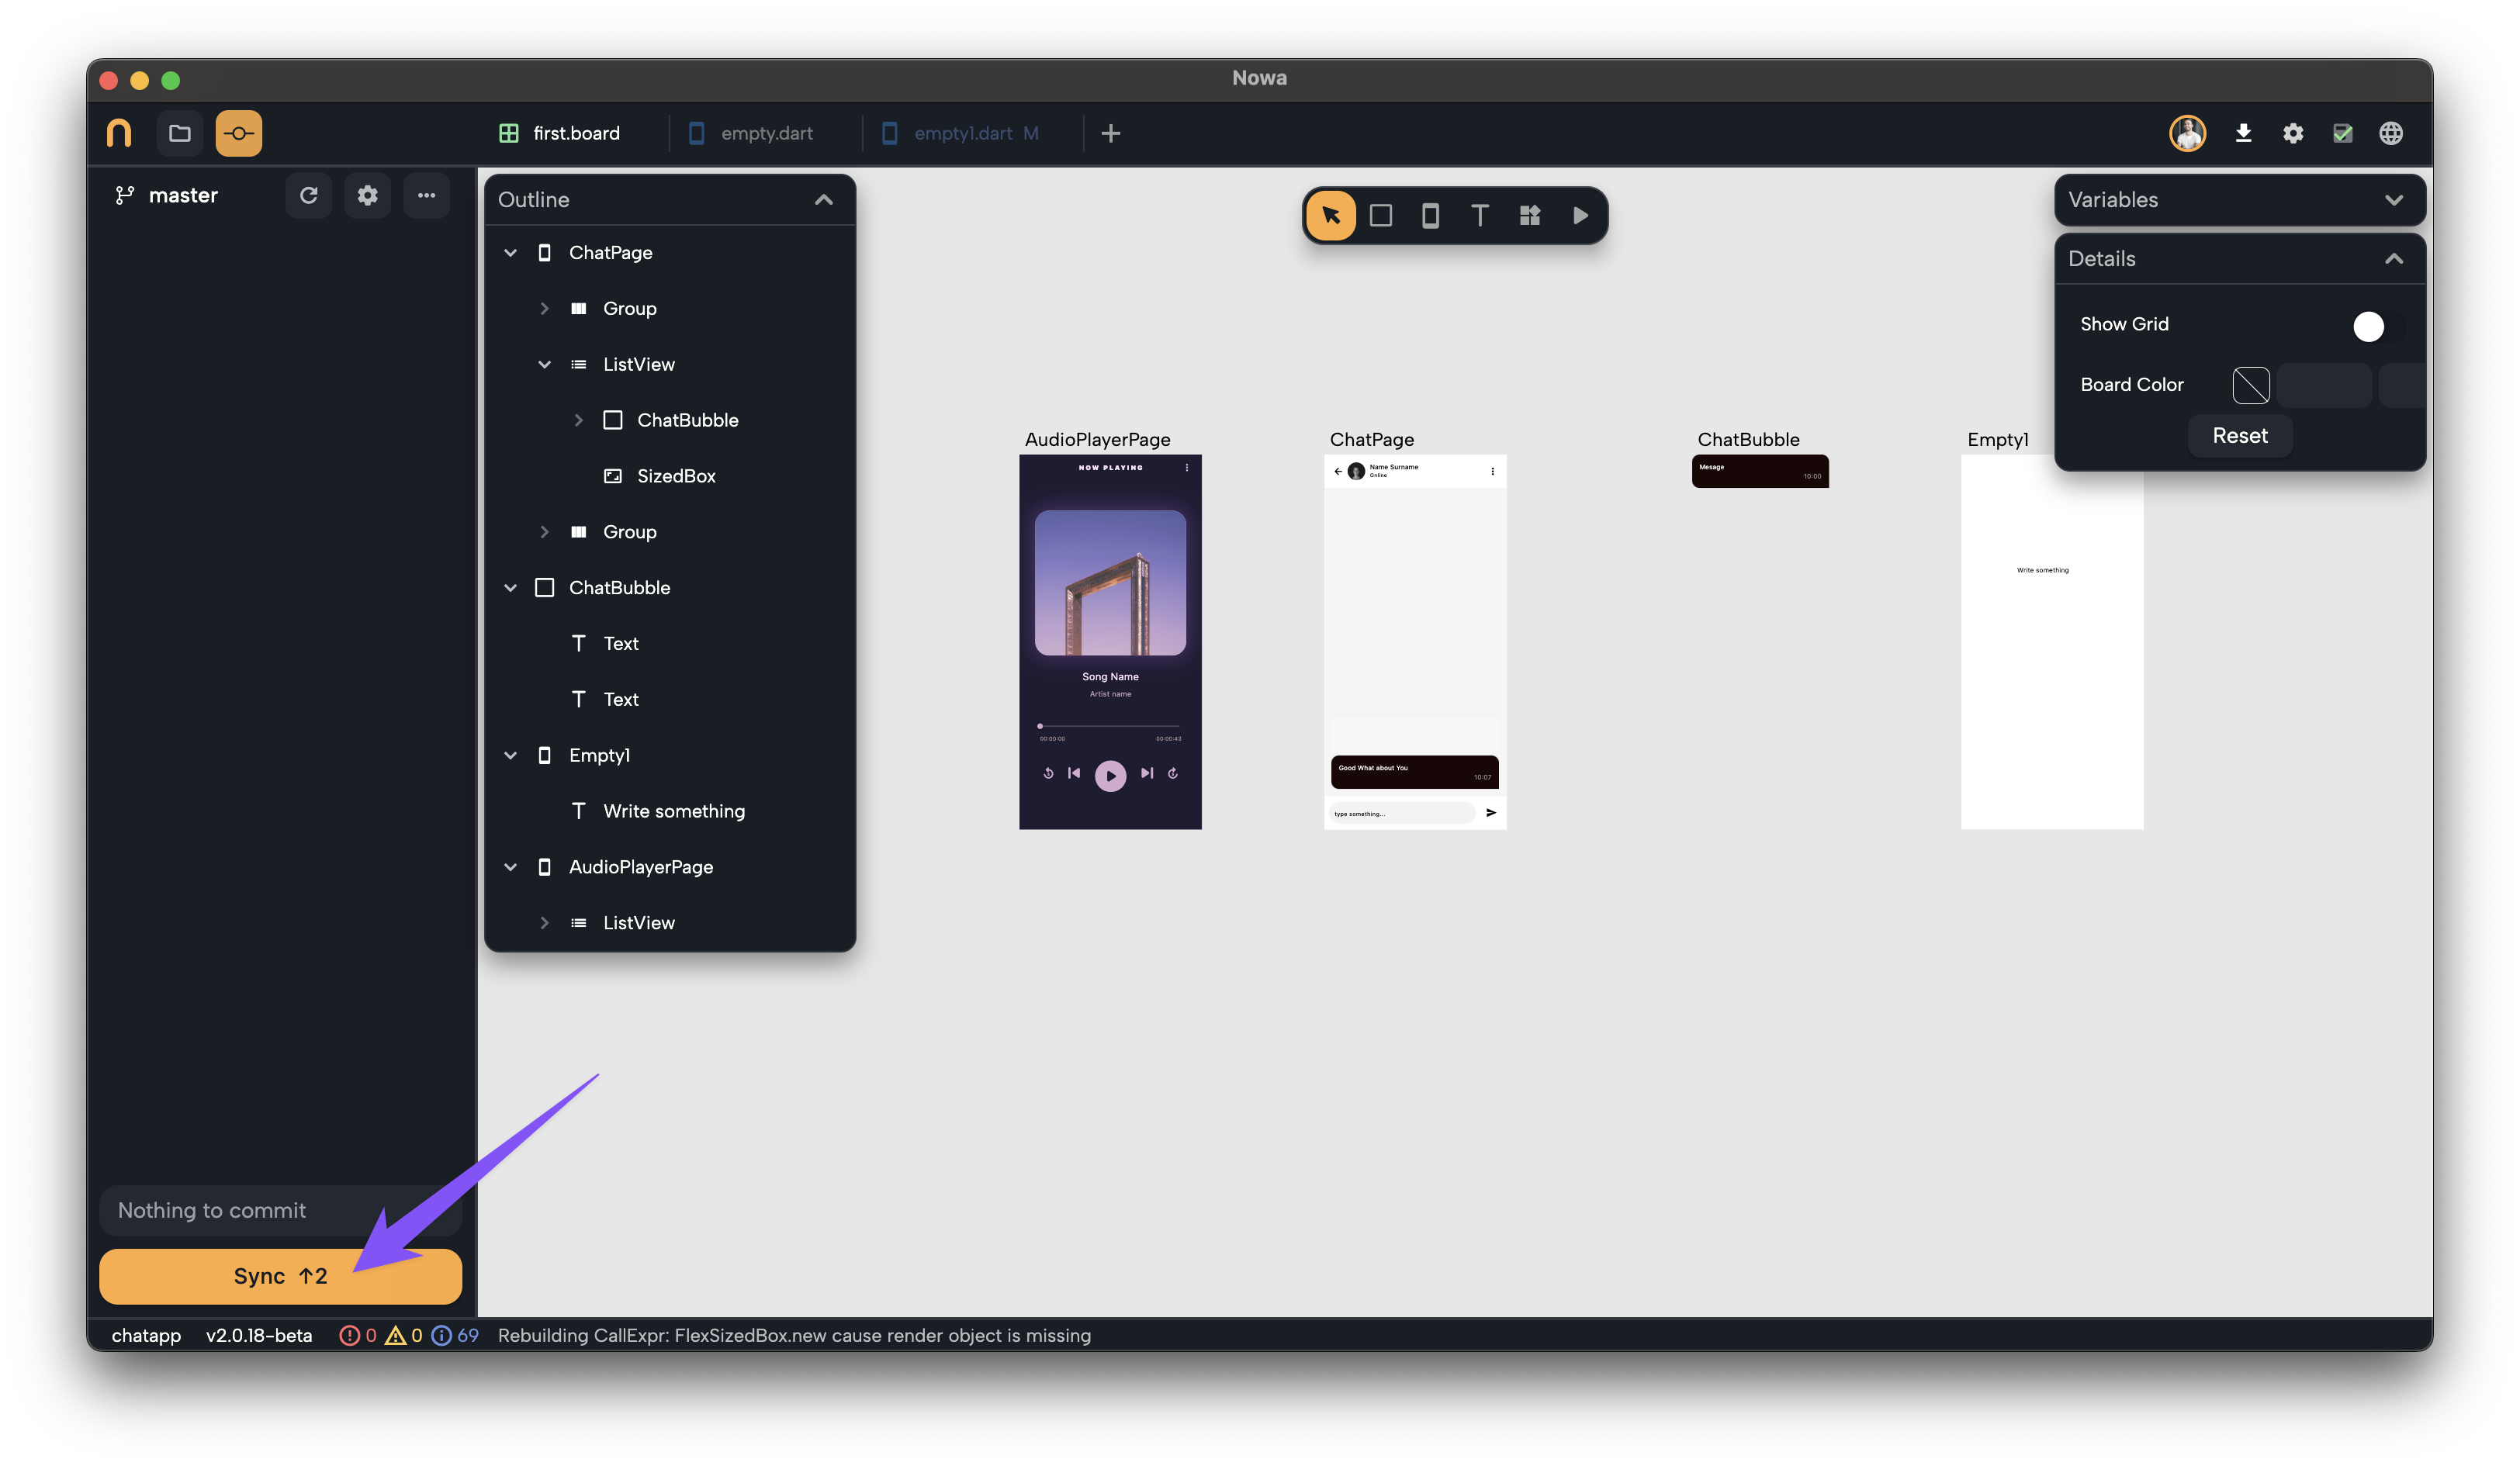
After committing, the "Sync" button appears.
-
Clicking "Sync" performs two steps:
- It first pulls any commits from GitHub that aren't in your Nowa cloud repository.
- Then, it pushes your commits from Nowa to GitHub.
-
The button shows arrows and numbers indicating how many commits will be pushed or pulled to synchronize both repositories.
-
Once synced, you can view your commits on GitHub, showing your identity set earlier during GitHub connection.
You can see a number next to Sync, which is the number of commits that will be pushed or pulled. In the following example, we can see there's two commits that will be pushed to Github once we sync.

Manually Pushing or Pulling:
-
To manually push or pull changes without syncing:
- Click the three dots (⋯) at the top of the Git panel.
- Select either Push or Pull individually.
-
Pull fetches updates from your GitHub repository to your Nowa cloud repository.
-
Push sends your local commits from Nowa to your remote GitHub repository.
Example: If a team member pushes new updates to GitHub, you can pull or sync these updates into your Nowa workspace to remain up-to-date.
Discarding Changes
Sometimes you might make changes you don't wish to keep. In these cases, you can easily revert them:
- Changes in files are compared to the last committed state and shown under "Changes".
- To discard changes:
- Click the undo arrow next to a file name to revert a specific change.
- To discard all changes, click the undo arrow next to the "Changes" heading.
In the following video, we changed the background color of a screen by modifying the file chat_page.dart. Once changed, the file appeared under "Changes". To revert this change, we clicked on the undo arrow next to the file name. Instantly, the changes disappeared, and the background color reverted to its original state, as per the last commit.
Staging Files for Selective Commits
Staging allows you to commit specific changes separately rather than committing all changes at once. This is helpful when different files or sets of changes belong to different tasks or fixes.
How to Stage Files:
- Click the three dots (⋯) in the Git panel, and choose "Add files".
- Select the files you want to stage from the changes list. They will appear under the new "Staged" section.
- To commit staged changes, click Commit (again from the three dots).
- You'll see two areas:
- Staged Area (files ready to commit).
- Unstaged Area (remaining files).
- Move files between these areas using the arrow buttons if needed.
- Add a commit message and click Commit.
- After committing, staged changes will be removed, while unstaged changes remain for later commits.
- Click Sync (or Push) to synchronize your changes with GitHub.
In the following video, we selectively staged the file audio_player_page.dart. We added it explicitly to the staged area because we wanted to commit it separately. After staging, we created a commit with the message "Adding audio player". Once the commit was made, audio_player_page.dart disappeared from the staged section, indicating it had been successfully committed. The remaining files under "Changes" stayed behind, ready for future commits or to be discarded.
Tip: You can also stage files directly within the commit window without going through the "Add files" step.
Managing Branches
Branches let you work on multiple features or fixes simultaneously without interfering with the main version of your app. Creating branches helps manage development effectively, ensuring stable releases.
Creating a Branch:
- Click the current branch name at the top-left of the Git panel (by default, this is "master").
- Select "Create new branch".
- Enter a branch name and choose the source branch (From branch) from which the new branch will be created.
- Click Create.
- The project automatically switches to the newly created branch. All commits made from this point are saved to this branch.
- Initially, this new branch exists only in Nowa’s cloud repository. To push it to GitHub, click Sync.
In the following video, we created a new branch named feature-pageInfo from the default master branch. After switching to this new branch, we added an "event screen" to the project, committed the change, and clicked "Sync" to push the branch and commit to GitHub.
After syncing, the new branch feature-pageInfo appeared on GitHub, along with the commit we made for adding the event screen. Finally, we switched back to the master branch, and as expected, the newly created event screen was no longer visible, demonstrating how branches isolate specific changes from the main version of your app.
Switching Branches:
- Click the branch name at the top of the Git panel.
- Select the desired branch from the list.
- Project files will automatically update to reflect the selected branch.
- Important: You cannot switch branches if you have unsaved changes. You must either discard or commit them first.
Deleting a Branch:
- Hover over the branch name and click the delete (🗑) icon.
- This action removes the branch only from your Nowa cloud repository, not from GitHub.
- To delete a branch from GitHub, visit your remote repository on GitHub and perform the deletion there directly.
With these Git operations, you can now effectively manage your project's codebase, collaborate with your team, and track your app’s development efficiently—all within Nowa’s intuitive visual environment!